10 ways to speed up Mac OS X
Network Administration - Apple Inc. still hasn't talked much about Snow Leopard, the next upgrade for the Mac operating system (Mac OS X) although the release date is in 2009 (probably in the first quarter of the year). But what still surprised many people, the company said that the new operating system would include a limited number of new features.
Instead of following Leopard's route, the operating system added more than 300 new features, Snow Leopard was designed to focus only on the core issues of the operating system. According to Apple, the operating system will make an operating system take advantage of the advantages of multi-core processor systems, increasing the power of graphics processing hardware for general computing operations and extends compatibility for 64-bit architectures - the purpose of which is to provide higher performance than Leopard.
At this point, reports indicate that Snow Leopard will purge the part of code needed by Mac OS X and its installed applications, which allows the operating system to not only improve performance. but also frees up a large amount of disk space in processing.
It seems that Apple's biggest focus with Snow Leopard minimizes and speeds up its 'flagship' operating system - both of which are very attractive to any computer user. However, why do you have to wait until Snow Leopard releases without finding some way to reduce the size and speed up your computer instantly.
While the tips in this article may not provide as obvious weaving improvements as we expect to see in Snow Leopard, they can also make significant differences - especially on older Macs or on computers where hard drives are very tight.
Warning : Some presentation tips require changing system files and application files. Please perform a backup of your system before performing these tips so that you can restore the system when there are unnecessary problems.
1. Eliminate languages you don't need
Mac OS X is always supported in many languages around the world. All interfaces (menus, dialog boxes, help files, etc.) are selected for use in many different languages and automatically grouped during the installation of system files of Mac OS X (except for languages that do not use Latin letters). This makes it easier to convert the language used on the Mac with the International dialog in System Preferences.
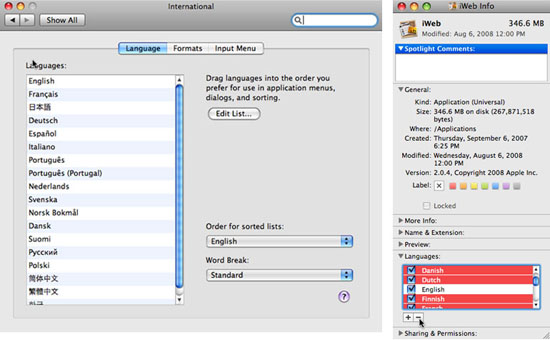
Choose language
Like Mac OS X, many applications are written to support more languages, allowing all of their user interfaces to be displayed in preferred languages with Mac OS X. All languages must be supported by application developers, so the International dialog in System Preferences will allow you to provide a list of preferred languages. Applications that do not support your first choice will display using the highest preferred language they support.
While support for a variety of support languages is a must for Mac OS X and applications to be sold worldwide, the opportunity is for those who speak only one or two languages. That also means that all those extended language files are encroaching on the critical gaps in your drive. You can cut these components in Leopard and in most applications (especially heavy language support applications like Microsoft Office or iLife, iWork and Pro applications) by removing files unnecessary.

Remove the language
There are several ways to do this. You can manually remove language files from applications by selecting an application in the Finder and using the Get Info command (from the File menu or using the command-I key). In the Get Info window, open the Language section, and you will see a list of local language files attached to the application. To remove those languages, simply select them and click the remove button ('-') below the list.
Note : The checkboxes in this list indicate the languages you are choosing to activate; Unchecking the languages will avoid the use but cannot remove the local files.
The process of removing native files for each application is a time consuming task. Another way to do that is to use software tools, software tools that can be used to perform this task are Xslimmer ($ 13; free trial), TinkerTool System ($ 9.75; free trial). ) or Monolingual (free / donationware).
These tasks will support you a lot more and it also offers many other features that can be used with some other tips in this article. (Monolingual has not been upgraded to support Leopard yet, most users do not report problems with using it with Leopard.)
2. Cut down parts of non-original code
When Apple made a transition from PowerPC to Intel processor in early 2006, there was a need for solutions to two major problems. The first is because Intel microprocessors cannot run code inherently designed for PowerPC microprocessors, so Apple launched Rosetta, a technology that allows Intel Mac to simulate PowerPC processors. active as needed to run PowerPC code. Rosetta makes all Intel Macs capable of running software that has not been updated to run on Intel processors.
Even with any type of simulation, though, this is a work that consumes energy and performance. Therefore, one of the biggest performance improvements you can make on Intel Macs is to remove the original PowerPC applications. Unless you work with some older applications, you can do that by upgrading your installation software, since most developers still design dual applications. Common or Intel-native stool.
The second challenge Apple faces in switching to Intel CPUs is to provide a mechanism that is known as 'universal binary' (universal binary) to allow developers to develop. Can provide own applications that can run on both Intel and PowerPC Mac. Universal binaries do this by grouping both the original code of Intel and PowerPC. While this approach is actually more effective for creating application distributions easier for developers and users, it does double the size of code in each application.
The utilities mentioned in the previous section can be used to remove this unnecessary piece of code between your installed applications. However, we do not expect that all applications can be cut in half immediately because most applications include code sets for common components such as dialogs, windows, and items. menu, .
Note : If you have a system that contains both Intel and PowerPC, besides you need to copy applications between them, you will not be able to make space-saving tips, as it will effectively create The version is only for PowerPC and Intel for applications.
3. Reduce iLife media libraries
Perhaps nothing consumes a lot of space on Mac hard drives with media collections. Apple's iLife suite allows you to maintain libraries for iTunes, iPhoto and iMovie to save your media; making them easier to find and browse; giving them access via other applications and Leopard. These libraries consume a lot of system resources. For many people, though, this may be an invalid option because it means that they will have to give up the music, photos, and video files they want to keep. However there are some circumstances we can still consider.
First of all, if you have an external hard drive, save the media library to it. This way will keep your media and free up space on the hard drive. This approach can be done on libraries but the most effective is video.
If you are using a portable Mac, consider building separate libraries for both external and internal drives. This will allow you to access the entire library while the computer is still plugged into an external device at home or work, you can also have another set of music or media files - such as movie you want to watch on the plane - all the time. Tools like Syncopation ($ 25; free trial) and iPhoto Library Manager (free; advanced version $ 20) can help you make this dual-library.
Another option that includes both disk space and workspace options for iTunes and iPhoto is to search for duplicates in your library. With thousands of songs and photos, the existence of duplicate files of tracks or images is a great possibility.
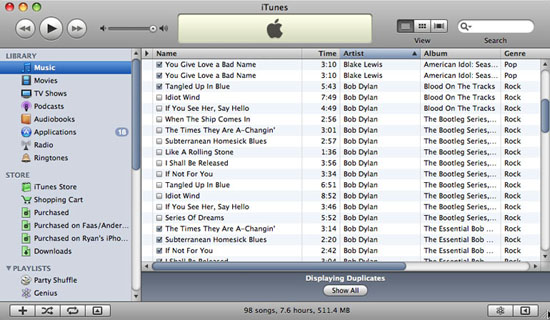
Duplicate in iTunes
Both iTunes and iPhoto provide features to delete duplicates, but these features are not always used for all duplicates. iTunify ($ 15; free trial) and iSweep ($ 15; free trial) provide you with advanced detection for iTunes, and Duplicate Annihilator ($ 8; free trial) provides this feature for iPhoto.
4. Delete the logs
Log files are created by some of Leopard's processes as well as applications, used to maintain the recording or writing of items to Leopard's system log file.
Leopard maintenance scripts automatically perform and compress regular log files. Therefore, the number of log files is increasing. If you do not need to store these log files for months and years, you can remove some of the old log files to increase the amount of free disk space.
Systemwide logs (logs used to write events from system components and applications that affect all users on the computer) are usually stored in the / Library / Logs folder at the root level of the drive. boot disk, and certain user logs are saved in the / Library / Logs folder within each user's home directory.
5. Delete unused applications and tools
This method seems too simple but it is worth mentioning because the effects really bring about the performance of the computer. Removing unnecessary applications (including Mac OS X applications, applications that go with commercial software suites that we have downloaded but have never actually used) is also economical. Get lots of disk space.
So it is possible to remove unnecessary system components such as screen savers, reference panels for System Preferences and Dashboard widgets. Because Mac needs to load some of these items on startup or when launching the Dashboard, you can see a noticeable change in performance as well as space when doing this.
Some system components are usually saved in the Library folder in the home directory (if only installed for your user account) or at the root level of the hard drive (if installed for all users). Such a set of items will consume space as drivers for unused printers. You can make it safer and easier to remove using the Print Therapy utility ($ 30).
In addition to removing component and application files, you should remove support files and reference files. These files also often consume a lot of storage space. Applications often create help files in the Library / Application Support folder in the home directory or at the root level of the hard drive, where they store a variety of files needed to improve their functions. (For example, iWeb saves web pages and related files that you can create in this folder, which can consume a large amount of space). Reference files rarely take up so much space but are also worth removing.
Some applications also create folders at other locations in the Library folders. Therefore, take a few observations to determine which applications can be deleted to help you improve the free space on the disk.
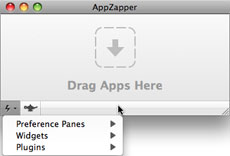
Delete applications and supporting files with AppZapper
If doing this manually seems a bit complicated or takes a lot of your time, you can use AppZapper ($ 13; free trial), this is a cost-free utility but it says Make sure when you can delete an application and all its supporting files are included.
AppZapper can be used to identify and remove third-party reference panels as well as Dashboard Widgets.
6. Reduce log entries
This implementation takes care of performance issues instead of disk space. You can speed up Leopard's initial login time as well as some of its performance issues by restricting some log entries.
Logging in items may include multiple applications and help processes for system components and applications, launching automatically and continuing to run in the background when you're working. Often login items are installed with the application without your knowledge. Some of which may be necessary for the application to perform its functions properly but not all.
Also not all Mac users need access to the login entries installed by each application. So you can speed up other users by removing the login items they don't need from their accounts.
Stop applications running when you log in by going to the Accounts panel in System Preferences and clicking the Login Items tab. Then select the login you want to remove and click on the '-' sign below the list of login entries. (If the Hide dialog box next to the login entry is selected, it will still launch when logged in, but you will not see any directives when it starts; this is often the case for support applications. Help, such as iTunesHelper application).
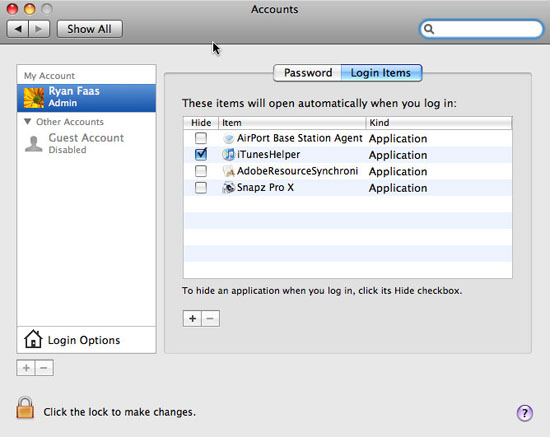
Select log entries
If you find that removing a login entry causes problems with an application or component, launching that item will fix this problem because some help processes will automatically launch. when applications related to them are launched. To resolve the logon problem permanently, you can navigate to the file in the hard drive and drag it back to the list box, or use the '+' sign to add it to the file dialog box. open. This approach is similar to the one you use to add login entries.
7. Do not use 3-D effects and animations
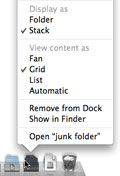
You can display folders in folder style, not Stacks
Leopard's interface features many animation and 3-D effects. From its 3D Dock with Stacks icons, to the fuzzy options menu, to a Finder animation introduced in Tiger, Leopard is filled with high-end graphics. Obviously, these graphics details will need to render capacity, which can slow Leopard on some older Mac models.
The solution to this problem is to disable some or all of those effects. You can revert to Tiger's 2D Dock using tools like TinkerTool (free) or LeoColorBar (free), also turn off the dimmed menu bar by using the Desktop & Screensaver panel in System Preferences, and display messages Items in Dock as regular folders instead of Stacks (control-click on each folder in Dock and select Display as Folder). You can also disable animation effects in Finder (as well as adjust guest system variables) with TinkerTool.
8. Remove unused fonts
Removing unused fonts can provide improvements in both performance and disk space. Obviously, each font file is a file that will consume a bit of space. Mac OS X must read installed fonts as part of the boot and login process, which reduces system performance.
All applications read font variables at launch. That means that reducing the number of fonts can have two benefits, which will be more apparent in slow or old Macs (unless you have a large number of fonts installed).
You can remove or disable fonts with the Font Book application included in Mac OS X (the application can also be used to preview installed fonts). Disabling a font increases performance (because the font is ignored) without removing it completely. However, completely removing a font will free up disk space as well as improve performance.

Font management with FontBook
To disable a font, select the font list and click the button below the list like a check box. To re-enable a font, select it and click on that button. To delete a font, select and press the delete key on the keyboard.
You will see fonts organized by a set of fonts and a family name. A font family will consist of one or several different variations of a file ( regular , bold , light and italic ). Removing one member of the font family will only remove one variant, not all versions of the font. While font sets are organized in groups so you can quickly find specific fonts. The Collection column also has a collection of all Fonts fonts, system fonts that are created by the system for the languages, and also the font sets that are disconnected by Computer and User labels.
The Computer font set will list the fonts installed for use by all users (located in the / Library / Fonts folder at the root level of the hard drive). The User font set lists fonts installed to be used only for a user who is currently logged in to the system (located in the / Library / Fonts folder in each user's home directory). It may be overlapping but depends on which files are installed for a particular user or for all users. If you are overlapping, you can remove the fonts from the User font.
9. Find and remove large files and folders
This method is like a solution to minimize the internal content of the hard drive. In fact, finding and removing large files is completely feasible and is the best way to regain disk space. The trick here is to find out which files are large. Files created by applications in anonymous locations on the hard drive, documents removed from one Mac to another for several years or folders that you do not want to use are all files Can remove to increase the amount of disk space.
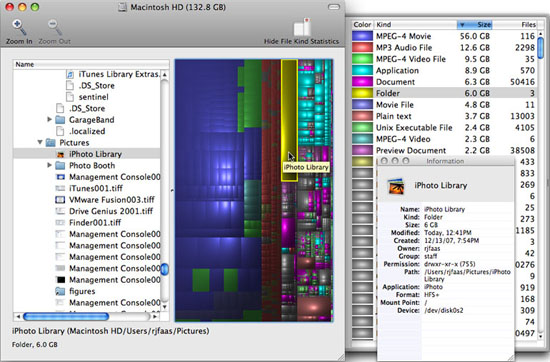
Find large files using Disk Inventory X
Since we are talking about files and folders but not explicitly, consider using one of the tools below to help you accomplish this task. Disk Inventory X (free / donationware), WhatSize ($ 13; free trial), GrandPerspective (free / donationware) and OmniDiskSweeper (free; enhanced version $ 15) are all designed to search the entire drive (instead of Browse through individual folders) to allow you to get a clear picture of disk performance.
Once you've found large files on your drive, you can delete them, transfer them to an external drive or save them in a compressed format to minimize size, increase hard drive space.
10. Increase RAM
The last tip in this article is the old advice for anyone who uses a computer to improve their performance: Add more RAM. Any computer will perform faster and better when adding RAM. RAM provides more working space for memory to run the operating system and applications.
Leopard can distribute RAM very efficiently and will exchange data from RAM to the hard drive if necessary, but having more RAM will increase in a way that reflects the system's performance. Especially with Intel Mac computers that use integrated graphics circuits, where the system RAM performs double the usual duties for computing and video, it is therefore very beneficial to add more RAM.