Use entities and fill in the blanks in the agent.
A crucial part of agent conversations in Copilot Studio is natural language comprehension, that is, the ability of the AI to understand user intent.
Table of Contents
For example, a customer might say, "I tried using my gift card, but it didn't work." The agent would redirect the customer to the topic related to the gift card not working, even if that exact phrase wasn't listed as a trigger phrase.
A fundamental aspect of natural language comprehension is identifying entities within a user's conversation.
An entity is a unit of information that represents a certain type of real-world object. For example, a phone number, a postal code, a city, or even a person's name. With the knowledge provided by these entities, the agent can recognize relevant information from user input and store it for later use.
Pre-built entities
The entities within the agent allow you to store information in similar groups.
Copilot Studio supports a set of pre-built entities that represent the most commonly used types of information in real-world conversations, such as age, color, number, and name. Let's use the Money entity as an example.
1. Open an agent in Copilot Studio, select Settings at the top of the page, then select Entities . A list of all available entities will appear.
2. Select Money . The entity details panel will open. You will see an explanation of this entity and the ways it can be used to extract information related to money or currency from user input.
For example, when a user answers "It costs $1000" to a question from the Question node configured to collect this entity, the agent recognizes that "$1000" corresponds to currency information. When the agent extracts this information and stores it in a variable, it will store "1000" as a number even though the surrounding information is text.
Custom entities
Pre-built entities include commonly used types of information. Sometimes, such as when building an agent to serve a specific purpose, you may need to teach the model to understand the agent's language and specialized knowledge about that domain.
For example, let's say you want to build an agent for an outdoor equipment store. In this case, you need to teach the agent to recognize the category "outdoor equipment products" in the conversation.
First, create a custom entity. In this case, you could create an entity that provides the agent with knowledge of all outdoor product categories.
1. Access your agent's Settings page and select Entities .
2. Select Add an entity > New entity .
3. Select the desired entity type: Closed list or Regular expression (regex)
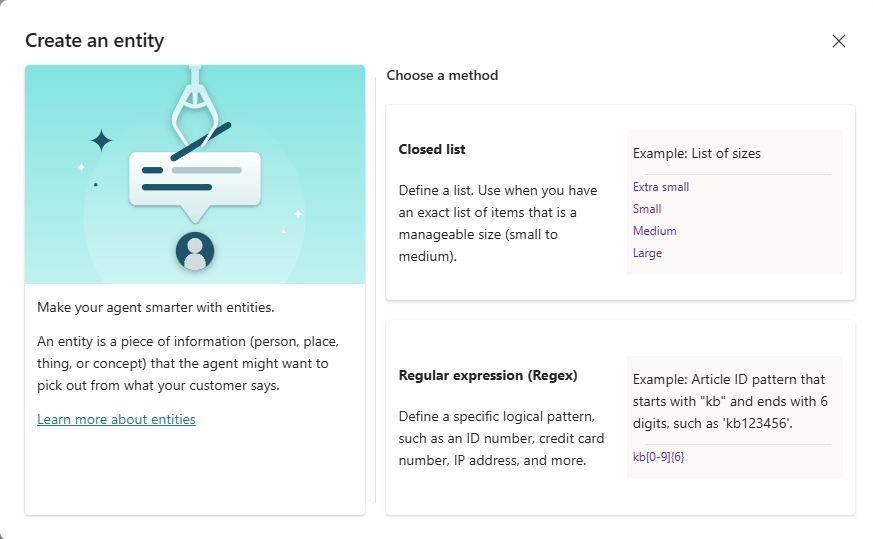
Closed list entities
Closed list entities allow you to define a list of items. Use these entities for small, manageable lists with simple item labels. If you want the agent to recognize contextually specific information that changes with the user or session and is only available at runtime, use open list entities.
1. In Create an entity , select Closed list .
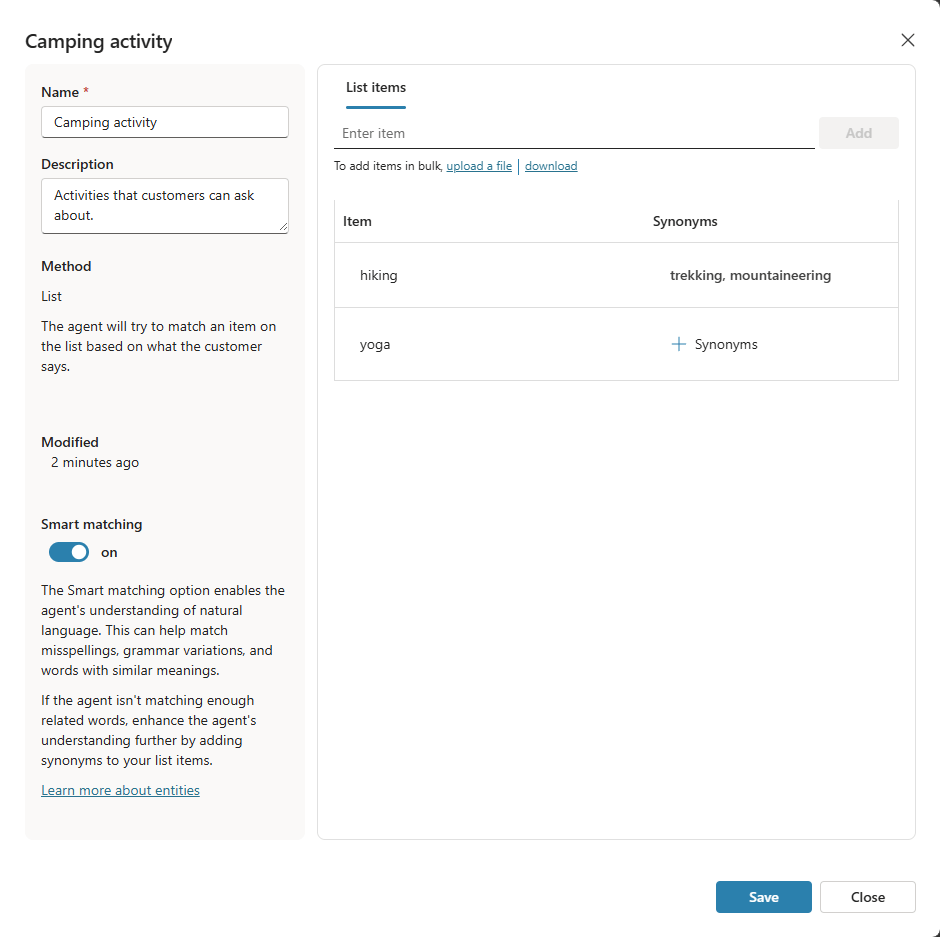
2. In the opened dashboard, enter a name for your new entity, such as Camping activity .
3. Add a description if needed.
4. In the List items section , enter the values you want to associate with this entity. For example: hiking and yoga .
Alternatively, you can upload a file listing all the values you want to add to this entity.
When entering a value, you can:
- Select a value and change it.
- Select the trash can icon next to the value you want to delete.
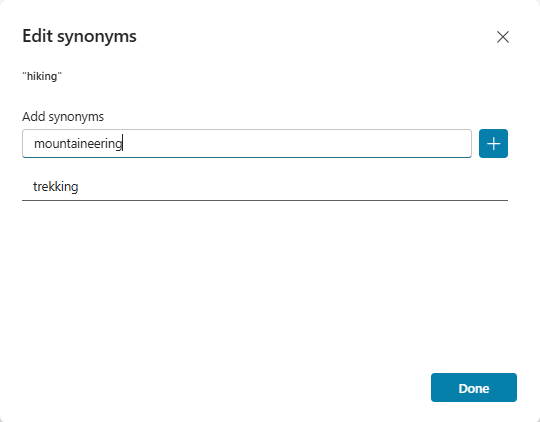
- Select Synonyms (or select existing synonyms) next to a value to open the Edit synonyms panel .
Add synonyms to expand the matching logic for each value in the list. For example, for hiking , you could add trekking and mountaineering as synonyms.
5. If desired, enable Smart Matching for this entity.
Smart matching is a part of intelligence supported by the agent's language understanding model. When Smart matching is enabled, the agent interprets user input using fuzzy logic against enumerated values for the entity.
Specifically, the agent can automatically correct spelling errors and expand semantic matching logic. For example, the agent can automatically match "softball" with "baseball".
6. After you have finished creating or editing the entity, select Save . Select Close to cancel your changes.
Upload a value to a Closed list entity.
From the details table of a Closed list entity, you can add or replace the set of values and synonyms associated with that entity.
1. Prepare a text file (maximum 3 MB) listing all the values you want for your entity, including synonyms, if any. Use this format: One value per line and use a vertical bar (|) as a separator for synonyms. Example:
hiking|trekking hiking|mountaineering yoga cycling|bicycling cooking2. In the List items section , select Upload a file .
3. In Upload a file , select the option you want:
- To add new values and synonyms to your entity, select Append .
- To replace all existing values and synonyms with the list from your file, select Replace .
4. Drag your file into the window. Or, select Click to browse , go to your file and select it.
5. Review the values and synonyms that appear and select Add .
Download the value for a Closed list entity.
From the details table of a Closed list entity, you can download a text file listing the set of values and synonyms associated with that entity.
1. In the List items section , select Download.
2. Save the resulting text file or open it in a text editor to view its contents. Each entity value appears on a separate line. If a value has multiple synonyms, they will appear on separate lines, as follows:
hiking|trekking hiking|mountaineeringRegular expression (regex) entity
Regular expression entities (regex) allow you to define logical patterns that you can use to match and extract information from input. Regex entities are useful for matching complex patterns to user input. They are also useful if you need to allow specific variations in how users can format or input their input within a conversation.
For example, use regex entities to identify items such as tracking IDs, license numbers, credit card numbers, or IP addresses.
1. In Create an entity , select Regular expression (regex) .
2. In the panel that appears, enter a name for your new entity.
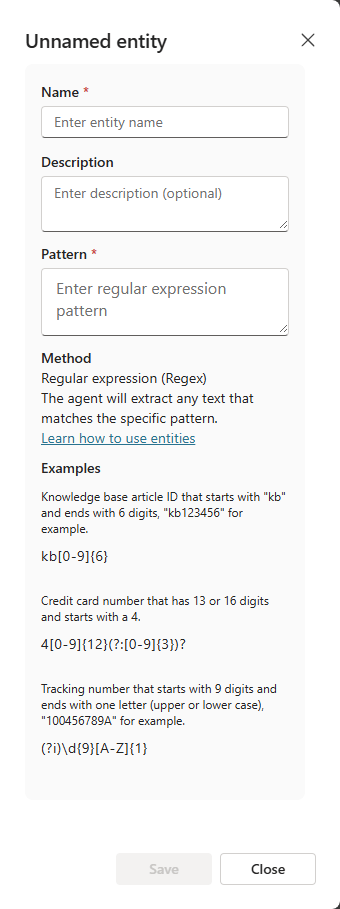
3. Add a description if desired.
4. Enter the regular expression pattern to be used for matching and extracting entity items from the input.
Copilot Studio NLU and CLU use .NET regular expression syntax. NLU+ uses JavaScript regular expression syntax.
By default, pattern matching is case-sensitive. To make it case-insensitive, use the regular expression option (?i) in your pattern string. Some basic examples are included in the regex entity console.
If you need a regular expression containing multiple patterns, use the replace operator | to concatenate the regular expressions. For example, you can combine two regex patterns to find both the old and new formats of the product ID code.
5. After you have finished creating or editing the entity, select Save . Select Close to cancel your changes.
Using entities in conversation
Now that your agent knows about the outdoor equipment based on the Camping activity entity and other custom entities you've created, you can start using them in your agent.
1. Access the agent's Topics page .
2. Open a topic for the entity you want to collect data from.
3. Select the Add node icon and then select Ask a question .
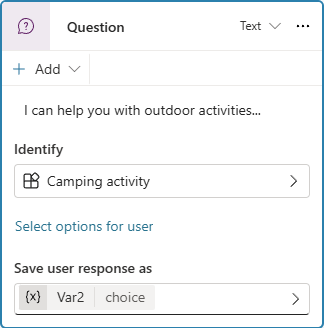
4. In the Identify section , select the entity you created in Custom entities .
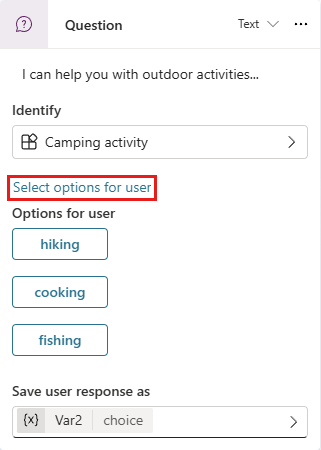
5. Optionally, select the items to display as buttons. For example, if you want to display certain categories as buttons for users to easily select as input, choose " Select options for user" and then choose the options you want from the list. This list contains the items you added when creating the custom entity.
6. Rename the variable storing the user's response, if you wish.
Provide entity values to the agent.
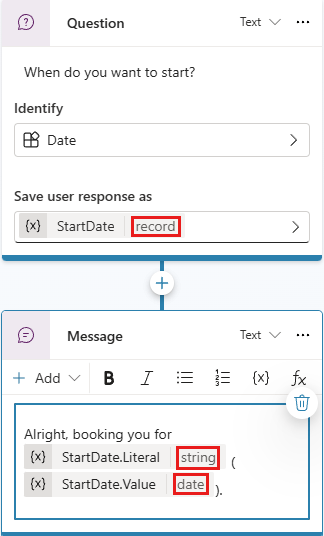
You may want to use the exact words the customer entered for purposes such as auditing or follow-up messaging. You can display entity values by enabling the Include metadata option in the entity identifier properties of the Question node that collects this entity.
When you enable this option, the data type of the variable StartDatecontaining the start date the user requests for an activity becomes a record type (instead of date ). StartDate.LiteralThe variable contains what the customer says (e.g., "tomorrow") and StartDate.Valuethe corresponding date. By using these elements in a message, you can have the agent generate a conversation like this:
The agent's question: "When would you like to start?"
Customer's answer: "Tomorrow"
Agent's message: "Okay, your appointment is scheduled for tomorrow (April 2nd, 2026)."
Fill in the value in the blank space.
Filling a blank is a natural language concept related to storing an extracted entity into an object. In Copilot Studio, filling a blank means setting the value of the extracted entity into a variable.
Let's continue using the camping activity theme, triggered by typing "I want something to do" in the test chat, as an example.
The topic is successfully activated, and the agent asks for the type of action, displaying the node options specified when editing the Question node . If you enable the option to track between topics, the conversation tree also shows the agent moving to this Question node.
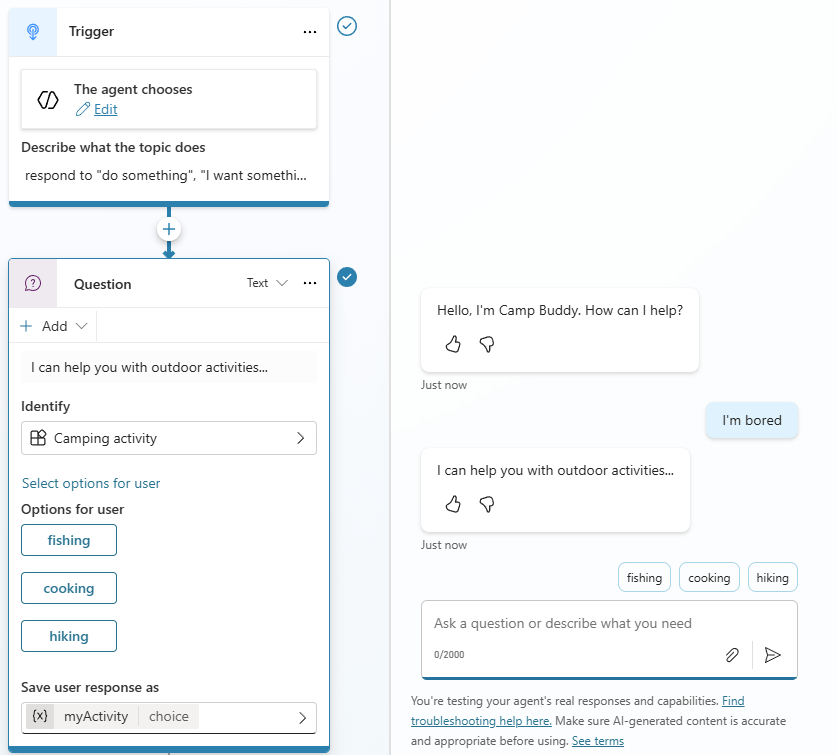
Customers can use predefined options by selecting one of the buttons. Alternatively, they can also type a word like "trekking" and see that it maps to "hiking," because these words are defined as synonyms.
The tracking view shows that the dialog box is correctly routed to the path with the product category value "Hiking".
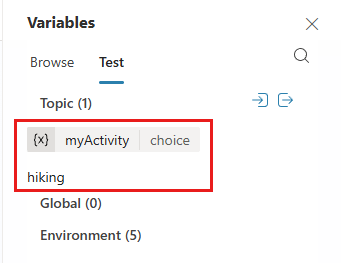
The population occurs when your agent stores the extracted entity value "Hiking" into the variable containing the user response at this question node ( myActivity, in this example). To see how the population works, observe the values of the variables when you test your agent. Here, the Test tab of the Variables table shows the variable value as "Hiking".
Fill in the information proactively.
You can also use the active fill feature, which allows users to specify multiple pieces of information corresponding to different entities at once. The agent understands which information belongs to which entity. In case of uncertainty about the intended mapping, it will prompt the user for more specificity by providing options.
In this example, the user wrote "I'm bored but I like mountaineering." This message includes a trigger phrase indicating the user wants assistance with outdoor activities and the second piece of information, "mountaineering," a synonym for hiking. In this case, the system will fill in both the entity to select the outdoor activity and the type of activity.
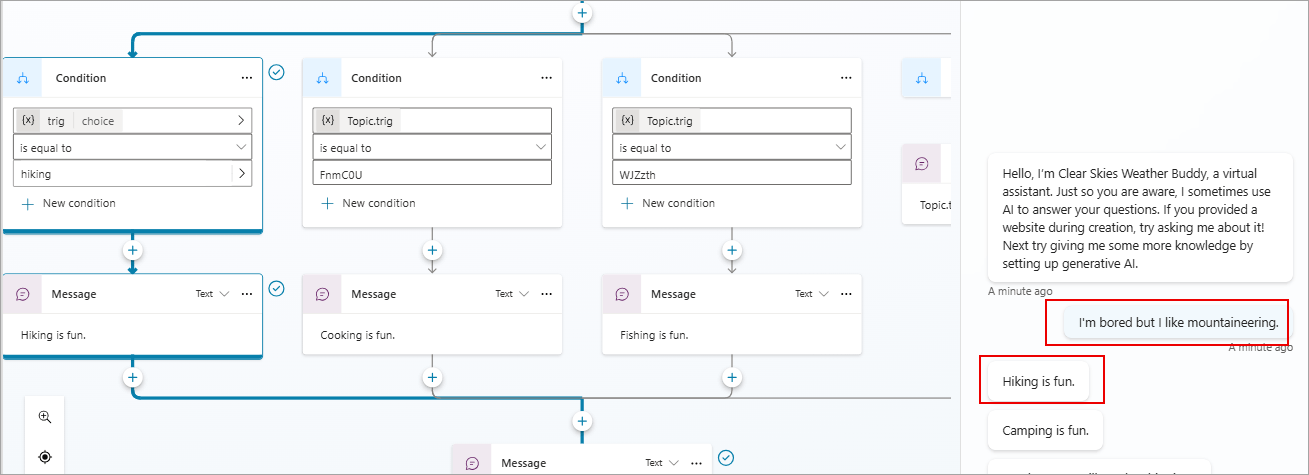
The monitoring view shows the system taking input from the user and intelligently ignoring the Question node regarding the type of activity.
The agent actively listens to user input, remembering the information beforehand so that unnecessary steps can be skipped when appropriate.
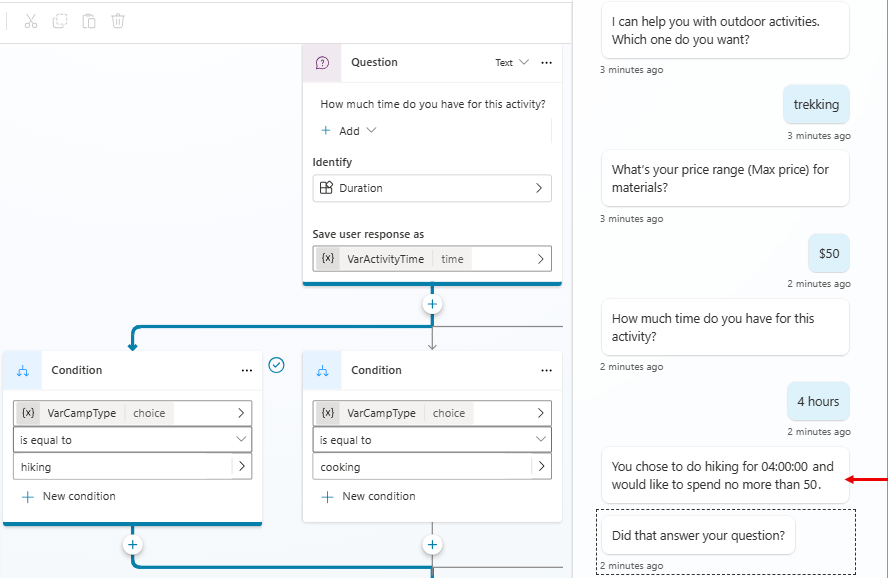
Let's restart the testing process and try a different case. In this round, you can add a few more Question nodes to ask about things like how much time you have for the activity (using the Duration entity) and the price range (using the Money entity ).
This time, when a question about product categories is posed, instead of simply telling the system the product category, the user can say, "I want to buy a pair of hiking boots under $100." In this example, the agent can not only route to the correct mountaineering product category path, but also proactively fill in the fields requesting information about the type of mountaineering equipment and target price range.
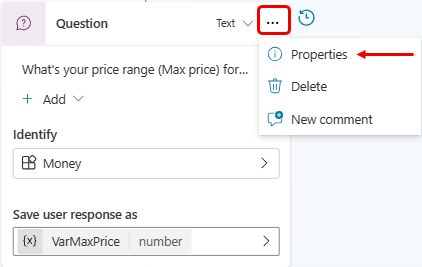
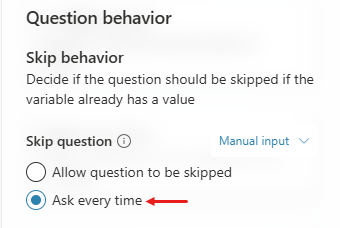
You can manually control active cell filling at the node level. If you want to always prompt for the question in a specific node, regardless of whether that cell has already been filled from previous user responses, turn off the Skip question option for the Question node .
1. Select the three dots (.) of the Question node , then select Properties . The Question properties dialog box will appear.
2. On the Question properties panel , select Question behavior .
3. On the Question behavior panel , under Skip question , select Ask every time , then select Save at the top of the page.
Using Open List Entities
Open list entities have values that are populated at runtime from an external data source rather than being predefined. They allow agents to recognize context-specific information—such as account names, payment recipients, or prescriptions—that varies from user to user or session to session. They work with both text and voice methods. The most common use case for open list entities is traditional voice agents.
For external data sources, you can use datasets such as Excel files or databases. By using the Dataverse connector, you can allow the agent to interact with back-office systems to retrieve relevant data for use in the context of the call. You can also generate data using PowerFx or other means.
Create a table to use as a dynamic inline entity.
Create a variable of table type that the agent can populate at runtime. This system allows customization of supported values for specific needs without any changes to the agent itself. The set of values the agent can recognize can change at the start of a conversation, based on the caller. Supported values can even change throughout the conversation to better tailor the question to the context.
Note : The table should not contain more than 100 entries.
Essentially, a table is a list of values of the same type (e.g., ["value1", "value2"]). For dynamic inline entities, use a string list. If you want to support synonyms, use a list of records, where each record follows the following schema.
| Element | Type | Describe |
|---|---|---|
| DisplayName | Chain | A possible value for the entity |
| Synonyms | Array of strings | One of the other synonyms for value |
For example:
[ { "DisplayName": "value1", "Synonyms": ["synonym1", "synonym2", "."] }, { "DisplayName": "value2", "Synonyms": ["synonym1", "synonym2", "."] }, { "DisplayName": "value3", "Synonyms": ["synonym1", "synonym2", "."] } ]Using dynamic inline entities in a theme
1. Access the agent's Topics page and select the topic for which you want to collect dynamic entities.
2. Add a Question node or use an existing node.
3. In the Identify section , select Options from a list variable .
4. In the List variable section , enter or select the name of the table containing the values that apply to your dynamic entity.
5. Rename the variable storing the user response of the agent, if you wish.
6. For voice agents, select the option "Assign DTMF keys to options ". During operation, DTMF keys will be automatically assigned to each option.
Accept one of several entities in a single conversation turn.
In some cases, the agent may accept one of several valid responses within a given conversation. For example, your agent might ask the customer to provide their account number or phone number. You might also want the agent to allow the customer to say they don't have the information and route the customer accordingly instead of immediately transferring them to a customer service representative.
1. Add a Question node.
2. In the Identify section , select One of multiple entities .
3. For each entity you want to accept at this node, select New entity and choose the desired entity. A Question node can support up to 5 different entities.
4. Select the default variable name in the "Save user response as" section to open the variable properties panel and rename it to a meaningful name - for example: Identifier .
The variable storing the value of the identified entity has a record data type, with one element per entity supported at this node—for example, Identifier.account , Identifier.phone , Identifier.unknown.
5. Add conditions to route the conversation based on information provided by the client. You should set your conditions with the ` is not Blank` (or ` is Blank` ) operator.
Identification behavior for "One of many entities"
This type of identification identifies a unique entity within a set of possible entities at a given conversation. If the client enters a sentence containing two or more entities configured for identification at the corresponding Question node, the agent will only identify the first entity in the list. Therefore, ensure that the questions and conditional logic following those Question nodes are appropriately formulated.
For example, suppose a Question node is configured to recognize one of the following values: Library card number, phone number, or "I don't know," in that order. If the customer says, "My phone number is 777 555-1212 and my card number is 123456789," the recognized entity value is the card number because it is the first entity in the list of possible entities at the corresponding Question node.
If the agent cannot identify any of the entities that the Question node is configured to recognize, it will apply the specified prompt regeneration behavior to that node.
Limit
The following limitations apply to the Question nodes that you configure to collect one of several entities in a single conversation:
- You can include up to 5 entities.
- You cannot use external entities.
- You can only include one entity of each type. For example, a Question node cannot recognize two entities of type Date .
Was this article helpful?
Your feedback helps us improve.
Related Articles
 HTML Entities - Entity characters in HTML1 minutes read
 How to create a Personal Agent in n8n7 minutes read
 How to change the browser User Agent without extenstion6 minutes read
 Run the test and view the agent evaluation results.8 minutes read
 Overview of Agent Skills3 minutes read
 Template agent IT Helpdesk4 minutes read
Reader Comments 0
Sign in with email or Google to join the discussion.