Check the Copilot Studio agent.
When designing agents in Copilot Studio, use test cases to see how the agent guides the customer through the conversation. This is a good way to ensure the topics work and the conversation unfolds as you expect.
Table of Contents
When designing agents in Copilot Studio , use test cases to see how the agent guides the customer through the conversation. This is a good way to ensure the topics work and the conversation unfolds as you expect.
When testing agents using orchestration, you can monitor the orchestration tool's progress in real time on the activity map. Close the activity map if you want to track each step of the conversation path with cross-topic tracking enabled.
In addition to testing agents in the Test your agent table , you can create test suites with multiple queries for automated testing.
Use chat tests.
Web application
Use the Test your agent dashboard to see the agent's conversations as a user. This is a good way to ensure that topics are working and conversations are proceeding as you expect.
In addition to testing agents in the Test your agent table , you can create test suites with multiple queries for automated testing. To start automated testing, select the evaluate button.

Preview the conversation
1. If the Test your agent panel is hidden, open it by selecting Test at the top of any page.
2. In the field at the bottom of the Test your agent table , enter some text. If the text matches the trigger phrase for a topic, that topic will start.
3. Select the agent's response in the test chat. This will take you to the topic and node that sent the response. Activated nodes will have a colored checkmark and a colored border.
As you continue the conversation within the active topic, note that each activated node is marked with a checkbox and a bottom border, centered on the canvas.
4. If you want to track the entire automated conversation as it transitions from one topic to another, select the three dots (…) at the top of the checklist and turn on Track between topics . For agents using orchestration (default), consider turning off Show activity map when testing to avoid having to collapse the activity map in each conversation.
5. Continue the conversation until you are satisfied that it is going as you wish.
Tip :
You can update the topic at any time while interacting with the test agent. Save your topic to apply the changes and continue the conversation with the agent.
Your conversation is not automatically deleted when you save a topic. If you want the agent to forget the test conversation and start over, select the Reset icon at the top of the test dashboard.
You can use the queries you send in the test chat to create automated test suites to evaluate your agent.
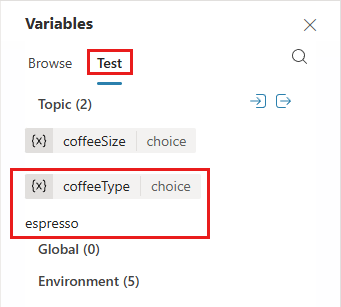
Check the variable value.
You can observe the values of the variables when testing the agent.
1. Select Variables from the secondary toolbar. The Variables dialog box will appear.
2. Switch to the Test tab and expand the desired variable categories. As you continue the test conversation, you can monitor the values of the variables being used.
The Test tab in the Variables table displays one topic variable with a value and one variable with no value.
3. To check a variable's properties, select the desired variable. The Variable Properties dialog box will appear.
Save a snapshot of the conversation.
While testing the agent, you can record the conversation and diagnostic data, then save it. Later, you can analyze the data to troubleshoot issues, such as the agent not responding as expected.
Warning : The snapshot file contains all of the agent's contents, which may include sensitive information.
Web application
1. At the top of the Test your agent panel , select the three dots (…), then select Save snapshot . A message will appear informing you that the snapshot file may contain sensitive information.
2. Select Save to save the agent content and conversation diagnosis to a .zip archive file named botContent.zip.
The botContent.zip archive file contains two files:
- dialog.json contains the conversational diagnostics, including a detailed description of the error.
- botContent.yml contains the agent's topics and other content, including entities and variables.
Connection management
If your agent requires user connections, you can manage the connections used by your test chat: Select the three dots (…) at the top of the test console, then select Manage connections .
Important Note : The Test Your Agent console is for validation during the design phase only and does not fully simulate all published channel behaviors. Timer-driven and background-triggered events, including those triggered by inactivity, may not be triggered or display follow-up messages in the test console even if the agent is configured correctly. To validate inactivity-triggered behavior, publish the agent and test it in a supported channel such as Microsoft Teams . The test console should not be considered formal validation for inactivity-based scenarios.
Incident Report
Help improve Copilot Studio by reporting issues. All information collected will be kept confidential.
Web application
1. At the top of the Test your agent dashboard , select the three dots (…), then select Flag an issue .
2. Select Flag issue . This action will send your conversation ID to Microsoft. The ID is a unique identifier that Microsoft uses to troubleshoot issues in the conversation. When reporting an issue, you are not sending other information, such as information stored in a conversation snapshot file.
Was this article helpful?
Your feedback helps us improve.
Related Articles
 Overview of Copilot Studio10 minutes read
 Upload files to create a knowledge base for agents in Copilot Studio.4 minutes read
 Should you choose Microsoft 365 Copilot or Copilot Studio to build your agent?9 minutes read
 Evaluating agent performance in Microsoft Copilot Studio14 minutes read
 Add the Copilot connector as a knowledge source for agents in Copilot Studio.3 minutes read
 Summary of knowledge sources for agents in Copilot Studio14 minutes read
Reader Comments 0
Sign in with email or Google to join the discussion.