The secret of creating unique photos with long exposure techniques
Long exposures are in the motion blur technique, using a slower shutter speed than normal speed. In order to be able to create a photo showing a time shift in a still image, the photographer needs to pay special attention to ...
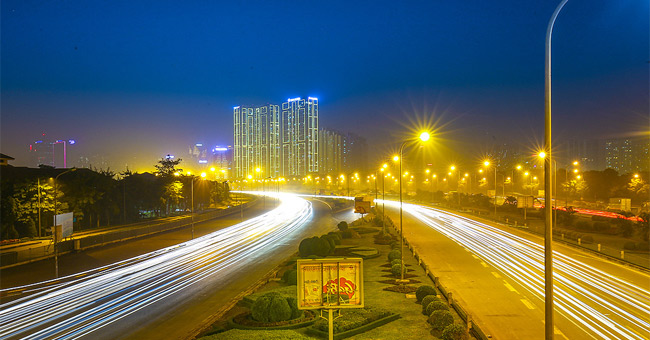
Long exposure is one of three types of motion shots, using a slow shutter speed to show the passage of time in still images. The photographer will use blur motion effects to make the image more interesting and impressive, giving the audience a "speed" feeling.
- Instructions for taking photos with flash
- Avoid red-eye phenomenon when taking photos
- Self-study photography - Macro mode
To take a long exposure, you need to use a tripod and a trigger. Time is a very important factor, sometimes you will have to wait relatively long to get beautiful views. Besides, we also need a lot of time to capture and adjust the position after shooting, etc. Therefore, it takes patience and avoids the slightest impact, which also causes the waiting process. Your become meaningless. The picture will definitely not be beautiful, but it is your idea. In this article, we will provide readers with tips to limit the impact of long exposure photography.
1. Use a good quality tripod:
With photos taken at 1/8 second, you can still hold your breath to reduce camera shake. However, for exposures of 2 seconds or longer, we basically can't do it without the help of a tripod. Some people can take advantage of tables, chairs, pedestals to set up cameras and shoot, but these measures are only temporary and do not completely overcome the image shake.
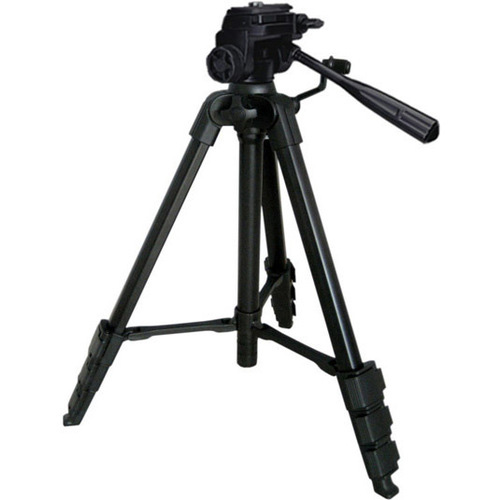
The most effective way to solve this problem is to use a tripod. Note that good quality, sturdy, durable tripods should be selected, because poorly constructed tripods will not keep your camera stable during shooting.
2. Use the self-timer or soft-press mode:
Even if you have used a tripod, only the slightest movement before shooting can cause your image to vibrate, and specifically to press the shutter button. There are many ways to fix this problem, for example, you can set a 2-second timer before shooting to avoid your hand operation affecting the camera.
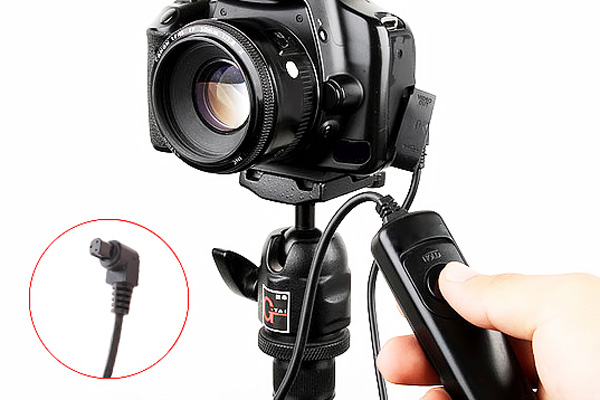
However, the most effective way is to buy a soft cord to connect to the device. The cord not only helps you control the shutter release remotely, but is also very effective when you want to expose it in Bulb mode (the shutter speed is not limited), by pressing and holding the shutter button on the machine for longer than 30 seconds without making camera shake is impossible.
Soft cords come in two types: wired and wireless. Wired type uses 3.5 mm plug and can connect to the camera via a headphone or microphone slot. Now you can buy this accessory on the market for quite cheap price, about 100 thousand dong.
3. Manual focus:
Operation of autofocus on the camera is convenient but when shooting long exposure, it is less effective, even the opposite. The reason is that most long exposure images are taken when it is dark or in low light conditions, while the autofocus function usually works best only when the ambient light is sufficient.
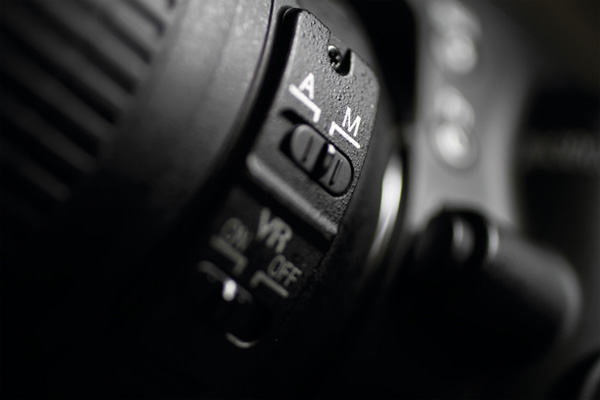
On the other hand, the camera's refocusing mechanism during exposure will produce unnecessary vibrations when shooting. So you should switch to manual focus and focus right from the start to get the best quality photos .
4. Locking mirror flip:
As mentioned above, even the slightest movement inside the camera when shooting long exposures can lead to blurry images. For cameras with flip mirrors, the mirror's flip motion when shooting is small but can also cause the camera to vibrate, resulting in unexpected quality finished photos.
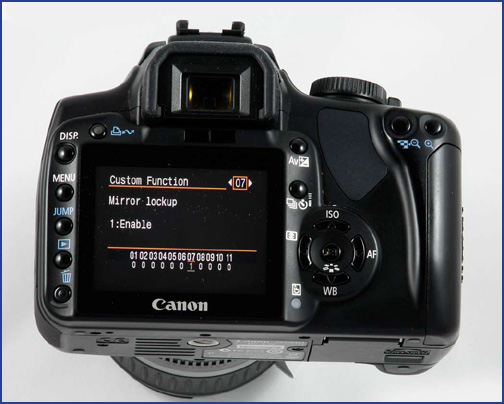
To fix this, you need to enable Mirror Lockup (Mirror Lockup) depending on the camera line. When locking the mirror, the machine will proceed to flip the mirror first, then start capturing the image signal into the sensor. When the sensor stops receiving the signal, the mirror flips back to its original state.
5. Use the optimal aperture of the lens:
When shooting long exposures, aiming to extend the exposure time, we often reduce the ISO speed to the lowest or maximum aperture. However, for most lenses, when the aperture is too small (f / 16 or smaller), images are often diffraction (diffraction).
Each different lens usually has a range of apertures that when taken will produce the highest definition image. Usually, for most lenses, it is the aperture range from f / 5.6 to f / 8.0. You should consult online forums, or try it yourself to find the optimal aperture range for your lens.
Refer to the following articles:
- 10 tips for taking beautiful photos with digital cameras
- 10 simple photography techniques for impressive photos
- 10 points travel camera 'eat off' camera phone
Hope this article is useful to you!
- Admire 10+ virtual long exposure images of the world around us
- Turn on the secret of long exposures in photography
- Admire the beautiful dual exposure wallpapers
- How to use Photoshop CS6 (Part 3) - Create Manipulation artwork with exposure effect
- Instructions for creating double exposure images in Photoshop
- 6 mobile apps to help create double exposure effects
- Things to know about Light Painting techniques in photography
- The secret to getting perfect answers from Gemini
- Adobe launches Photoshop Camera application, free on iOS and Android, with many impressive filters
- The class of macro camera of the Galaxy A51 is what users rarely see
- The divine poses will give you a beautiful image of ecstasy
- The photographer shares how to take portraits beautiful and shimmering with ugly background
- Mistakes when using white balance in taking photos
- Don't miss the 15 basics for better shooting and video recording
- Taking photos and mirroring which ones will give you the most accurate picture?
- Do you choose a large aperture or a large sensor when taking photos?
- Take a picture of the Cinematic Photography style
- Should photographed RAW mode or not?


-
 How to open the camera on a Windows computer or laptop.
-
How to turn the camera on and off in Windows 11
-
5 Android camera features only available on foldable phones.
-
These minimalist camera apps will help you fall in love with photography again.
-
Transfer files from computer to phone using just camera – no internet needed
-
How to turn your old phone into a security camera
 How to open the camera on a Windows computer or laptop.
 How to turn the camera on and off in Windows 11
 5 Android camera features only available on foldable phones.
 These minimalist camera apps will help you fall in love with photography again.
 Transfer files from computer to phone using just camera – no internet needed
 How to turn your old phone into a security camera