'Beginner lessons' take landscape photos for new ghosts
Landscape photography is always a fascinating topic for any photographer. Each photographer has his own personal senses, and is clearly shown in each landscape picture. But all have a common goal is to make your photos sharp, high quality. For beginners practicing photography, you need to remember the following basic techniques ...
Landscape photography requires the photographer to have their own subjectivity with the definition from the foreground to the background. It's not just about the camera and shooting time, but we need to adjust the mode, control the depth of the field before pressing the camera. And finally, the results should be sharp images, harmonious colors and balance.
Whether any photographer is attracted to taking landscape photos, but not everyone can get photos. Especially for newly photographed people, it is necessary to know the basics when taking outdoor photos.
1. Select RAW or JPEG image format:
Landscape photography changes to RAW and JPEG formats. JPEG will be suitable for non-edit photos. RAW images, will be suitable for those who are proficient in Photoshop editing skills because RAW images are always the most original. RAW image format will contain more color information, especially different color bands, such as the sky.

2. ISO adjustment to 100/200:
ISO is a measure of the light sensitivity of an image sensor to light. The higher the ISO, the better the capture device when shooting in places with poor lighting conditions. However, high ISO is not always beneficial. When shooting landscapes, use the lowest ISO setting. Most cameras will have a minimum of ISO 100, but it may also be 200. Low ISO will ensure the wrong color in the least affected image, the picture will not be grainy.

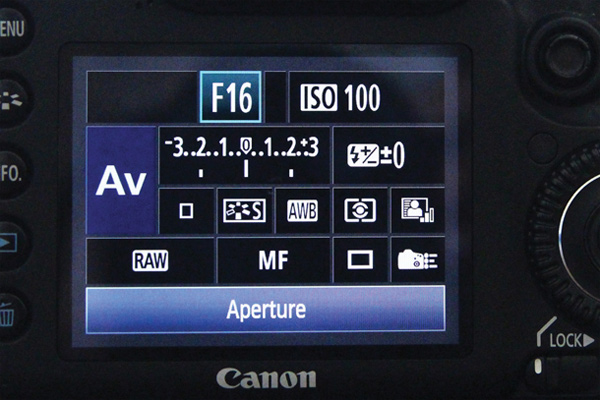
3. Team f / 16 A / AV mode:
The smaller aperture (the larger f / x with x), the greater the depth of field. This also explains, do not let the aperture be smaller than f / 16, this may affect the softness of the image. To install this section, select Aperture Priority (A / Av) mode, then use the dial to select the aperture.
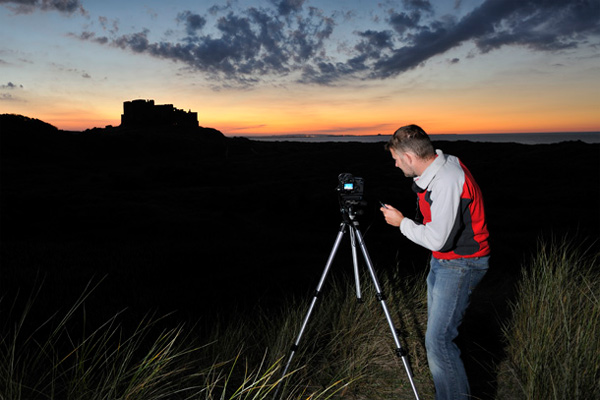
4. Using camera tripod:
After you've set up everything, use the camera tripod (Tripod) to capture the landscape. Remember to check if the Tripod watch is tilted and firm enough, not having a proper setup of the tripod can cause a fall and damage our camera. If possible, use a remote control to avoid working. Touch the camera while shooting, minimizing the shake.
5. Do not focus on the center of the photo frame:
Most people focus on the center of the photo frame, but usually get 1 shot of a balanced image, here we take landscape photos, so we can't apply it. When you start looking for the shooting angle, use the most basic "one-third" layout. Also look for paths and objects in the background to increase the image depth.
6. "One-third" rule:
Focus on the one-third rule to maximize the depth of field. If one of the focus points is at the corner position you want to focus on, use autofocus, otherwise, select the closest point in the frame, use autofocus, then switch to manual mode to lock the focus.

7. Check out some photos:
Take a few photos and check the color chart. The graph will display at a balanced level if the image is "consistent" - harmonizing between light and dark, the left column will be dark, the right will be bright. The most important thing when viewing graphs is that the image should not be too bright or too dark to show that the chart loses its head.
8. Adjust metering meter:
If you think the image is too bright or too dark, press and hold the +/- button and use the dial key to adjust the exposure compensation. -1 will be to the left, make the image darker, +1 will be on the right, making the image light up. Try taking some pictures to check the camera's metering capability and the quality of the picture before taking it.

Refer to the following articles:
- 10 simple photography techniques for impressive photos
- 9 basic rules of composition in photography
- The harsh truths in photography
I wish you all success!
- The photo series captured the famous 'ghost' controversy
- Take photos of the fanciful sky landscape with the following 5 tips
- Create ghosts in Photoshop or GIMP
- Beautiful Landscape Background, download Beautiful Landscape Background here
- 7 essential techniques for taking landscape photos on your phone
- What is Ghost?
- Cold with the mysterious stories about the 'ghost of the living'
- How to force the screen to rotate into Landscape Mode on iPhone
- Please take a look at the Vietnamese photos viewed from above on American newspapers
- Synthesis beautiful landscape background
- The difference between Panorama and 360-degree photos
- Reviews Canon EOS R5 and R6: Configure powerful video
- Dwarf mushrooms want to increase height when taking photos? Use a heightened 'cheat' way like Mark Zuckerberg
- Fujifilm X-E4 Quick Review: Much changed compared to previous generations, but in a positive or negative direction?
- The meaning of the symbol on the camera lens you need to know
- Don't miss the 15 basics for better shooting and video recording
- How to create Flare effects for photos without Photoshop
- Leica Q2 Monochrome camera has the highest resolution available today
- What is green time in photography? Is it different from Golden Time?
- How to preserve and prevent moisture for simple cameras at home
-
 Guide to creating wallpapers using AI on iPhone
-
Experience Lexica.art with its vast library of image creation prompts.
-
Guide to creating better AI images: 4 steps to writing effective prompts for beginners.
-
Instructions on how to use AI models to create images in Civitai
-
Guide to inserting images under text in PowerPoint - Changing image position
-
Transform any text and image into a coloring page.
 Guide to creating wallpapers using AI on iPhone
 Experience Lexica.art with its vast library of image creation prompts.
 Guide to creating better AI images: 4 steps to writing effective prompts for beginners.
 Instructions on how to use AI models to create images in Civitai
 Guide to inserting images under text in PowerPoint - Changing image position
 Transform any text and image into a coloring page.