Table of Contents
This updated guide examines Address: Set up Dhcp Server in Windows 2003 and organizes the essential facts, background, and practical takeaways in clear American English.

The above diagram shows the simple structure of the DHCP server with some client computers in the network.
The DHCP Server itself contains an IP Address Database (IP Address Database) that holds all available addresses. If a client (member of the network, using Windows 2000 Professional or Windows XP operating system) is allowed to use "automatic IP address" in TCP / IP settings, it can receive the IP address from the server. DHCP. Install DHCP Server Below we will step by step guide how to install DHCP server. Installing the DHCP server is quite easy in Windows 2003. Using the " Manage your server " Wizard, you only need to enter the necessary details, the program will set up the basic components for you. Open the " Manage your server " Wizard, get a list of server roles in the " List of server roles " option of the DHCP server and click Next . You will be asked to enter a name and description of scope. Scope: A scope is a collection of computer IP addresses in a subnet using DHCP.
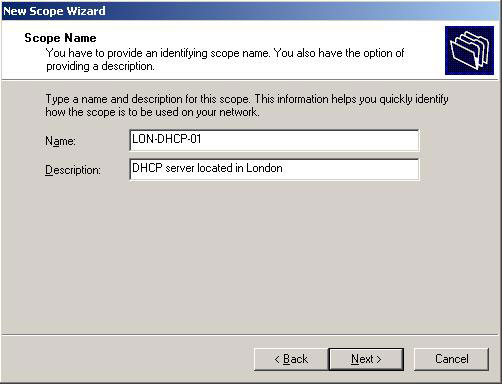
The next window will ask you to define the scope of distribution of IP addresses in the network and subnet mask. Enter the appropriate details and click Next .
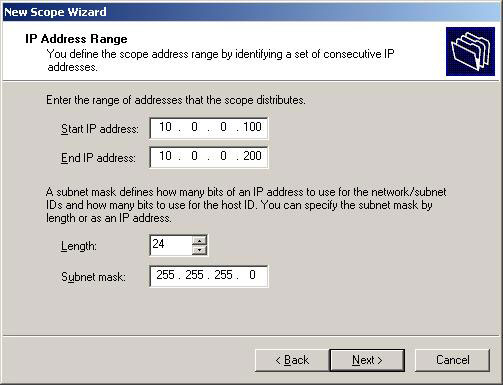
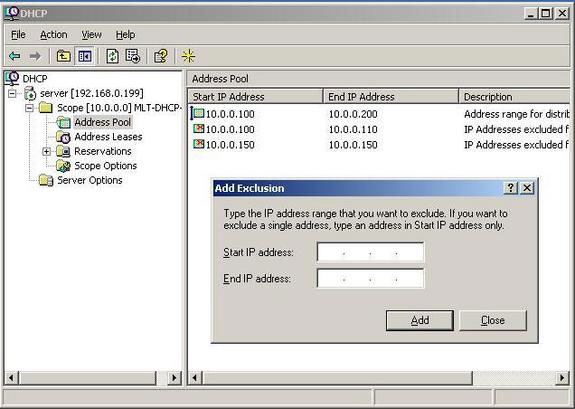
For the following interface, you must add the IP address range described in the previous window. For example, if the IP address 10.0.0.150 is the company router, you do not want the DHCP Server to distribute it. In the example, the IP addresses are limited to 10.0.0.100 to 10.0.0.110 and a single address 10.0.0.150. In this case, eleven IP addresses will be reserved and not distributed among network clients.

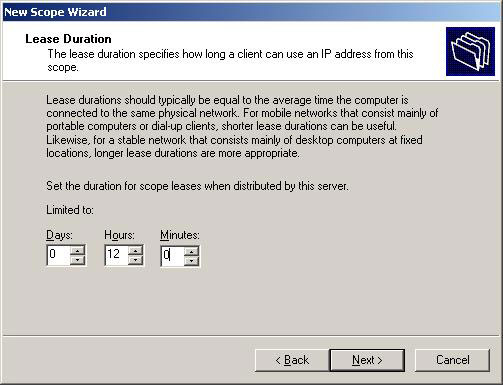
Now you need to set the "subscription" time limit to which a client can use the assigned IP address. You should leave a long term for fixed networks (such as office networks) and short deadlines for remote connections or laptops. In this example our setup is 12 hours for a fixed desktop in the local office and the normal working time is 8 hours.
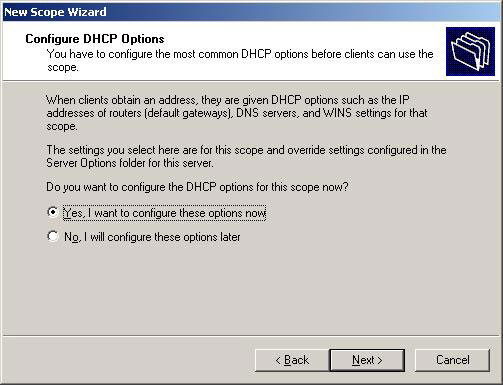
Next you are asked if you want to configure the scope of DHCP functions now or later. If you choose Yes , a new screen with options will appear for you to use. If you choose No , you can configure it at a later time.
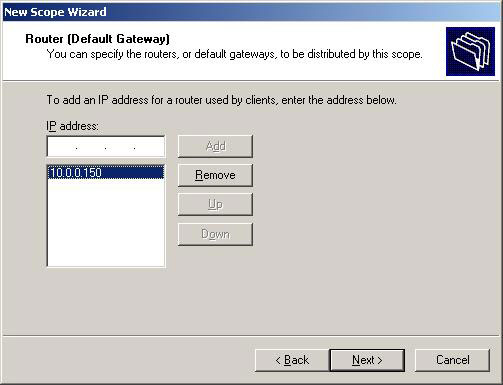
Router or gateway and IP address may be required to enter parameters in the next section. Client computers will then know which routers are used.
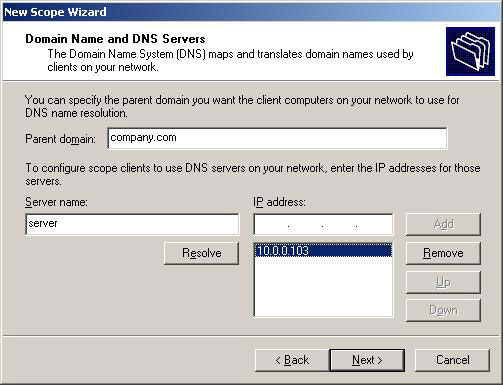
In the following window, DNS and domain settings are required. The DNS server of the IP address will be distributed by the DHCP server and provided to the client.
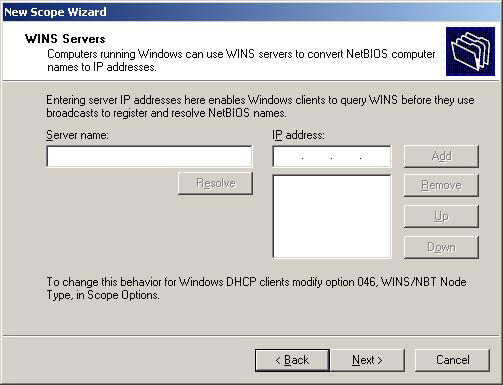
Next is the WINS setup screen. You must enter the IP address of the WINS server. Just enter the server name into the appropriate box and press " Resolve ", it will automatically find the IP address for you.
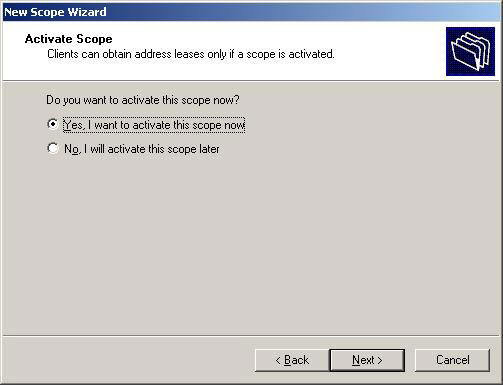
The last step is to activate the scope. Just press the Next button when you see the following window appear. The DHCP server will not work if you do not do this.
The DHCP server has been installed with the basic settings. Next will be to configure the necessary points to suit your own network structure. Configure DHCP Server Here's a simple explanation of how to configure a DHCP server. The Address Pool section shows a list of restricted IP addresses for distribution and exclusion points. You can add additional exceptions by right-clicking the Address Pool on the left side of the MMC window and selecting " New exclusion range ". Another window (as below) appears, allowing you to enter additional address limits. If you only enter Start IP, you will add a single IP address.
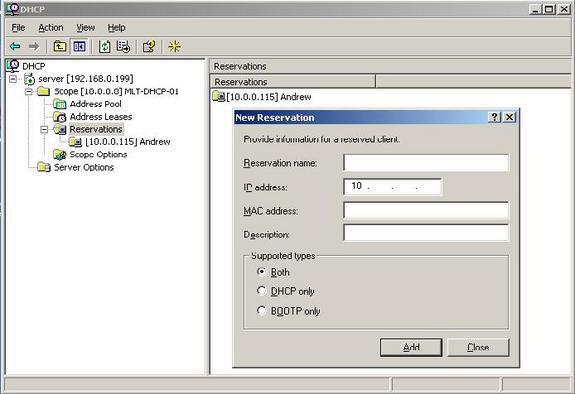
The DHCP server allows you to reserve an IP address for a client. This means that a particular network client can keep the IP address as long as you want. To do this you need to know the physical address (MAC) on the network card. Enter the reserve name, desired IP address, MAC address and description, choose support (either DHCP, or BOOTP) and press the Add button. New reserves will be added to the list. For example, I can reserve IP address 10.0.0.115 for a client computer called Andrew.
If you right-click Scope Options and press " Configure options ", there will be more servers and their parameters are configured in the next window. These settings are distributed by the DHCP server along with the IP address. Server options work by default in the entire scope of the DHCP server. However, the scope option can refer to server options. DHCP server in Windows 2003 is quite smart. It is upgraded from Windows 2000 version and is classified primarily for large networks. Imagine that you have to configure each client in the entire network, how will things work? It will take a lot of time and more times to troubleshoot the real number if unfortunately an error occurs. Before making any DHCP-related settings, it's a good idea to build your own network plan and think about the range of IP addresses used for the previous computer.
FAQ
What is Address: Set up Dhcp Server in Windows 2003 about?
It provides a structured overview of address, explains the main context, and highlights practical takeaways for readers.
Why does this topic matter?
Understanding the main concepts helps readers evaluate the issue, avoid common mistakes, and make better-informed decisions.
How should readers use this information?
Use the guidance as a practical starting point, confirm details that may have changed, and follow current product, safety, or security recommendations.
Related Articles
 Steps to Fix 'Unable to Contact Your DHCP Server' Error on5 minutes read
 How to Install, Configure, and Test Windows Server 2012 R2 Single8 minutes read
 What Is Dhcp Error? How to Overcome It?6 minutes read
 Install and Configure Windows Server 2008 Dhcp Server9 minutes read
 Transfer Dhcp from Windows Server 2000 to 20089 minutes read
 Move DHCP from 2000 Server // Server 2003 to Server 200810 minutes read
Reader Comments 0
Sign in with email or Google to join the discussion.