Remote Desktop Connection: How to set up details, 100% successful access to computers via the Internet
Remote Desktop is a feature available on Windows Pro and Enterprise versions from XP and above, helping you access your computer remotely within the same LAN, or via the Internet with a few simple setup steps.
To avoid confusion, in this article we call the computer being accessed remotely the host computer, the computer used to access the host is the client. This article uses Windows 10 Home to remotely access Windows 10 Pro, Vigor2925 series router.
Below we will go through the detailed setup steps on 2 computers, as well as setup on the router to be able to access the computer remotely via the Internet using Remote Desktop.
1. Set up on the host computer
Note: To ensure more security, you need to set a password for the host computer, the more complex the password the better.
On the machine you want to remotely access, you need to make the following settings:
Step 1: Enter remote desktop settings in the search box.

Step 2: Turn on the button below Enable Remote Desktop

Step 3: Open Command Prompt and enter the ipconfig command
Step 4: If the host computer is connected to a wired network, find the Ethernet adapter line, and remember the IP address in the IPv4 Address line as shown below:

If the host machine uses Wifi, find the Wireless LAN adapter Wi-Fi line and write down the machine's IPv4 address.
Step 5: Access the router's administrative address , usually the default is 192.168.1.1 (this address may vary depending on the network operator, or be changed by the network administrator, to know exactly, you need to ask the administrator). network administrator, or flip the bottom of the router up to see it with your home network).
Step 6: Log in to your router management account.
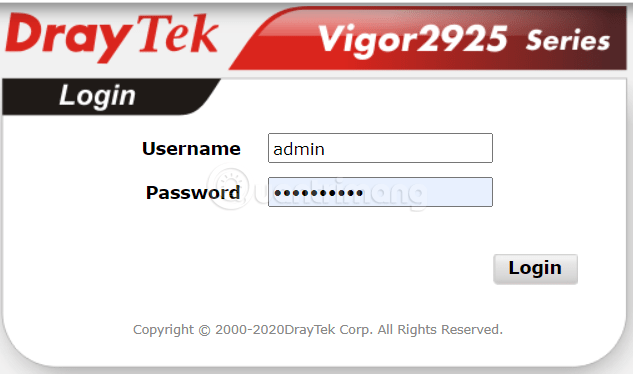
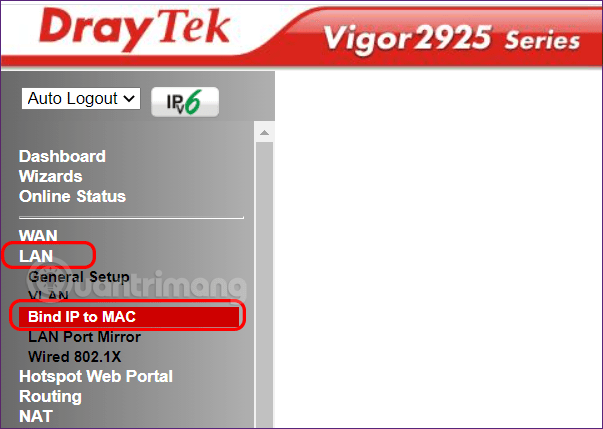
Step 7: Find LAN settings >> then find Bind IP to MAC.
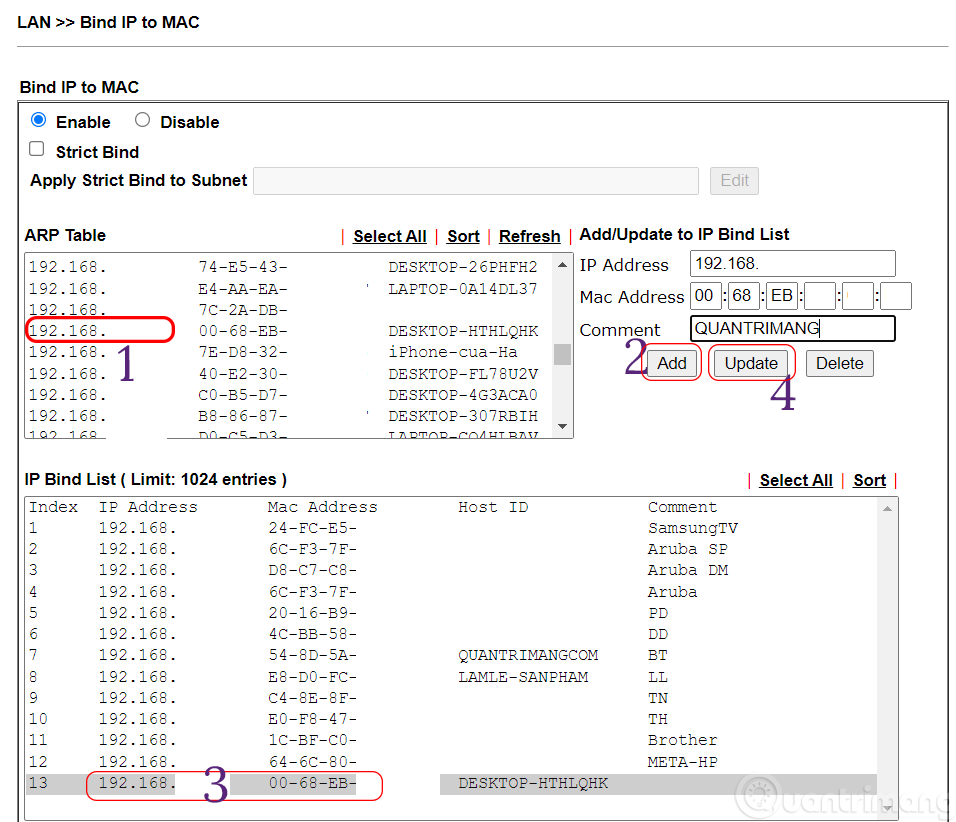
Step 8: In the ARP Table , find the IP address recorded in step 4 > click Add to add it to the IP Bind List table.
Step 9: In IP Bind List, select the newly added IP address > enter a name for the computer to easily identify the computer > click Update > scroll down to the bottom and click OK .
Step 10: Find NAT settings >> then find Port Redirection settings in NAT.
Step 11: Click on the serial number you want to add the host machine, here I clicked on number 2.
Step 12: Check Enable and enter the following:
- Mode: Single
- Service Name: A memorable name, you can name it any way.
- Protocol: TCP/IP
- WAN Interface: ALL
- Public Port: Enter any number and keep this number secret, for example 189.
- Source IP: Any
- Private IP: Enter the IP address in step 4.
- Private Port: 3389 (This is the default port, you can change this default port to another port if needed, detailed instructions below).
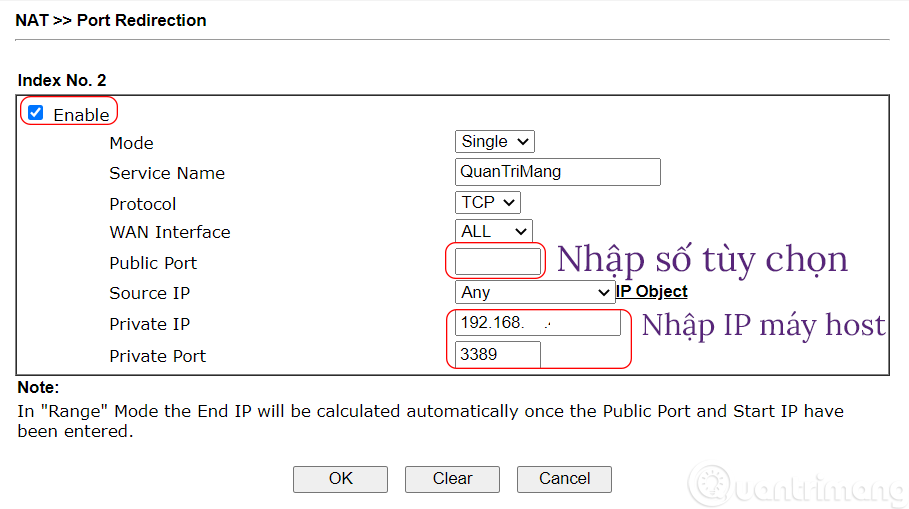
Step 13: Click OK > OK again.
Step 14: Check the host computer's network IP address:
- If your company uses a corporate network, it will usually be okay, you ask the administrator for this address.
- If you use a home network, enter Speedtest.net into your browser, wait a moment for the host computer's network, usually displayed below the network operator's name.
Suppose in this step we have the address: 113.190.91.117.
Change default RDP port
1. On the host machine, press Windows + R > enter regedit > Enter .
2. Copy and paste the following path into the Registry Editor window:
HKEY_LOCAL_MACHINESYSTEMCurrentControlSetControlTerminal ServerWinStationsRDP-Tcp3. Find and double-click PortNumber .
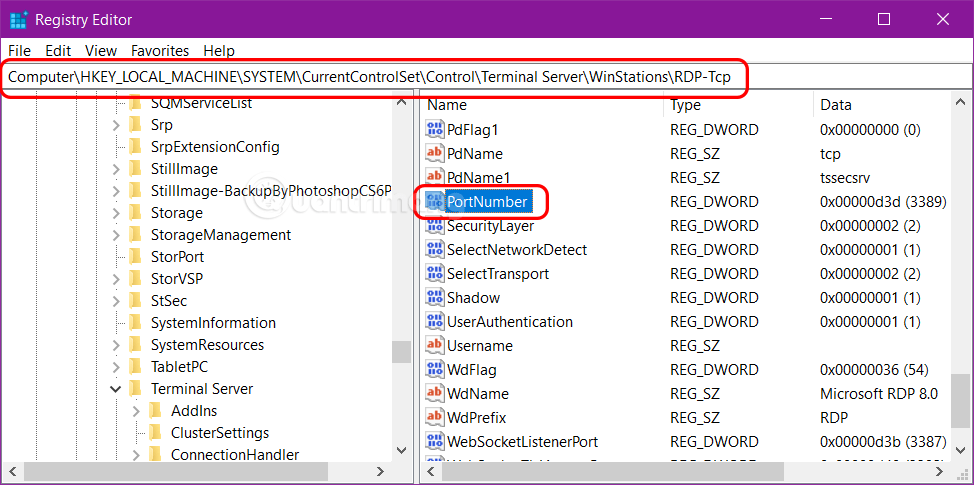
4. In the window that opens, select Decimal and enter a number you want as the new port instead of 3389 > OK .
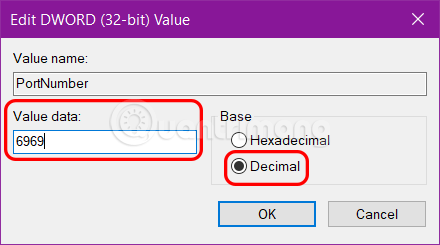
5. Restart the host computer. If the firewall is on, you must configure the firewall to allow connections to the new port number. Because it's too long, I would like to write a more detailed tutorial for this part.
6. You can check the current port by running the following PowerShell command:
Get-ItemProperty -Path 'HKLM:SYSTEMCurrentControlSetControlTerminal ServerWinStationsRDP-Tcp' -name "PortNumber"You can also change the RDP port by running the following PowerShell command. In this command, we will specify the new RDP port as 6969.
Set-ItemProperty -Path 'HKLM:SYSTEMCurrentControlSetControlTerminal ServerWinStationsRDP-Tcp' -name "PortNumber" -Value 6969 New-NetFirewallRule -DisplayName 'RDPPORTLatest' -Profile 'Public' -Direction Inbound -Action Allow -Protocol TCP -LocalPort 69692. Set up on the client computer to access the host via the Internet
On the client computer, do the following:
Step 1: Enter Remote Desktop Connection in the search bar and click to open it.
Step 2: In the Computer box, enter:
If 2 computers are on the same LAN, you just need to enter the IP address of the host computer in step 4 above. If you have changed the default RDP port from 3389 to another port (for example 6969), the address you need to enter now is IP_Address_step_4: 6969.
If accessing another network, enter the following structure: Network_IP_Address (in step 14) : (two dots) Public_Port (you enter in step 12). Then the address you need to enter is: 113.190.91.117:189.
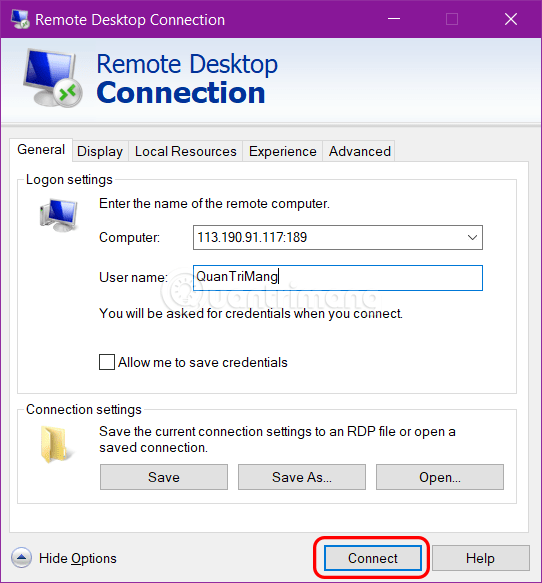
Step 3: Click Connect
Step 4: Enter the password to access the host machine
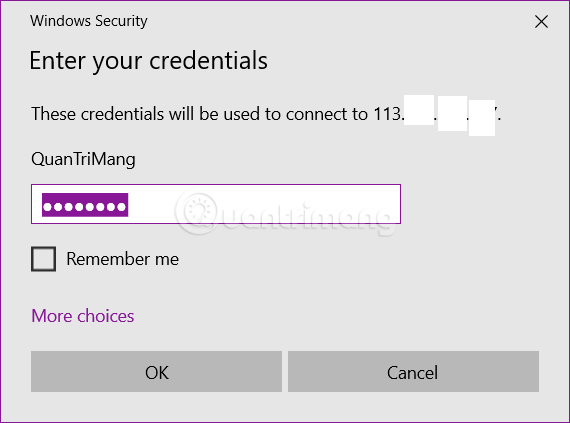
Step 5: Click Yes when this screen appears:
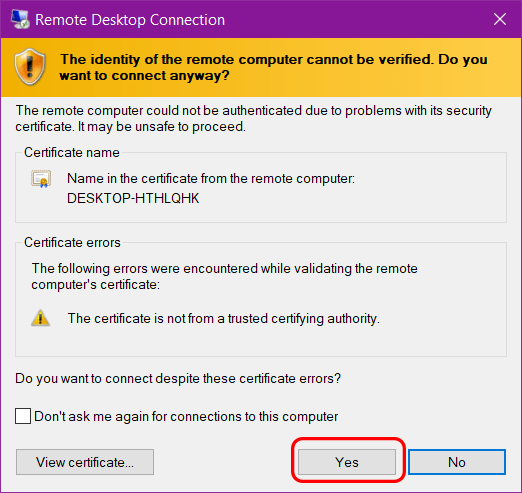
That's it, you have successfully connected to the host computer. Especially with this setup, you can also use your phone to remote your computer, like I often use RD Client.
Few other remote access options
Option 1: Set up a VPN
If you create a virtual private network (VPN), you will not have to expose the Remote Desktop server directly to the Internet. Instead, when you're not at home, you can connect to the VPN and the computer you're currently working on will act as part of the same local network as your home computer, running the Remote Desktop server. This will allow you to access Remote Desktop and other services that are normally only exposed on the local network.
TipsMake has demonstrated several ways to set up your own VPN server, including how to create a VPN server in Windows without any additional software or services.
Setting up a VPN is the safer option when it comes to making Remote Desktop accessible over the Internet, and with the right tools, doing this is quite simple. However, that's not your only option either.
Option 2: Bring the remote computer directly to the Internet
You can also bypass the VPN and expose the Remote Desktop server directly to the Internet by setting up the router to forward traffic from Remote Desktop to the PC being accessed. Obviously, this puts you at risk from potential attacks on the Internet, so if you choose this route, you'll need to understand what risks you're facing. Malware and automated hacking applications are now widely available on the Internet and constantly probe your router for weaknesses such as open TCP ports, especially ports like Remote Desktop commonly used. use. At the very least, you should make sure your PC's password is strong enough, but even so, there are still certain risks from unpatched vulnerabilities. However, although TipsMake strongly recommends that you use a VPN, you can still allow RDP traffic on your router, if that is what you want.
Set up a single computer for remote access
The process is quite simple if you only have one PC that you want to access via the Internet. The computer on which you set up Remote Desktop will 'listen' for traffic using Remote Desktop Protocol (RDP). You will need to log in to your router, and forward all traffic using TCP port 3389 to the IP address of the PC running Remote Desktop. Because routers have different interfaces, we cannot give you specific instructions. But for more detailed help, be sure to check out TipsMake 's detailed guide on port forwarding. Here, we'll look at a quick example using a basic router.
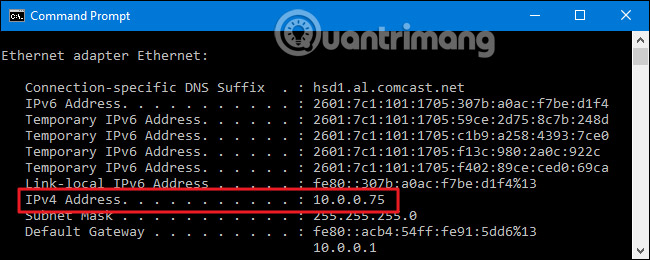
First, you need to know the IP address of the PC running Remote Desktop that you want to connect to. The easiest way to do this is to fire up Command Prompt and use the ipconfig command. In the results, find the network adapter details that connect you to the Internet (in the example in this article, it's 'Ethernet Adapter'). In that section, find the IPv4 address.
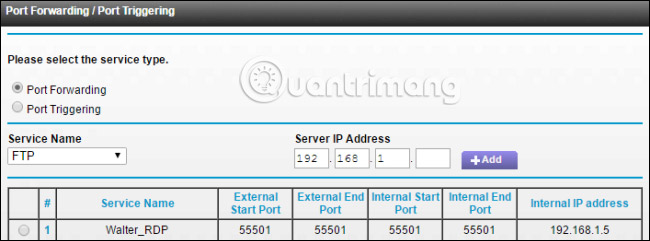
Next, you will log in to your router and find the Port Forwarding section. The exact location will depend on the router you are using. In this section, forward TCP port 3389 to the IPv4 address you set earlier.
You can now log in to Remote Desktop over the Internet by connecting to the Public IP address that the router shows for your local network.
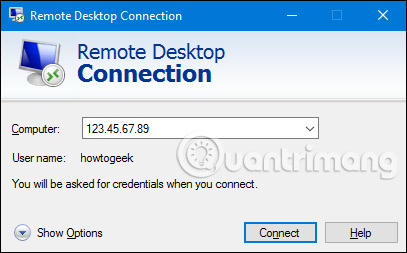
Remember that an IP address can be difficult to grasp (especially if it changes), so you may also want to set up a dynamic DNS Service so you can always connect to an easy-to-remember domain name. You may also want to set up a static IP address on the computer running the Remote Desktop server. This will ensure that the computer's internal IP address will not change. If so, you will have to change your port forwarding configuration.
Change port numbers or set up multiple computers for remote access
If you have multiple computers on your local network that you want to access remotely over the Internet - or if you have one PC but want to change the default port used for Remote Desktop - you have additional steps to take. Setting up a VPN is still the better option here, in terms of ease of setup and security, but there is another way to do it, via port forwarding if you want. The trick is that you will need to delve into the Registry on each PC, to change the TCP port number it uses to 'listen' for Remote Desktop traffic. You then forward the ports on the router to each individual computer using the port numbers you set up for them. You can also use this trick even if you only have one PC and want to change from the default, commonly used port number. This is considered a bit more secure than leaving the default port open.
Before you dive into the Registry, you should also note that some routers allow you to listen for traffic on some external ports, but then forward the traffic to some other ports and the internal PC. For example, you can have a router listen for traffic coming from the Internet on a port number like 55,000 and then forward the traffic to a specific computer on the internal network. Using this method, you won't have to change the port each PC uses in the Registry. You can do it all on your router. So check if your router supports this first. If so, skip the Registry section of these instructions.
Assuming you have Remote Desktop set up on each PC and it works for local access, you will need to go to each PC and do the following steps:
1. Get the IP address for that computer using the procedure outlined above.
2. Use Registry Editor to change the remote listening port number on that computer.
3. Take note of which IP address the port number goes with.
Here's how to do the Registry portion of those steps and the usual standard warnings: Registry Editor is a powerful tool, and misusing it can make your system unstable or even inoperable. . This is a pretty simple trick and as long as you follow the instructions, you shouldn't encounter any problems. That said, if you've never worked with it before, learn about using the Registry Editor before you start, and be sure to back up the Registry (and your computer) before make changes.
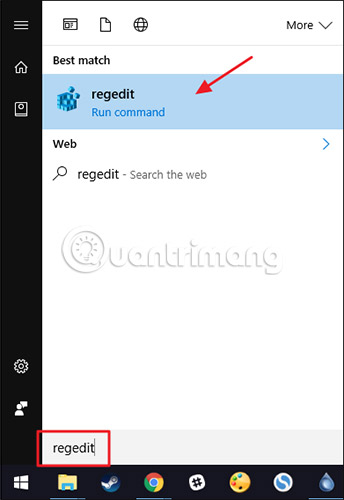
Open Registry Editor by pressing Start and typing "regedit". Press Enter to open Registry Editor and allow it to make changes on your computer.
In Registry Editor, use the left sidebar to navigate to the following key:
HKEY_LOCAL_MACHINESystemCurrentControlSetControlTerminal ServerWinStationsRDP-TcpPortNumber 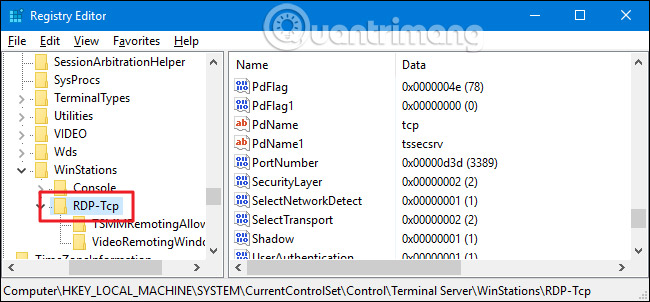
On the right, double-click the PortNumber value to open its properties window.
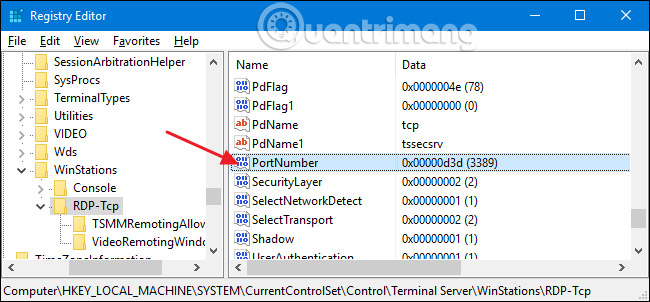
In the properties window, select the 'Decimal' option and then enter the port number you want to use. The port number you choose is up to you, but note that some port numbers are already in use. You can look at Wikipedia's list of common ports to see which numbers you shouldn't use. However, network applications installed on your computer may use additional ports. Port numbers can go up to 65,535 so if you choose a port number above 50,000, you will be safe. Once you have entered the port number you want to use, click 'OK'.
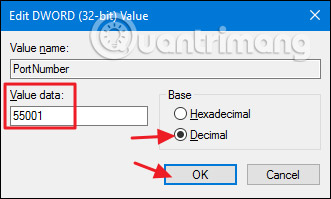
You can now close Registry Editor. Note down the port number you used, the IP address, and the name of the computer. Then move on to the next PC.
Once you're done changing ports on all PCs, you can log in to your router and start forwarding each port to the linked computer. If your router allows it, you should also enter the computer's name. You can always use the 'Application' entry where most routers have a feature that keeps track of which applications are assigned to the port. Just enter the name of the computer with an extension such as "_RDP" .
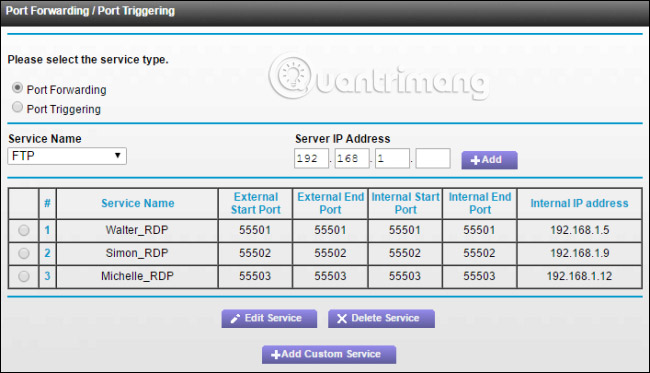
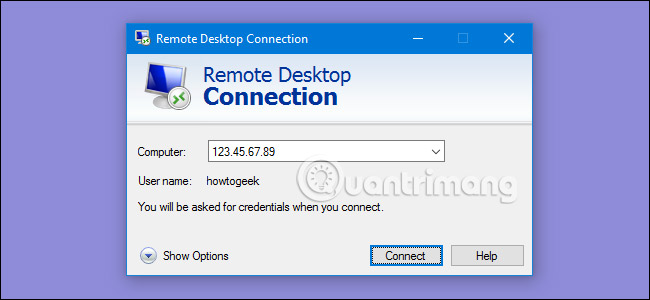
Once you have everything set up, you can log in to Remote Desktop over the Internet by connecting to the Public IP address that the router uses on the local network, followed by a colon and the port number for the computer you want to connect to. connect. For example: Public IP is 123.45.67.89 and setting up PC with port number 55501, will connect to '123.45.67.89:55501'.
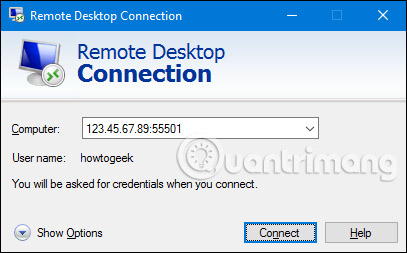
Of course, you can always save that connection in Remote Desktop by name, so you don't have to enter the IP address and port number every time you access it.
This process requires a bit of setup to get Remote Desktop working over the Internet, especially if you're not using a VPN or even if you have multiple computers you want to access. However, once you have completed the installation, Remote Desktop gives you a powerful and reliable way to access your computer remotely without requiring any additional services.
What is Remote Desktop?
The term Remote Desktop refers to the ability to connect a remote computer to another computer and control its screen, as if the user were sitting in front of the remote computer. Remote Desktop is typically accessed through port 3389 and uses software included with Windows or some third-party programs, such as TeamViewer, PC Anywhere, VNC, and other similar software.
All versions of Windows operating systems are equipped with the Remote Desktop feature. However, to be able to use this feature you will have to enable it first.
Good luck!
You should read it
- Troubleshoot Remote Desktop problems
- 6 ways to disable Remote Desktop on Windows 11
- How to enable and use Remote Desktop on Windows 11
- How to Hear Audio from the Remote PC when Using Remote Desktop
- Leaks information about Microsoft's new Remote Desktop application
- Steps to Fix the error that cannot be copied and pasted into the Remote Desktop session
 Why is PC Copilot+ such a disaster for the average user today?
 Will AMD make last-minute changes to 'save' the Ryzen 9000 CPU line?
 Microsoft stopped implementing WSUS driver synchronization
 Apple launches iOS 19 update with codename 'Luck'
 How to spot fake ChatGPT apps on the Apple App Store
 The 4 best Apple Watches of 2024