Prevent Microsoft from collecting system information on Windows 10
Customer Experience Improvement Program (CEIP) is a feature enabled by default on Windows 10. This feature will secretly collect information on the system to report to Microsoft. The information that Customer Experience Improvement Program (CEIP) collects includes hardware configuration and how you use the operating system and other programs and software.
Table of Contents
Customer Experience Improvement Program (CEIP) is a feature enabled by default on Windows 10. This feature will secretly collect information on the system to "report" to Microsoft. The information that the CustomerExperience Improvement Program (CEIP) collects includes hardware configuration and how you use the operating system and other programs and software.
This information helps Microsoft improve the quality of its features in the future.
Although Microsoft is certain to the user that the Customer Experience Improvement Program (CEIP) does not collect any personal user information, there is no way to verify the correct information. Your device sent out. If you're concerned about privacy or simply don't want Microsoft to collect your system information, you can disable the Customer Experience Improvement Program (CEIP).
In the article below, Network Administrator will show you how to disable Customer Experience Improvement Program (CEIP) to prevent Microsoft from collecting system information on Windows 10.

How to disable Customer Experience Improvement Program (CEIP)
1. Use Group Policy to disable Customer Experience Improvement Program
If you are using Windows 10 Pro or higher versions, you can use the Local Group Policy Editor to quickly disable the Customer Experience Improvement Program on your Windows 10 computer.
To disable the Customer Experience Improvement Program, follow the steps below:
1. Press the Windows + R key combination to open the Run command window.
2. On the Run command window, enter gpedit.msc there and then click OK or press Enter to open the Local Group Policy Editor window.
3. In the Local Group Policy Editor window, navigate to the path:
Computer Configuration => Administrative Templates => System => Internet Communication Management => Internet Communication settings
4. In the right pane, find and double-click the policy called Turn off Windows Customer Experience Improvement Program .

5. On the Turn off Windows Customer Experience Improvement Program window, in the left pane, find and click the Enabled option to disable policy.
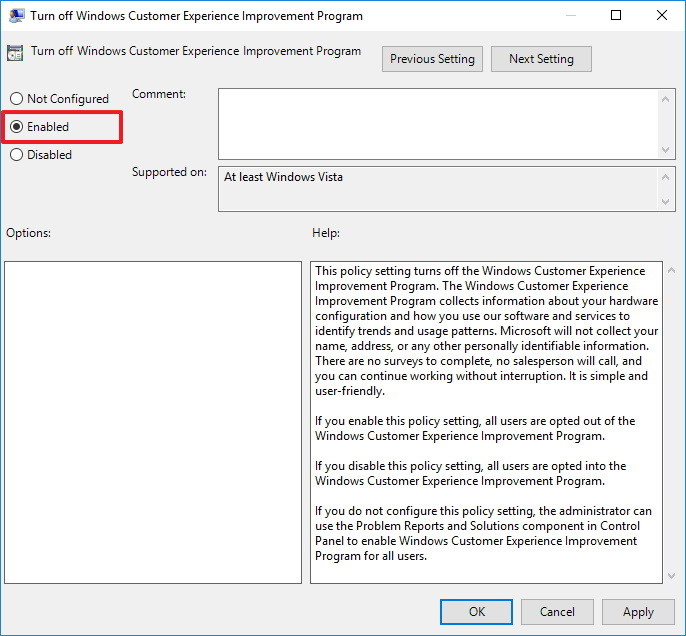
6. Click Apply.
7. Click OK.
8. Close the Group Policy Editor window again.
9. Finally restart your computer to complete the process.
After completing the above steps, the Customer Experience Improvement Program feature on all user accounts (users) on your computer will be disabled.
In case if you want to re-enable the Customer Experience Improvement Program, follow the same steps and go to step 5 and select the Not configured option to finish.
2. Use the Registry to disable the Customer Experience Improvement Program
If you use the Windows 10 Home version without the Local Group Policy Editor integrated, you can use the Registry to disable the Customer Experience Improvement Program on your computer.
To disable the Customer Experience Improvement Program, follow the steps below:
1. Press the Windows + R key combination to open the Run command window.
2. On the Run command window, enter regedit and press Enter or click OK to open the Registry window.
3. On the Registry window, navigate to the path:
HKEY_LOCAL_MACHINESOFTWAREPoliciesMicrosoftSQMClient
4. Select the SQMClient key , right-click it and select New => Key.
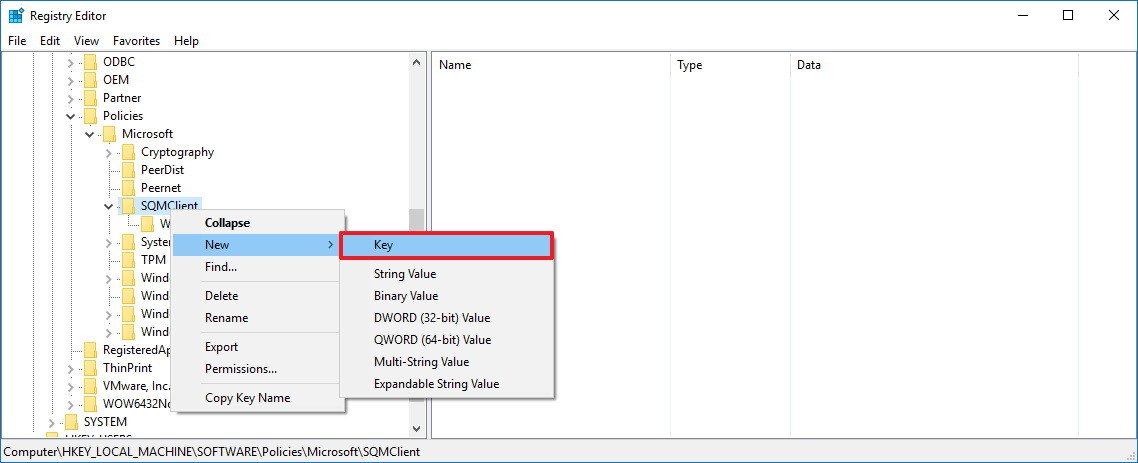
5. Name the new key Windows and press Enter.
6. Select the Key you just created, right-click any space in the right pane, select New => DWORD (32-bit) Value .
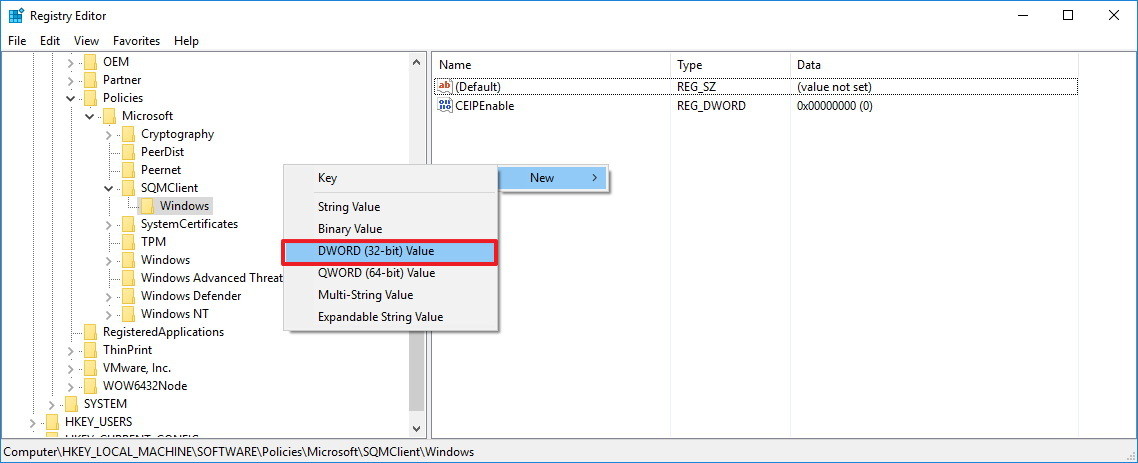
7. Name the DWORD you just created as CEIPEnable and press Enter.
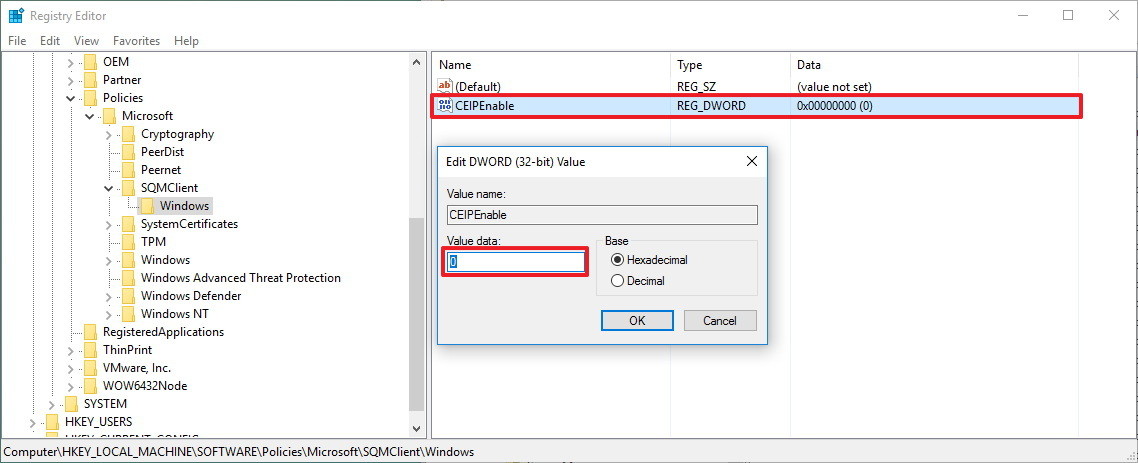
8. Double-click the DWORD that you just created and set the value in the Value Data frame to 0 .
9. Click OK .
10. Close the Registry window.
11. Restart your computer to complete the process.
After completing the above steps, the Customer Experience Improvement Program feature on all user accounts (users) on your computer will be disabled.
If you want to re-enable the Customer Experience Improvement Program, follow the same steps and change the CEIPEnable DWORD value in the Value data box from 0 to 1 .
Refer to some of the following articles:
- Quick fix computer error Windows 10/8/7 crashes, Safe Mode can not be escaped
- Cannot create a new user account on Windows 10, 8.1 and 8, this is how to fix it
- How to enable or disable SuperFetch on Windows 10/8/7?
Good luck!
Was this article helpful?
Your feedback helps us improve.
Related Articles
 How to prevent Microsoft from automatically downloading Windows 10 updates?4 minutes read
 How to prevent Windows Security from sending files to Microsoft4 minutes read
 Microsoft strengthens encryption to prevent NSA from accessing the system2 minutes read
 4 ways to check Windows 10 system configuration details5 minutes read
Reader Comments 0
Sign in with email or Google to join the discussion.