Table of Contents
This guide provides a clear, practical overview of "Meet Samsung Studio: the Secret Video Editor That's Much Better Than". It organizes the most useful details, explains important considerations, and highlights the steps or choices that matter most.
- Why no third-party photo editing apps on Samsung Galaxy phones?
1. Choose your preferred aspect ratio
Before you start editing, you should choose the right aspect ratio depending on where you plan to share your video. For example, if you shot your video horizontally but want to post it as an Instagram Reel, you'll need to convert it to vertical so it looks good.
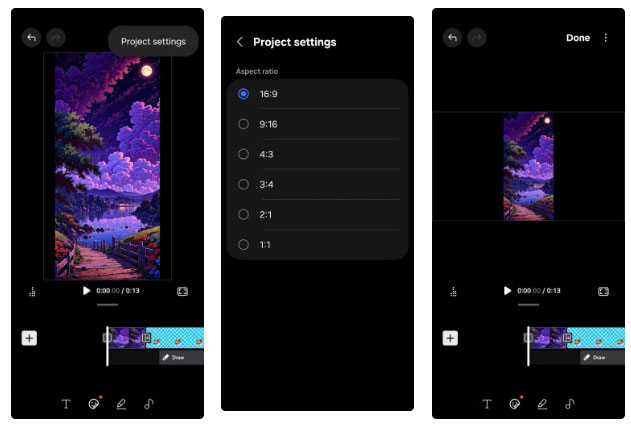
In Samsung's Studio app, tap the three-dot icon in the upper-right corner and go to Project settings . There, you can choose from popular aspect ratios like 1:1, 9:16, 16:9, or even 2:1. The app will automatically adjust your video by adding black bars on the sides or at the top and bottom to fit the video.
2. Add, trim, and rearrange clips
Once you have your aspect ratio set, you can start cutting, splicing, and rearranging your clips. If you have used any video editor before, this will be pretty familiar.
To trim a clip, tap on it in the timeline to select it. You'll see white handles pop up at either end. Drag them inward to trim away any parts you don't need from the beginning or end. If the part you want to remove is in the middle, you'll need to split the clip first.
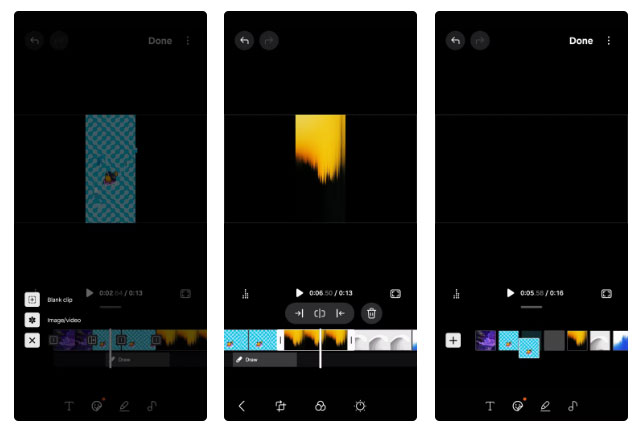
Drag the playhead to where you want to cut it, then tap the split icon to split the clip into two parts. You can then delete the part in the middle or drop a new part in the middle. You can also tap the trash icon to delete a clip entirely.
3. Edit clips and add smooth transitions
Adding transitions between clips is an easy way to make your video more engaging. Once you have your clips trimmed, arranged, and in the right order, you can add some smooth transitions to tie everything together.
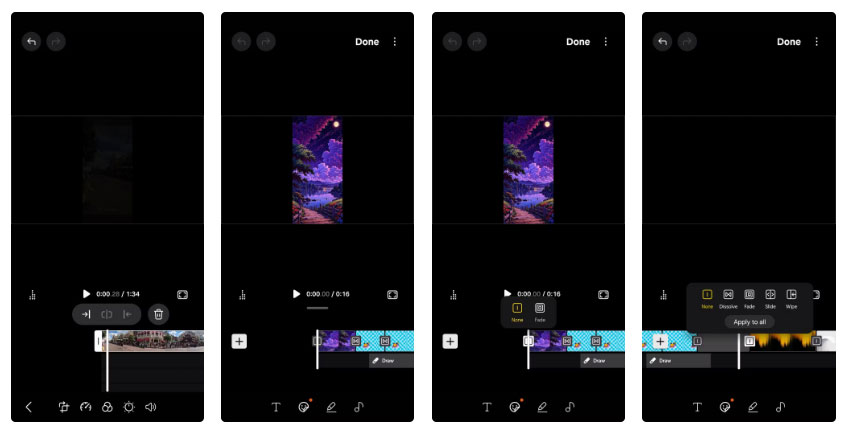
To add a transition, tap on the little icon that appears between two clips on the timeline. In the menu that opens, you'll see different transitions like Fade , Slide , Wipe , etc. You can preview each one by tapping on the options, and when you select one, it will be applied immediately. If you want things to be consistent, there's also an Apply to all option to add the same transition across all clips.
4. Add text, stickers and drawings
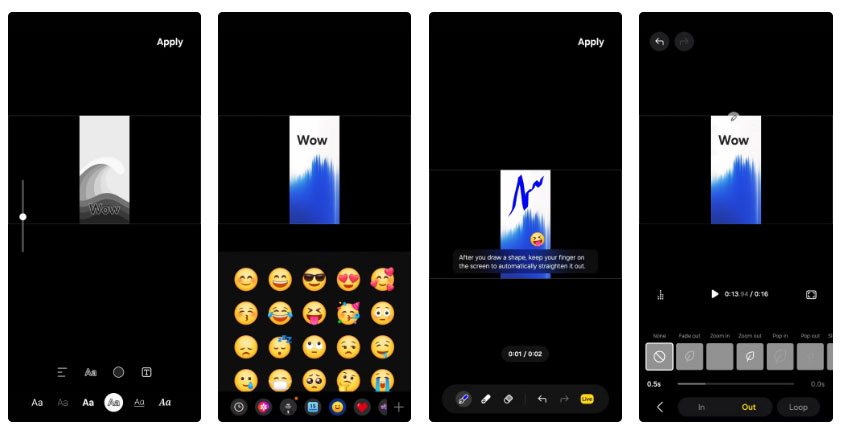
In addition to basic editing, you can add text, stickers, or drawings to your clip to make it more engaging. To get started, tap the clip you want to edit and look for the text, sticker, or pencil icon.
Tap the Text tool to add a caption, title, or label anywhere in your video. This tool is great for calling out important moments or providing a little context. You can adjust the font style, size, alignment, and color to your liking.
5. Add background music to video
Adding background music can really enhance your video and make it much more interesting. In Samsung Studio, tap the music icon in the bottom right corner. Then select Soundtrack to browse music from Samsung's built-in library, or tap My music if you want to use a song or voice recording from your phone's storage.
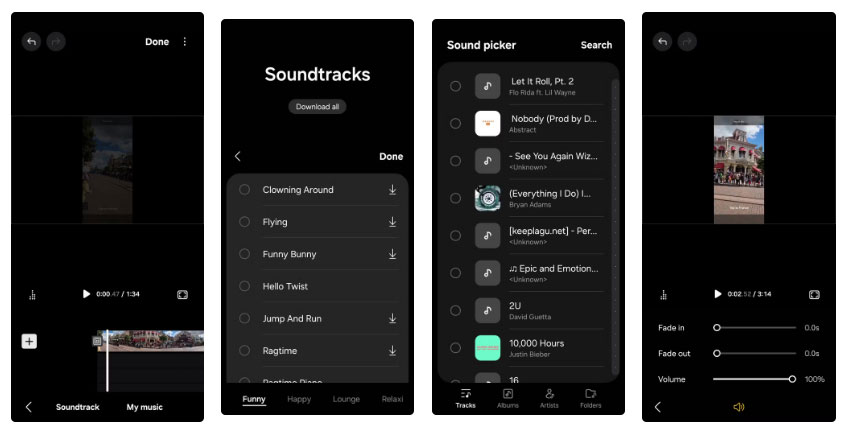
In the Soundtrack menu, you'll find a selection of Samsung tracks organized into categories like Funny , Happy , Lounge , and Upbeat . Tap any track to download and preview it. If it looks good, tap Done to add it to your project. Once it's in the timeline, you can tap on the music clip to adjust the volume or add fade-in and fade-out effects for a smoother feel.
You can trim tracks to fit the length of your video or layer multiple audio files if needed. Tap a music clip in the timeline to apply fade in and fade out effects. You can also adjust the volume to make sure it doesn't overwhelm dialogue or important audio in your video.
FAQ
What should you know about 1. Choose your preferred aspect ratio?
Before you start editing, you should choose the right aspect ratio depending on where you plan to share your video. For example, if you shot your video horizontally but want to post it as an Instagram Reel, you'll need to convert it to vertical so it looks good.
What should you know about 2. Add, trim, and rearrange clips?
Once you have your aspect ratio set, you can start cutting, splicing, and rearranging your clips. If you have used any video editor before, this will be pretty familiar.
What should you know about 3. Edit clips and add smooth transitions?
Adding transitions between clips is an easy way to make your video more engaging. Once you have your clips trimmed, arranged, and in the right order, you can add some smooth transitions to tie everything together.
What should you know about 4. Add text, stickers and drawings?
In addition to basic editing, you can add text, stickers, or drawings to your clip to make it more engaging. To get started, tap the clip you want to edit and look for the text, sticker, or pencil icon.
Related Articles
 7 Top AI Video Editors on Mobile: Best Options Compared9 minutes read
 How to Adjust Video Audio on Camtasia Studio10 minutes read
 Visual Studio Code Review: Microsoft's Cross-platform Code3 minutes read
 Top 4 Free Video Editors for YouTube7 minutes read
 How to Use Hidden Video Editor on Windows 119 minutes read
 How to Use Video Editor on Windows 109 minutes read
Reader Comments 0
Sign in with email or Google to join the discussion.