Instructions on how to install Ubuntu
Instructions on how to install Ubuntu. Ubuntu is free and open source software, meaning users are free to run, copy, distribute, research, change and improve the software. This is why IT people or software developers often use welding systems.
If you are bored with Windows or Mac, or you are an IT hobbyist, switching to Ubuntu will help you satisfy that. Ubuntu is a computer operating system based on Debian GNU / Linux, a popular Linux distribution. The purpose of Ubuntu includes providing a stable operating system, updating it for ordinary users, and focusing on usability and ease of installation. In addition, Ubuntu is free and open source software, which means users are free to run, copy, distribute, research, change and improve the software. This is why IT people or software developers often use this operating system. In this article, TipsMake.com will guide you through the basic steps to install Ubuntu, please follow along.

1. Prepare before installing Ubuntu.
Similar to when installing windows, to install Ubuntu we need to have the Ubuntu installer ISO file and a 4Gb USB or higher.
- Link to download ISO Ubuntu: https://www.ubuntu.com/download
- Rufus software creates USB boot: https://rufus.akeo.ie
How to create Ubuntu bootable USB as follows:
You plug the USB into the computer, then open the software Rufus and do the following steps:
1 - Select the USB that you connect to the computer to create Boot.
2 - Select the Ubuntu ISO file that you have prepared.
3, 4 - You default to the picture.
5 - Name the USB.
6 - Choose the default FAT32, if the ISO file is larger than 4GB, select NTFS.
7 - Select the default as shown.
8 - Click Start to start creating USB boot.
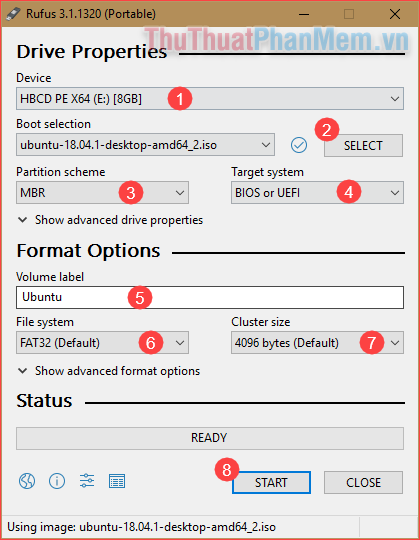
After clicking Start if a message appears, click Yes and OK.
2. Steps to install Ubuntu
Step 1 : You plug the USB boot created above into the computer and then restart. During the reboot process, choose BIOS and select boot from USB or CD.
List of BIOS access keys by mainboard:
- ASRock mainboard - Press the F2 key
- ASUS Mainboard - Press DEL, Print or F10 key .
- GIGABYTE Mainboard - Press the Del key to enter the BIOS Setup Utility.
- Intel Mainboard - Press F2 to enter BIOS Setup Utility.
- MSI (Micro-Star) Mainboard - Press the DEL key to enter the BIOS Setup Utility.
List of BIOS access keys by model:
Laptop SONY VAIO
- To get into the BIOS when restarting the computer you need to press the Vaio Assist key
Laptop HP - COMPAQ
- On some HP models, you will need to press F10 to enter the BIOS.
- To get into BOOT when restarting the computer you need to press and hold the F9 key
ACER Laptop
- To get into BOOT when restarting the computer you need to press and hold the F12 key
- To get into the BIOS when restarting the computer you need to press and hold the F2 key .
ASUS laptop
- To get into the BIOS when restarting the computer you need to press and hold the F2 key
- To get into BOOT when restarting the computer you need to press and hold the ESC key
LENOVO THINKPAD Laptop
- To get into the BIOS when restarting the computer you need to press and hold the F2 key
- To get into BOOT when restarting the computer you need to press and hold the F12 key
DELL Laptop
- To get into the BIOS when restarting the computer you need to press and hold the F2 key
- To get into BOOT when restarting the computer you need to press and hold the F12 key
Step 2 : After booting into USB, we will see the Ubuntu installation interface as shown below:
Here you have 2 options: Try Ubuntu (trial) and Install Ubuntu (install). We will choose Install Ubuntu to install.

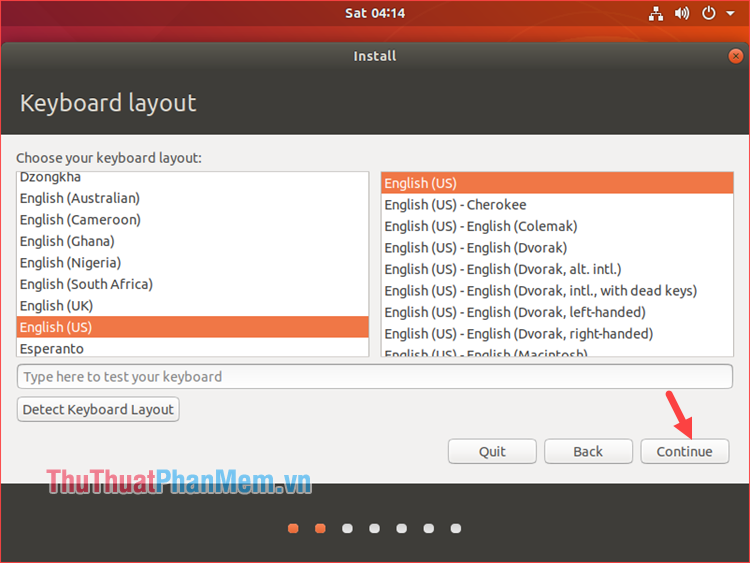
Step 3 : We choose the keyboard language for Ubuntu then click Continue .
Step 4 : You can choose either of the following options:
- Normal installation : Normal installation with full software such as: web browser, utilities, office, games, and media player.
- Minimal installation : shortened installation includes only browser and utilities.
If you want to install quickly, select Minimal, if you want to fully, then select Normal.
Also, the two options under Other options are installing updates and third party software, so you can uncheck to save time during the Ubuntu installation process.

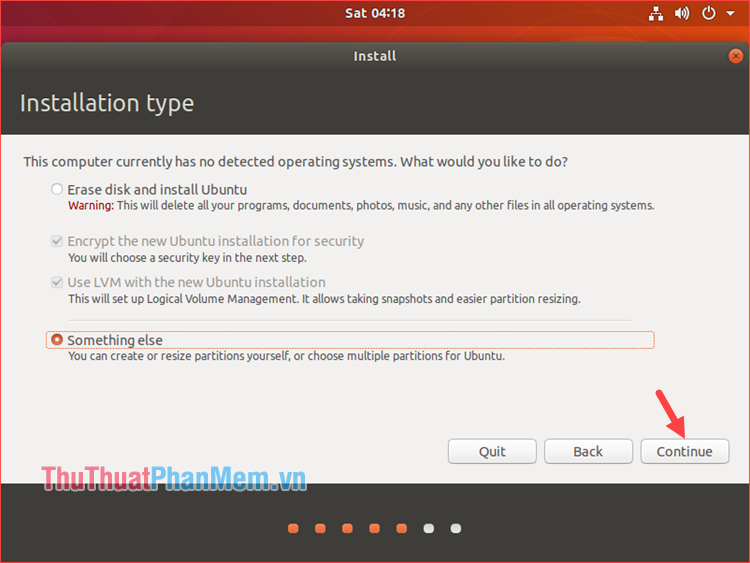
Step 5 : At the Installation Type interface, you will pay attention to 2 options:
- Erase disk and install Ubuntu: This option you need to pay attention, it will wipe all data in the hard drive when installing. Only select when your hard drive no longer has important data. If your computer has Ubuntu installed, you can select this option to install Ubuntu.
- Something else: If you want to install Ubuntu together with windows, you need to Check this option to create an Ubuntu installation partition.
Click continue to continue.
Step 6: After selecting Something else , the interface to create the Ubuntu installation partition appears. You can create the following partition type:
Swap Partition : This is the RAM partition for Ubuntu, you should choose the size of the Swap partition to double the amount of RAM in your computer.
/ Partition : This partition is the repository of Ubuntu data, we will install Ubuntu into this partition.
How to create a partition as follows:
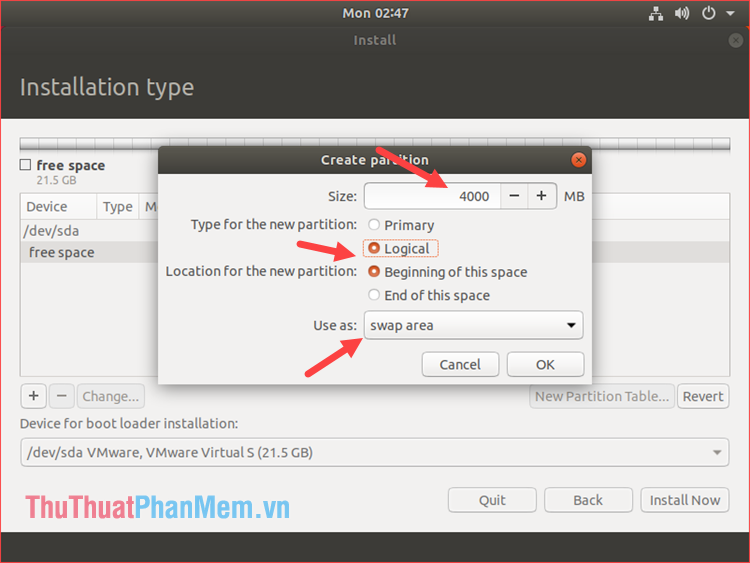
To create a Swap partition, click on the Free Space partition and then click the plus sign.
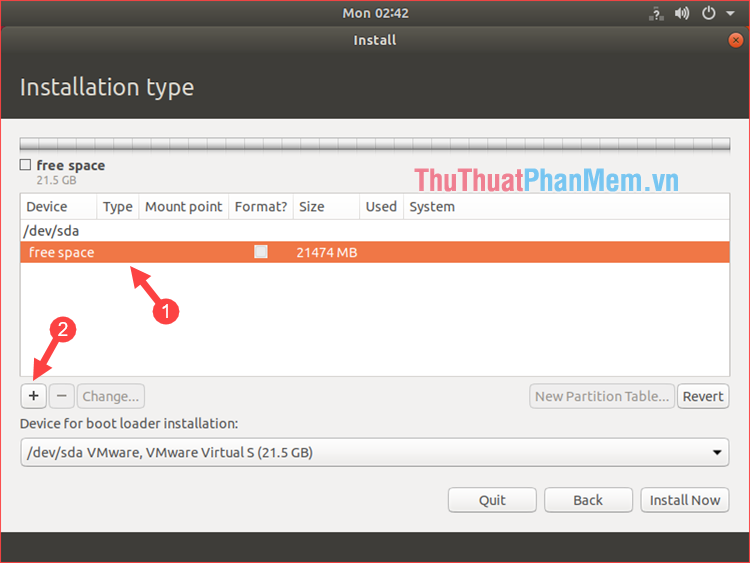
A small window appears, enter the amount of Ram in the Size box, then select the partition type is Logical , the Localtion for the new partition you choose Beginning of this space and the Use as select Swap area then click OK .
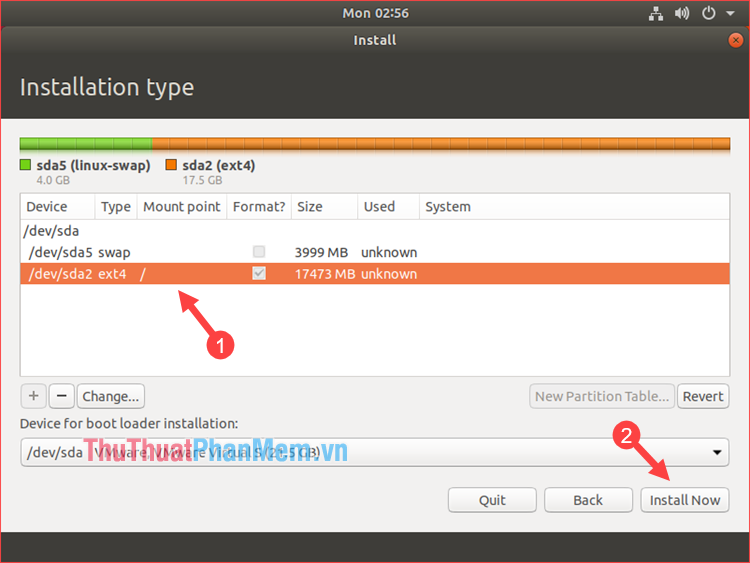
After creating the swap partition, we continue to click on free space and click the plus sign to create the partition /
You choose according to the picture below, Use as you default to Ext4 journaling file system , Mount point you choose /
Finally click OK.

Step 7 : After creating 2 partitions, Swap and /, select the partition / and click Install now to install Ubuntu. If a message appears, click Continue.
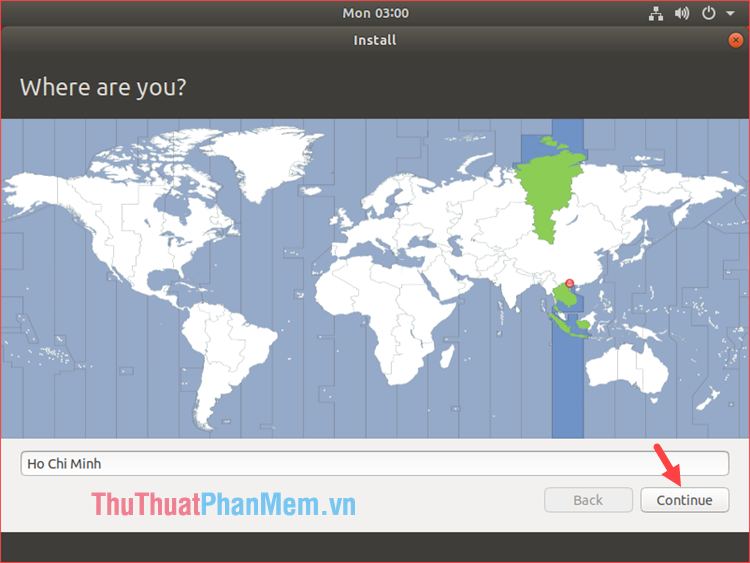
Step 8 : Select the Vietnamese time zone, then click Continue:
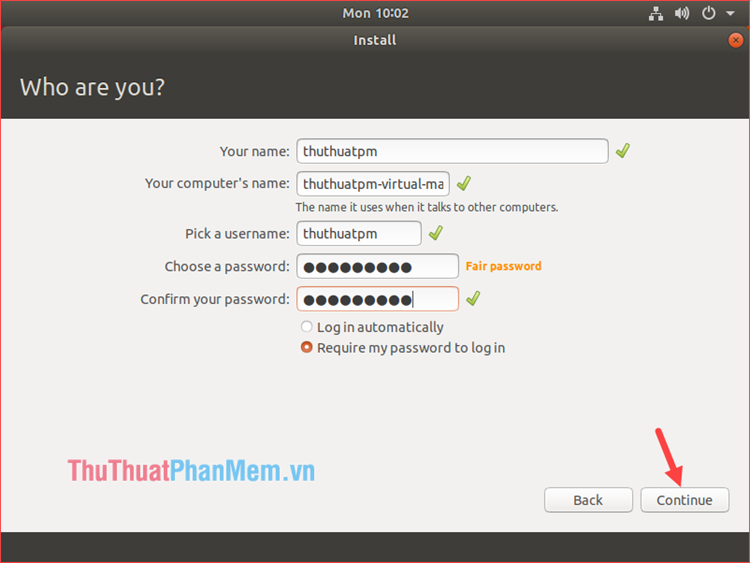
Step 9 : Enter your username and password and click Continue
Now our job is to wait for the Ubuntu installation process to complete and reset the computer is done:

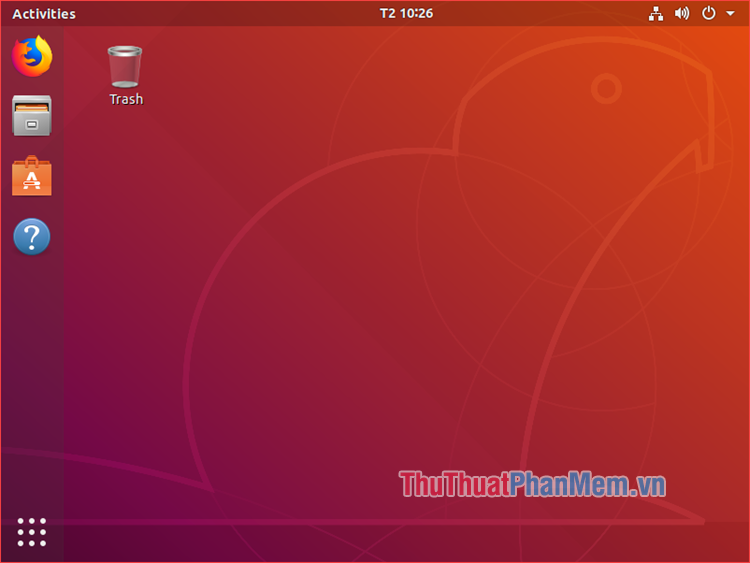
And here is the Desktop interface of the Ubuntu operating system:
Above is a detailed guide on how to install Ubuntu, hopefully the article will help you to know how to install Ubuntu easily. Good luck!