Instructions for running Windows 11 on a Mac with Parallels 17
As planned, the stable version of Windows 11 will officially launch at the end of 2021. But for now, the preview release is available and available for users to test.
Table of Contents
If you're using a Mac (including the M1 version) and want to experience Windows 11 to the fullest, the familiar virtualization tool Parallels 17 will help you do this easily.
What are the requirements to run Windows 11 on a Mac?
Parallels 17 is a popular virtual machine application that supports using Windows 11 releases on macOS Monterey. The main version of the app costs $80, but if you already have an older version, just upgrade for $50. Visit the Parallels website here to purchase the relevant version.
On Intel Macs, you can use Windows 11 after installing the Windows 10 Insider Preview build. To do this, you need a Microsoft account signed up for the Windows Insider Program.
On the other hand, the Mac M1 can essentially run Windows software, but won't be able to run the standard version of Windows 11. So you need to install Windows 10 on ARM first and then move to Windows 11.
In fact, there are many ways for you to run Windows on your Mac. For example, it is possible to use Boot Camp, but this method requires the system to dual-boot Windows 11 with macOS, which consumes a large amount of storage space, and only uses one operating system at a time. point. Whereas with a virtual machine application like Parallels, you won't have to dual-boot or reboot your Mac every time you use Windows 11.
Install Windows 11 in Parallels on Mac
First, you need to download and install Parallels 17 (or later) on your Mac.
Make sure you have allowed Parallels Desktop to access your Mac's Desktop, Documents, and Downloads folders.
Open the Parallels app and run the built-in virtual machine wizard. Then, click 'Get Windows 10 from Microsoft' and press the 'Continue' button.

(Note: Mac M1 users need to download a copy of Windows 10 on ARM Insider Build here and install the VHDX file using the Parallels installation wizard.)
Select 'Download Windows 10' and click the 'Continue' button.

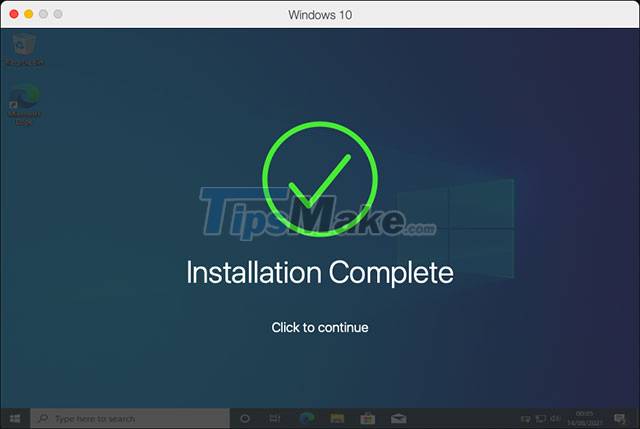
The wizard will download the latest build of Windows 10 and install it in minutes.

After completing the installation, click on 'Click to Continue'.
In the Windows 10 virtual machine, type 'Windows Insider Program Settings' in the search box and press Enter.
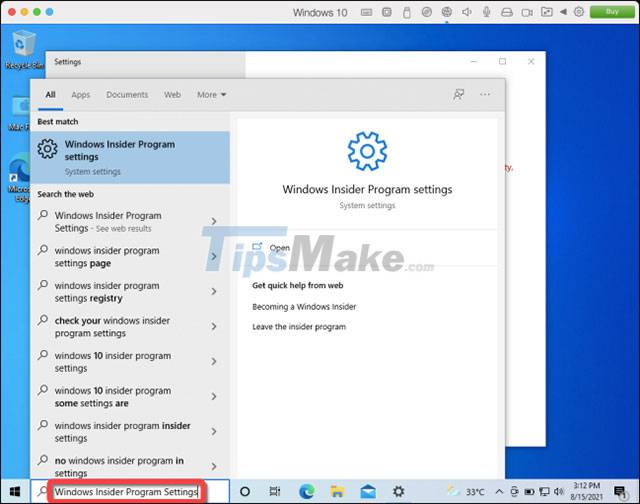
Click the 'Get Started' button in the Windows Insider Program section of the Settings app.

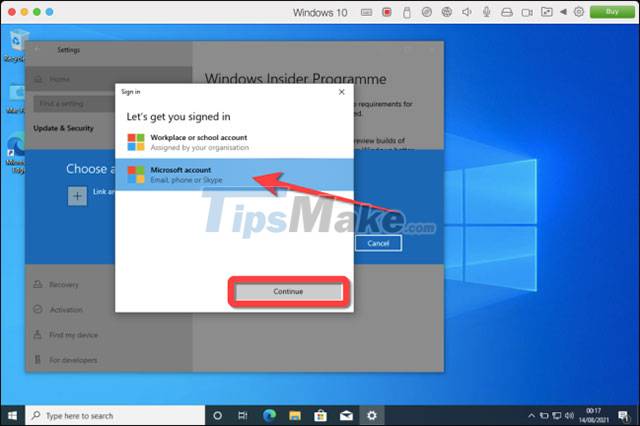
Then, link the Microsoft account you signed up for in the Windows Insider Program.
You should now see the Release Preview Channel available for Windows 10 Insider Program accounts. Next, you will need to edit a few specific Registry keys and switch from Release Preview Channel to Dev Preview Channel.
Open Registry Editor in Windows 10 with Admin privileges. After allowing it to make changes, you can navigate to the following key, or copy-paste it into the Registry Editor's address bar:
HKEY_LOCAL_MACHINESOFTWAREMicrosoftWindowsSelfHostUISelection
From the right hand pane, double-click the 'UIBranch' key and enter 'Dev' in the 'Value data' field.

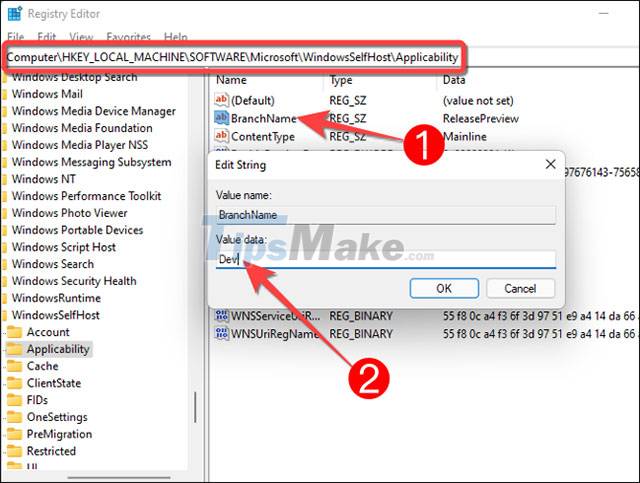
Next, navigate to or copy-paste the following key into the Registry Editor's address bar:
HKEY_LOCAL_MACHINESOFTWAREMicrosoftWindowsSelfHostApplicability
From the right hand pane, double-click the 'BranchName' key and enter 'Dev' in the 'Value data' field.
Before proceeding, shut down Windows 10 and check that Parallels is assigned at least 4GB of memory. To check, click the gear-shaped 'Configuration' icon in the upper-right corner of the Parallels window.

Click the 'Hardware' tab and select 'CPU & Memory' to see the memory assigned. Change the value to at least 4GB if the automatically specified value is less than that.

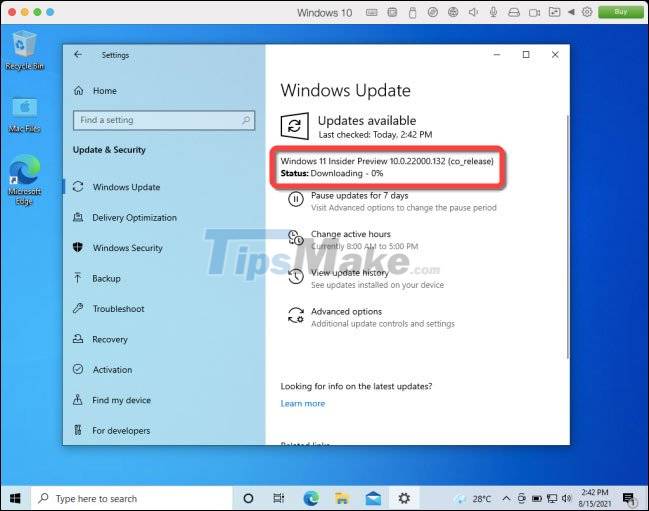
Next, restart the Windows 10 virtual machine and go to Windows Update to fetch new updates. The download of the Windows 11 Insider Preview build will begin.
Once the Windows 11 installation is complete, restart Windows to apply the changes.
It's all as simple as that! Hope you are succesful.
Was this article helpful?
Your feedback helps us improve.
Related Articles
 Parallels Desktop 18 is out and ready for macOS Ventura3 minutes read
 INSTALL WINDOWS UBUNTU ON MAC M1 M2 WITH PARALLELS COPYRIGHT2 minutes read
 Install Windows on Mac with Parallels Desktop 94 minutes read
 Parallels - Download Parallels here3 minutes read
 Run Windows on a Mac using Parallels Desktop 156 minutes read
 Boot Camp brings XP to a Mac4 minutes read
Reader Comments 0
Sign in with email or Google to join the discussion.