Instructions for overclocking graphics cards for better gaming performance
If you want your computer's graphics card to have a little extra power without spending a lot of money on a new model, overclocking the GPU is a simple way to do this. And it is really simple especially on Windows computers. Although this process takes a long time, it does not require any specific knowledge or advanced skills..
If you want your computer's graphics card to have a little extra power without spending a lot of money on a new model, overclocking the GPU is a simple way to do this. And it is really simple especially on Windows computers. Although this process takes a long time, it does not require any specific knowledge or advanced skills.
Warning: Although the risk level is quite low, it is possible that overclocking the GPU may damage other components in the computer, so be careful when performing overclocking the graphics card.
Before starting, you need to prepare something like this:
- A computer running Windows: Although it is possible to overclock GPUs on macOS and Linux, Windows is still the ideal place to play games.
- A discrete graphics card: PCI-Express-based video cards are still the main means of playing high-end PC games. This tutorial will work on AMD and NVIDIA mobile graphics cards on laptops, but you should not overclock those machines, because laptop heat dissipation is difficult. And should not overclock on Intel graphics or other integrated systems.
See also: Which graphics card is good for gaming laptops
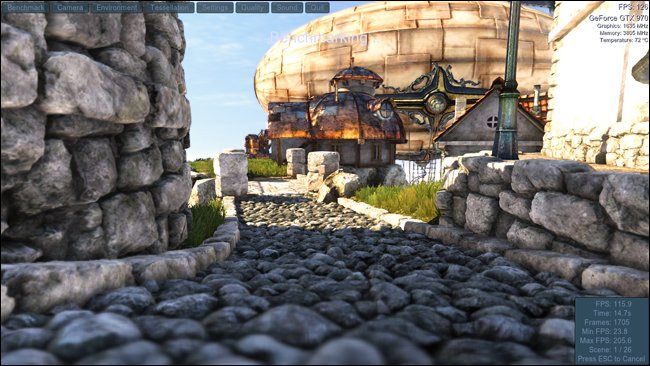
- Performance measurement tool : You need a tool to push the graphics card to its fullest extent to check overclocking stability. You can use the built-in performance measurement tools in PC games or other programs designed to measure performance. This will use the Unigine Heaven tool because it displays statistics such as clock speed and GPU temperature during running, very handy if there is only one screen.
- MSI Afterburner : This is a tool for overclocking Windows-based GPUs. But don't let its name fool you, although the software is provided free of charge by MSI graphics card manufacturers, but you don't need an MSI card, it still works on NVIDIA or AMD GPUs.
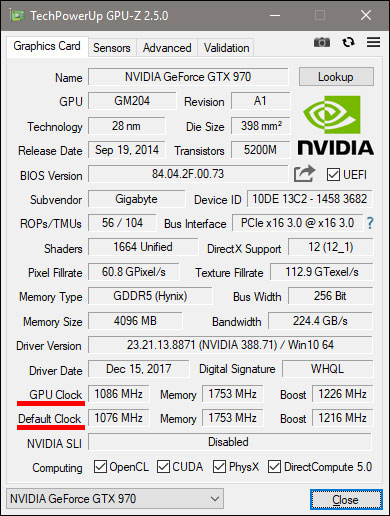
- GPU-Z : Another major element of computer overclocking. It is best to open it while performing overclocking to be able to see the results in real time.
Once you've installed all of the above tools, follow these steps to overclock your graphics card to improve gaming performance.
Step 1 : Search your graphics card information on Google
Each graphics card is different and is very complicated. Your overclocking results will be specific to your computer and GPU. You won't get the same result for people with ASUS GTX 970 Strix graphics card, and must perform the overclocking process to see if your graphics card can handle it.
Ideally, users should check and understand the information about their computer hardware as much as possible. Perform a search overclocking your graphics card on Google and see the results of others who have received it for reference.
For example, this article will perform overclocking an NVIDIA GeForce GTX 970 graphics card, famous for memory problems, but this really does not affect overclocking it. Perform a search for overclocking GTX 970 and find a lot of results, even have a few videos on YouTube and refer to these instructions before self-executing very useful. Note, you should also check if the computer runs the video driver of the latest graphics card.
Step Two: Evaluate the original configuration performance
Before performing any overclocking operation, run the performance measurement tool and set the graphics card to a high level so that you can push the GPU to its full power. (Check GPU-Z while running the performance measurement tool or later to make sure it pushes the card up to 100% - if not, set up graphics in the performance test program.)
In this tutorial, we will use three performance testing tools on the original GTX 970 graphics card before making changes in the Afterburner application, resulting in:
- Shadow of War benchmark: average number of frames per second: 40.9; Maximum: 79.9 and a minimum of 24.2.
- 3D Mark Sky Diver: graphical points: 33683, physical points: 7814 and combined points: 16826.
- Heaven: Total points: 1381, average number of frames per second is 54.8, 123.6 maximum and 24.5 minimum.
Save your results in any format available. (Some performance measurement tools in the game do not have the option to save the results so you can only record them.) If using Heaven, please note that in order to actually record the test process, you need to Click the " Benchmark " button on the upper left corner.
Step 3 : Use Afterburner to increase the GPU clock and voltage
We will use Afterburner overclocking tool to increase GPU voltage and clock. The clock is the internal speed at which the GPU core processor runs itself and the voltage is the amount of electricity in volts that the overall card is set to get from the computer's power source.
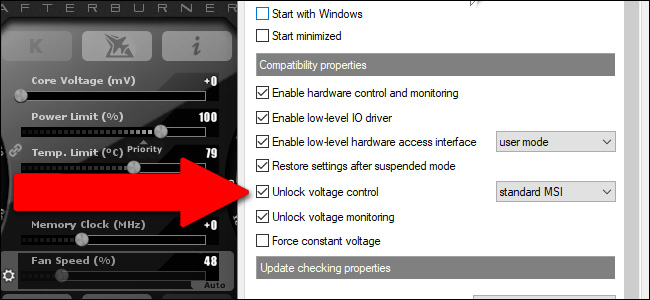
Changing either of these values can make your GPU and computer unstable. The goal is to gradually increase the clock and voltage until maximum stability is achieved. Note that in the latest version of Afterburner, you may have to click the Settings button (gear icon) and turn on the " unlock voltage control 'option to appear the adjustment slider.
Record the original settings or you can capture the computer screen in case you want to return to the original settings.
Change the first clock, raise it to 10 to 20 MHz, then apply the settings with the bookmark button. Resist the rapid increase in clock speed with large pieces, otherwise the computer will completely collapse and stop the process abruptly.
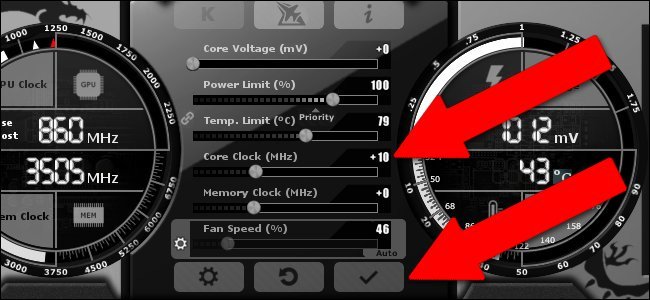
Check GPU-Z to make sure that the GPU is using the new core pulse value. After applying changes in Afterburner, GPU-Z will display the default "active" pulse and new overclocking values in the "Default Clock" and "GPU Clock" fields.
Now run the performance test tool, you should pay attention to the values and FPS points. If the results are good, repeat the above process and run the performance test tool until you see one of the following situations: 1) faulty performance testing program, 2) GPU driver malfunction , or 3) begin to see strange components displayed in the graphics of performance testing tools such as black or one-color blocks. This is the result of unstable overclocking.
When this happens, you can do one of two things: return to the last MHz level the computer is not affected, and perform a slight overclock or can increase the GPU voltage to allow it to stay at even even higher. Increase it to 5mV and rerun the test tool again, hoping there will be no strange signs and everything will be stable again.

Keep repeating this process, increasing 10MHz into the core pulse until you see the crash performance measurement points or tools, increase the 5mV (millivolts) for the processor, rerun the test tool and see it. Is it stable.
Note that if the voltage is increased, it also leads to an increase in GPU temperature, so be aware of the temperature. The Heaven tool is especially useful in this because it displays GPU speed and temperature by default. The GPU will automatically run the fan to cool down if necessary, but having a maximum set beforehand will trigger a shutdown if it exceeds that level. Even when overclocking, you should not exceed that threshold so try to keep the GPU at least a few degrees below this limit, this value is displayed as " Temp. Limit " in Afterburner. You can adjust beyond the manufacturer's level, but will damage the graphics card.
Once the level has been reached, it is impossible to adjust the pulse and voltage anymore because the temperature is too high or because of a collapse phenomenon, return to the clock value, the final stable voltage. This is your last overclock.
Step 4: Perform stress test for the last overclock
This is the result of graphics card overclocking: the clock reaches a value of more than 210MHz and the voltage increases 5mV. This is the final performance test value:
- Shadow of War benchmark: average number of frames per second 44.3, maximum 72.2 and minimum 24.1.
- 3DMark Sky Diver: graphics points: 33797, physical points: 7808, and the combined score is 16692.
- Heaven: total score: 1512, the number of frames on the wire averages 60.0, 134.3 maximum and 27.3 minimum
When you find your "final" installation, you should use Heaven and run it for an hour or two. This will check the card's stability for longer game sessions. The long-term use will make card ants work more, accumulate high temperatures. If you run the benchmark for a long time, you see an unstable phenomenon that can return to the previous overclocking level so that you can play long game sessions.

When running Heaven successfully for several hours without any problems, this means you have achieved a stable overclocking level.
Check memory clock speed, manage fans and overclocking records
With Afterburner, you can increase the GPU memory clock. This can increase performance, but implementation is more difficult than overclocking the processor and increasing the voltage, so unless you're willing to spend hours to improve performance by 1-2%, otherwise ignore it. This process is similar to the above process: increasing slowly with small amounts, checking, repeating the process, returning to the previous level if not stable.
In addition, Afterburner can adjust fan speed on GPUs but the "auto" mode by default can be the best value so you don't need to change. The GPU will automatically increase or decrease the fan speed when needed thanks to the temperature sensor.
Once you're done editing everything in Afterburner, look at the lower right corner of the interface. Make sure the lock icon is "unlocked" (just click if it is not open), then click the " Save " floppy option.
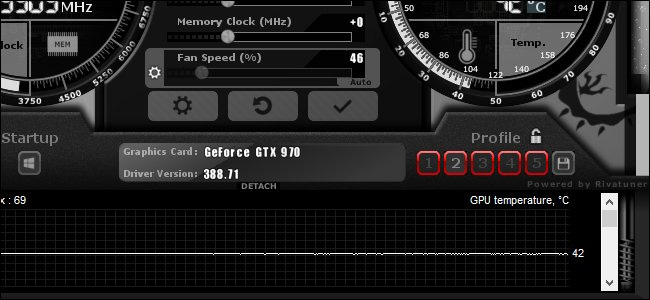
When the profile icons are numbered flashing red, click "2". Reset the settings to default, then click the save button, then click "1". This way you can easily apply and uninstall overclocking when you start playing and when finished.
This is also helpful if you encounter problems. When starting to play the actual game, be aware of any problems that occur because different games will react differently to overclocking. Most games can work well, but there may be a 'dislike' overclocking game and problems or other problems. Of course, some games can automatically crash regardless of the changes you made in the GPU.
If in trouble, just download the "1" profile and play without overclocking. But if you've done the right stress test, you'll see that game performance increases significantly.
I wish you all success and have fun playing games!
See more:
- Overclock CPU, GPU and RAM easily and safely
- Things to know about overclocking computers
- Instructions for overclocking the CPU