Everything you need to know about overclocking your Raspberry Pi 5
Although the Raspberry Pi 5 is 2 to 3 times faster than the Pi 4, it can be overclocked for even better performance..
Discover how to overclock your system on the Raspberry Pi 5 chip to get that extra speed boost for free.
Why overclock the Raspberry Pi 5?
The Raspberry Pi 5's default CPU speed of 2.4 GHz is significantly faster than the Pi 4's 1.8 GHz, delivering significantly faster performance for many tasks. Its VideoCore VII GPU (graphics processor) also runs at 800 MHz by default, compared to the Pi 4's VideoCore VI at 500 MHz.
However, just like overclocking the Raspberry Pi 4, these speeds can be increased by overclocking the four CPU and GPU cores of the Pi 5 SoC. This will help improve performance for processor-intensive tasks like using a Raspberry Pi as a Plex media server or trying to run a large language model for an AI chatbot.
The downside to overclocking is that it can shorten the life of the Pi 5. Using excessive voltage can even void the warranty. So do it at your own risk - especially if pushing it to higher speeds.
Keep your Raspberry Pi 5 cool!
To enable SoC (system-on-chip) overclocking of the Raspberry Pi 5, you need to keep its temperature below 80°C (176°F). Once that level is reached, the SoC will automatically activate a safety mechanism that starts throttling the CPU cores, reducing their speed until the temperature drops. If the temperature reaches 85°C (185°F), maximum throttling will be activated, including the GPU.
While the Raspberry Pi 5 is actually cooler than the Pi 4 when running common desktop tasks, under heavy load it needs some help with thermal control. This is why the Raspberry Pi company launched the Pi 5 with some optional extras.
The official Raspberry Pi 5 case has a built-in cooling fan that you connect to the JST port, labeled 'FAN', on the Pi 5 board. For even more powerful cooling, the Active Cooler accessory – mounted on the side on the Pi 5 board – there is both a heatsink and a fan.

How to overclock Raspberry Pi 5
Like other Raspberry Pi models running the official operating system, Raspberry Pi OS, you can change the clock speed of the Pi 5's SoC by modifying the config.txt boot settings file .
Before you get started, it's best to update and upgrade your system. Open a terminal window by clicking on its icon in the top menu bar or via Menu > Accessories > Terminal and enter:
sudo apt update && sudo apt upgrade -yThis process may take some time to check for the latest software packages and then update the system.
Install monitoring tools
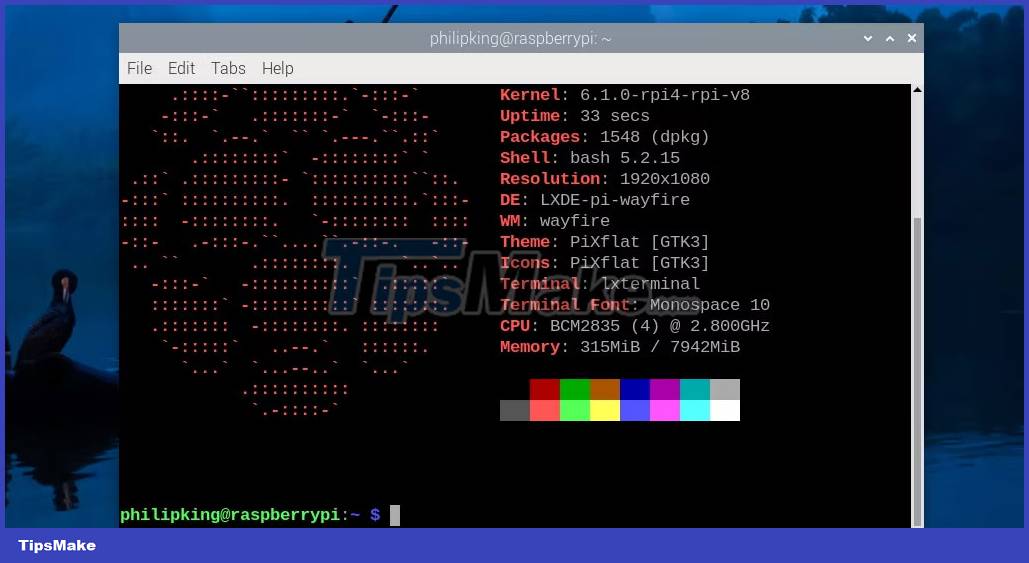
Before overclocking the Raspberry Pi 5, we will install some useful tools so we can compare performance and temperatures before and after. First, install the Neofetch system information tool:
sudo apt install neofetchTo view current system information, run:
neofetchIt will show the default CPU speed of Pi 5 as 2.4 GHz. Next, install the "stress" workload creation tool:
sudo apt install stressTo install Stressberry's stress test tool in Raspberry Pi OS "Bookworm", you first need to create a virtual Python environment (called "overclock"), change directory into it and activate it:
python -m venv overclock cd overclock source bin/activateYou can then install Stressberry:
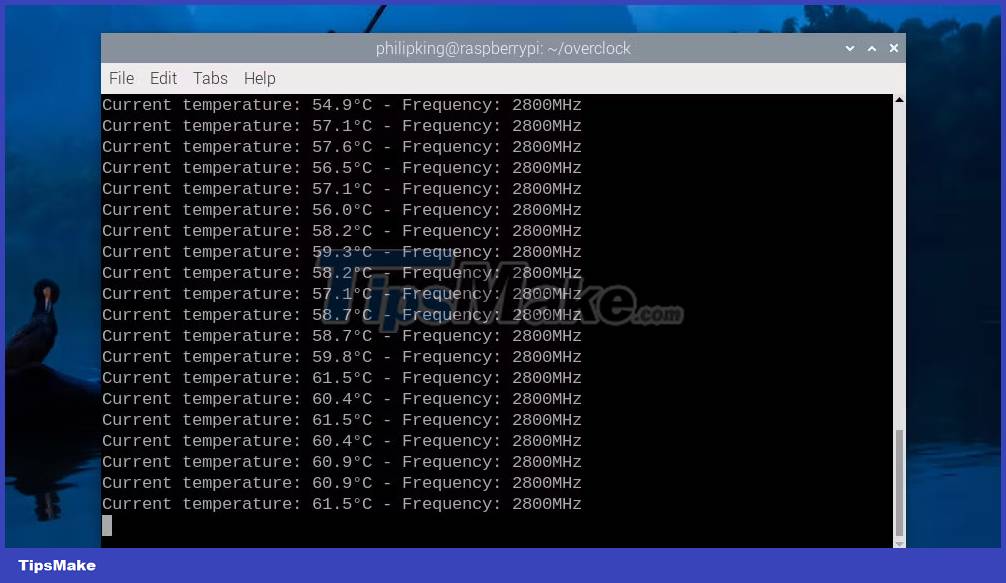
pip3 install stressberryNow, let's perform an initial stress test at the default clock speed to compare with the overclocked results later. Run this command to test 100 seconds using all 4 CPU cores:
stressberry-run -n "My Test" -d 100 -i 30 -c 4 mytest1.datAfter waiting for the base temperature to stabilize (which may take a while), the stress test will run and each line will display the temperature and current CPU frequency (in MHz), which can be up to 2400.
Edit the Config.txt file for overclocking
Now it's time to change the CPU speed settings to start overclocking your Pi 5. Open the config.txt settings file in the nano text editor:
sudo nano /boot/config.txtAdd the following lines:
arm_freq=2800 gpu_freq=900 over_voltage_delta=50000Here, the article is setting the CPU clock speed to 2.8 GHz, while increasing the GPU speed and increasing the SoC core voltage to help - you may or may not need to apply this overvoltage to make it works. Exit nano and save the settings by pressing Ctrl + X , then Y and Enter . To enable overclocking, reboot the Pi 5:
sudo rebootOnce it reboots, run the neofetch terminal command again; you will see the new CPU speed is 2.8 GHz.
Perform stress test on overclocked Pi 5
You will need to run Stressberry from within your Python virtual environment, so enable it again:
cd overclock source bin/activateThen run the same Stressberry test as before (with a different filename for the output):
stressberry-run -n "My Test" -d 100 -i 30 -c 4 mytest2.datThis time you will see the CPU reach an overclock speed of 2.8 GHz or whatever speed you have set. It will also have higher temperatures - in tests, with the Active Cooler fitted to the Pi 5, temperatures reached a maximum of 64.8°C (148.6°F), much lower than applicable Regulatory.
Some users have managed to increase the CPU speed even further, to 3GHz or a bit more and the GPU to 1GHz, but the speed can vary for each different Pi 5 board and cooling method used. If overclocking to a certain level causes your system to become unstable, you should try overclocking to a more modest level. In some cases, the Pi 5 may not even be able to boot to the desktop, usually due to not having enough power.