Instructions for completely removing the 3D Builder application on Windows 10
Windows 10 is not only added but also has other features. One of the new default applications built into Windows 10 is the 3D Builder application , designed to create, edit, and 3D print models for a 3D printer. However, although 3D printers are affordable, not everyone needs to use the 3D Builder application.
If you do not want to use the 3D Builder application, you can uninstall the application from Windows 10.

1. How to uninstall 3D application?
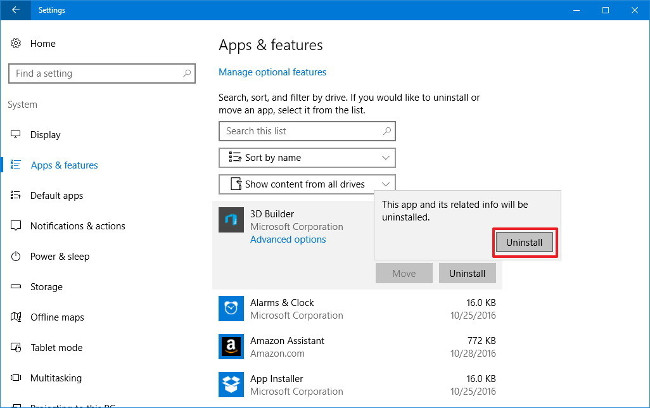
To uninstall the 3D application, follow the steps below:
1. Open the Settings window.
2. On the Settings window, click on System .
3. Next click on Apps & features .
4. Select 3D Builder .
5. Click Uninstall .

6. Click Uninstall again to confirm and complete the process.
2. Remove the 3D Builder option from the context menu
After uninstalling the 3D Builder application, the next step is to proceed to edit the Registry to remove the " 3D Print with 3D Builder " option from the context menu to prevent the application from returning to Windows 10 again. .
Important note:
Back up your computer before performing the process to prevent a bad case from happening.
1. Press the Windows + R key combination to open the Run command window.
2. On the Run command window, enter regedit then click OK or press Enter to open the Registry Editor window.
3. In the Registry Editor window, navigate to the key:
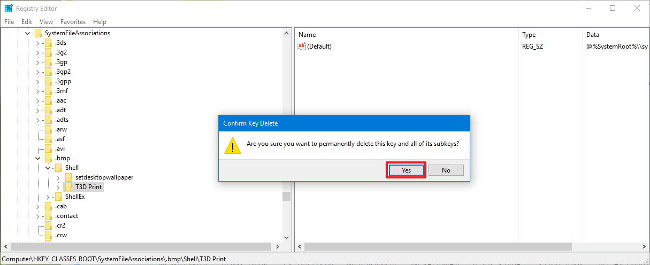
HKEY_CLASSES_ROOTSystemFileAssociations.bmpShell
4. At the Shell key, right-click the T3D Print subkey and click Delete .

5. Select Yes to confirm.

6. Next browse by path:
HKEY_CLASSES_ROOTSystemFileAssociations.jpgShell
7. At the Shell key, right-click the T3D Print subkey and click Delete .
8. Select Yes to confirm.
9. Next browse by path:
HKEY_CLASSES_ROOTSystemFileAssociations.pngShell
10. At the Shell key, right-click the T3D Print subkey and click Delete .
11. Select Yes to confirm.
12. Finally close the Registry Editor window to complete the process.
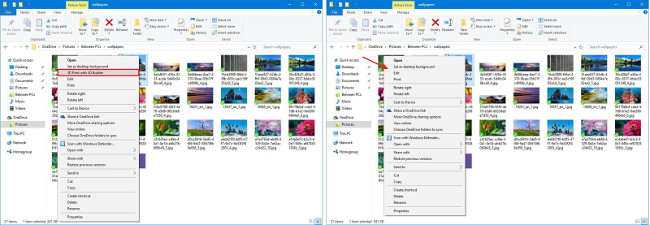
After completing the steps, when you right-click the .bmp, .jpg , or .png image file , the " 3D Print with 3D Builder " option no longer appears in the context menu.

3. How to bring the 3D Builder application back and display on the context menu?
If you want to bring the 3D Builder application back, you can reinstall the application by downloading the application on the Windows Store.
It is important to note that reinstalling the application will not bring back the T3D Print key that you deleted from the Registry.
The only way to recover the T3D Print key is to use the previous backup version or export each key before deleting these keys.
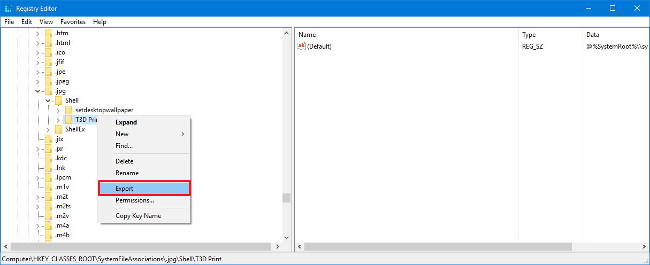
To export the T3D Print key before deleting the Registry, follow the steps below:
1. Press the Windows + R key combination to open the Run command window.
2. On the Run command window, enter regedit and press Enter to open the Registry Editor window.
3. In the Registry Editor window, navigate to the key:
HKEY_CLASSES_ROOTSystemFileAssociations.bmpShell
4. Right-click the T3D Print key and click Export .

5. Save the file with the descriptive name.
6. Navigate by key:
HKEY_CLASSES_ROOTSystemFileAssociations.jpgShell
7. Right-click the T3D Print key and click Export .
8. Save the file with the descriptive name.
9. Navigate by key:
HKEY_CLASSES_ROOTSystemFileAssociations.pngShell
10. Right-click the T3D Print key and click Export .
11. Save the file with the descriptive name.
If you want to restore the " 3D Print with 3D Buildern " option on the context menu, simply double-click each .reg file you exported above, click Yes to add the key to the Registry.
Refer to some of the following articles:
- How to enable or disable SuperFetch on Windows 10/8/7?
- Quick fix computer error Windows 10/8/7 crashes, Safe Mode can not be escaped
- Configure the "brain damage" PIN to log on to Windows 10
Good luck!
You should read it
- ★ How to choose the best website creator 2018
- ★ Instructions to uninstall the Modern application on Windows 10 / 8.1 / 8
- ★ Trick to remove the default application on Windows 10
- ★ Pros and cons of creating a website using Canva's web builder
- ★ Instructions to uninstall many applications at once on Windows 8.1