How to use Camera Continuity on MacOS Mojave and iOS 12
The Continuity Camera feature allows you to quickly add photos or documents to your Mac via the camera on your iPhone or iPad.
Table of Contents
The Continuity Camera feature allows you to quickly add photos or documents to your Mac via the camera on your iPhone or iPad.
What is Continuity Camera?
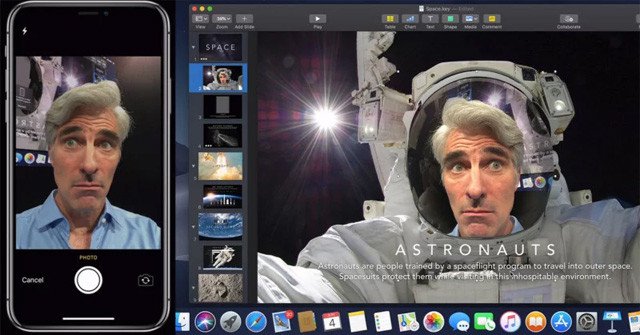
Continuity Camera is a new feature on macOS Mojave and iOS 12 that allows you to access your iOS device camera from the Mac, then directly transfer the captured image to the document you are working on the Mac. For example, you are working with Pages application and you need to take a picture, you can activate the Continuity Camera, then take a picture with your iPhone, the picture will immediately appear in the document you are working on Pages on Mac's Pages.
- The best features on iOS 12 that Apple did not officially announce on WWDC stage
- How to set multiple faces for Face ID in iOS 12
How to add photos using Continuity Camera
To use the Continuity Camera, you must be working with an editable document.
- Open documents or projects on one of the applications like Pages, Keynote or TextEdit.
- Ctrl + left mouse button or right-click or double-click on a blank space in the document ( Note: Photos will appear where you clicked)
- Click Take photo below Insert from your iPhone or iPad .
- Use iPhone / iPad to take a photo . Select the capture device by clicking on the device in the list that appears.
- Click Use photo . Photos will appear on documents / projects on Mac
- Double-click the image if you want more information.
- Enter the URL, title or add a description for the photo.
- Click Remove photo on the pop-up window if you want to delete the photo.
How to scan documents using Continuity Camera
- Open documents or projects on one of the applications like Pages, Keynote or TextEdit.
- Ctrl + left mouse button, right-click or double-click on a blank space in the document ( Note: Photos will appear where you clicked)
- Click Scan Documents below Insert from your iPhone or iPad .
- Use iphone / ipad to scan documents . Select the scan device by clicking on the device in the list that appears. Repeat the above steps to scan multiple documents.
- Click Save . Your document will be inserted into the project on a Mac.
- Double-click the scanned document if you want more information.
- Enter the URL, title or add a description for the document.
- Click Remove Image on the popup window if you want to delete the document.
See more:
- How to scan documents on iOS using Notes application
- List of devices upgraded to iOS 12
- AirDrop fixes not working on iOS 11.2
Was this article helpful?
Your feedback helps us improve.
Related Articles
 10 latest features of macOS Mojave13 minutes read
 How to fix problems when upgrading to macOS 10.14 Mojave11 minutes read
 How to fix the Continuity Camera error does not work4 minutes read
 Apple officially released MacOS 10.14 Mojave, invite you to update2 minutes read
 How to install macOS Mojave on Windows 106 minutes read
 How to change the default location for saving screenshots in macOS Mojave3 minutes read
Reader Comments 0
Sign in with email or Google to join the discussion.