How to take Panorama photos on iPhone
Panorama mode first debuted on the iPhone 4S, and it has been the iPhone's main photography feature ever since. A panorama is a collection of images seamlessly stitched together to form an extremely high-resolution composite with a wider viewing angle than is possible with a given lens.
Table of Contents
In typical Apple style, the best iPhones and the latest iOS updates make Panorama photography quick and incredibly simple. The entire process is done in the Camera app and the stitched image is automatically displayed. Here's everything you need to know to take the best Panorama photos on your iPhone.
How to take Panorama photos on iPhone
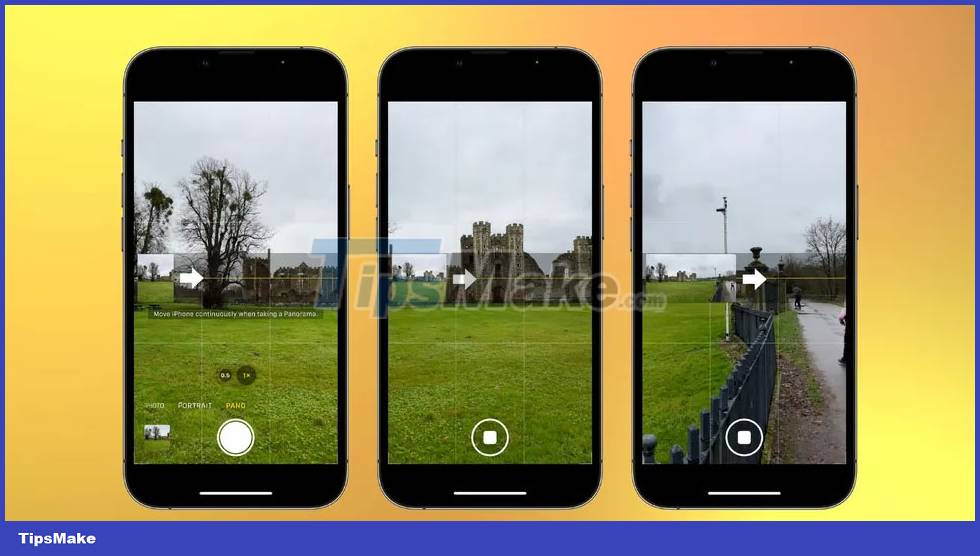
Taking Panorama photos on iPhone is extremely simple. When you select Pano mode in the Camera app, it will automatically switch to a 16:9 aspect ratio. You still get the same full-screen preview as in other photo modes, but you'll also notice a thin strip in the middle of the screen. On the left side is a small live view preview and an arrow pointing right centered on a thin yellow line.
To take a Panorama photo, press the shutter button and rotate in a clockwise motion. As you do so, the arrow will start moving as the small live view image stretches out, so you can preview what your Panorama will look like. If you tilt the camera up/down, the arrow will move above/below the yellow line respectively. You aim to keep it as centered on the yellow line as possible (will take a bit of practice). When you reach the end, you will turn about 180 degrees and the Panorama will end.
- Open the Camera app and scroll right on the mode menu to select Pano
- Frame what will be the left edge of your image and trigger the shutter to begin panning
- Pan right and keep the arrow on the yellow line, tilt the camera down/up a bit if it's above/below respectively
- When you reach about 180 degrees, Pano mode will stop and the image will display
Aspect ratio and orientation
While it's fun to capture a 180-degree Panorama, you'll have a hard time getting an attractive composition with such a huge image size. You can stop Panorama photography and display the image at any time by pressing the shutter button again. It's best to start panning a little before and finish panning a little after your intended composition. You can then refine the composition by cropping the image in the edit. This gives you more control over your layout, and it's always worth having a little extra space.
Panorama images do not necessarily have to be horizontal images. You can also tilt the camera to take Panorama photos in portrait orientation. This is useful if you're taking a photo of something tall and thin, such as a building. Simply rotate your camera 90 degrees counterclockwise. You will then start at the bottom of the subject you are photographing and tilt the camera upward to take a Panorama photo.
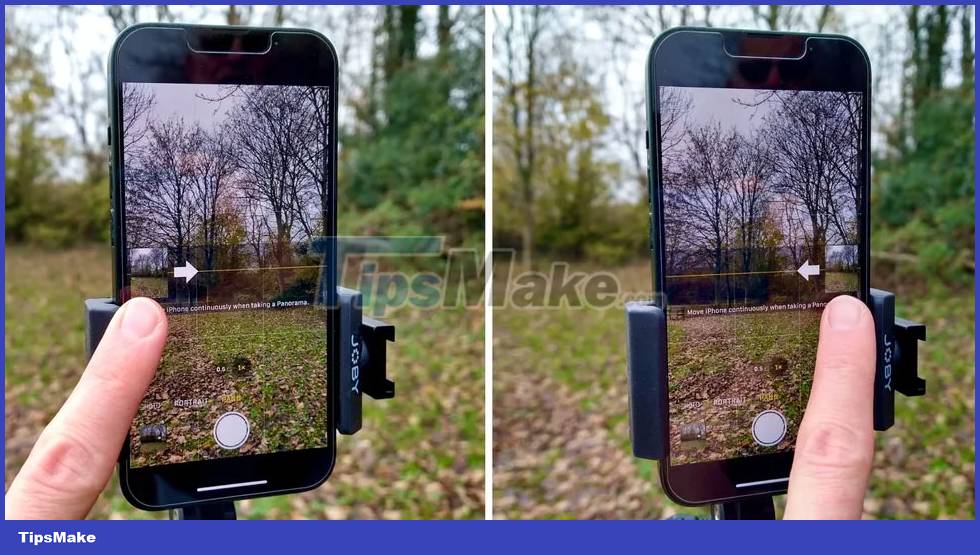
If you find it easier to rotate in a counterclockwise motion or by starting at the top of a vertical object and tilting the camera downward, you can do this by flipping iPhone 180 degrees. The image you're taking will always be in the right orientation, the only consideration is that you may have to adjust the way you hold your iPhone so it doesn't obscure the camera. However, you can avoid this by tapping the right side of the screen to move the live view to the right and flipping the arrow so it points in the other direction. You can then rotate in a counterclockwise motion.
- Tap the shutter button at any time while panning to stop Pano mode and display the image
- Tilt the camera horizontally to take vertical Panorama photos
- Tap to the right of the live view to move the small live view preview to the right side of the screen
- Now you can rotate counterclockwise or rotate vertically from top to bottom
How to take Pano photos on a tripod
Apple's optical image stabilization [OIS] and computational photography are increasingly impressive. The former feature helps reduce camera shake – important when you're shooting manually – while in Pano mode, the latter feature stitches multiple photos together so you get a sharp, evenly exposed image. and seamless. This means that the latest iPhones are extremely adept at letting you take manual Panorama photos. However, if you want to capture the sharpest, most detailed image possible, you will need to use a tripod.
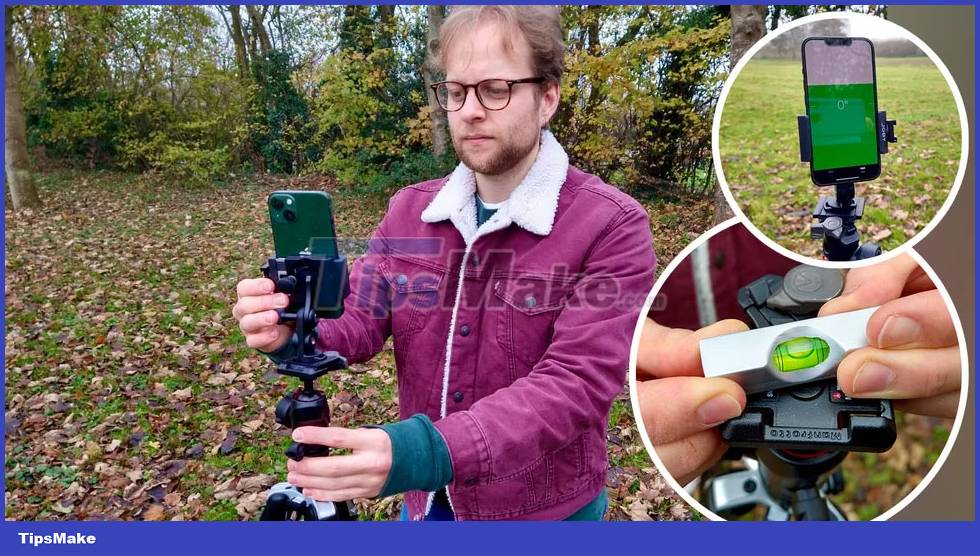
Not only does this help minimize movement, but it also helps you keep your iPhone on a flat surface. This will allow you to retain as many pixels as possible, because if you rotate in an uneven motion, it can cause patches of pixels to be lost, forcing you to crop the image. The Camera app has a built-in level so you can make sure your horizon is straight. Unfortunately, this only appears in Photo mode. But if you shoot with a tripod, your frame will stay the same, so this won't be a problem. However, when panning, having a flat horizon is not good enough. You need your rotation axis to be perfectly level so your horizon line isn't affected as you rotate.
The most effective way to do this is to remove the tripod head and place a small glass ruler on the mounting plate – right above the legs. You can then extend or retract each leg individually until the mounting plate is level. If you don't have a glass ruler, you can use the Measure app on your iPhone. When the device is in a vertical position, it can be used to straighten horizon lines.
- First, extend the tripod legs to ensure the highest possible stability
- Make sure your tripod mounting plate is level by using a glass ruler or the Measure app
- Use the level in Photo mode or the Measure app to straighten your horizon.
How to take portrait Pano photos

It's fun to get a photo of the same person in many different positions in the same image. Traditionally, this would be created by placing the camera on a tripod, taking multiple photos of the person, and manually stitching the photos together in editing software. However, you can achieve the same effect using the iPhone's Pano mode.
Place your subject on the left side of the frame and start panning. When there is a large enough gap on the right side, hold the camera as steady as possible and aim your subject at the gap. Once they are in position, continue panning. Repeat this process – moving your subject to the right side of the frame – to create variety. This takes a bit of experimentation to get accurate results, but the results are definitely worth it.
- Open the Camera app and select Pano mode
- Place your subject on the left side of the frame and start rotating until you create a gap large enough for them to move into.
- Hold the camera still until they are in the right position and continue panning.
Was this article helpful?
Your feedback helps us improve.
Related Articles
 How to capture and post Panorama 360-degree photos on Facebook8 minutes read
 How to post photos to Facebook computer 360-degree Panorama mode5 minutes read
 The super panorama makes viewers 'brain twisted'2 minutes read
 The difference between Panorama and 360-degree photos4 minutes read
 Top 4 best Panorama photography apps on Android4 minutes read
 Some tips and tricks on using Camera on iPhone (part 2)6 minutes read
Reader Comments 0
Sign in with email or Google to join the discussion.