How to specify the target feature update version in Windows 10
This guide will show you how to specify the TargetReleaseVersion version of Windows 10 you want to switch to or maintain in Windows Update, until the end of the service on Windows 10 Pro, Enterprise, or Education.
Table of Contents
The new Policy TargetReleaseVersion is available in Windows 10 version 1803 and above, allowing you to specify which version of Windows 10 feature updates you want your computer to switch to and / or maintain until the version ends support. or when you reconfigure this policy.
- If you do not update this policy before the device finishes supporting, the device will automatically be updated after 60 days of service for the device version.
- If you specify TargetReleaseVersion the same as the current version, Windows 10 will stay there until the end of the service.
- If you specify TargetReleaseVersion higher than the current version, Windows 10 will only update directly to the specified version, even if there is a higher version.
This guide will show you how to specify the TargetReleaseVersion version of Windows 10 you want to switch to or maintain in Windows Update, until the end of the service on Windows 10 Pro, Enterprise, or Education.
Note : You must be logged in as an administrator to specify the TargetReleaseVersion version for your Windows 10 computer.
Specify the updated version of the target feature in the Local Group Policy Editor
This option is only available in versions of Windows 10 2004 and above.
1. Open Local Group Policy Editor.
2. Navigate to the location below in the left panel of the Local Group Policy Editor.
Computer Configuration > Administrative Templates > Windows Components > Windows Update > Windows Update for Business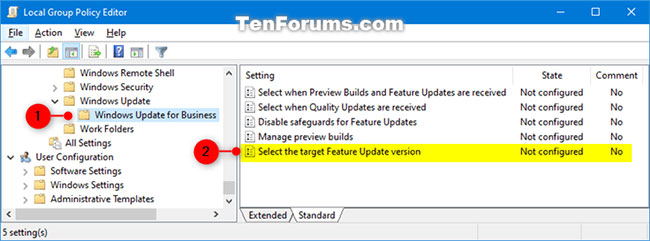 Navigate to the above position
3. On the right panel of Windows Update for Business , in the Local Group Policy Editor , double-click the policy Select the target Feature Update version to edit.
4. Follow step 5 (to specify) or step 6 (to undo) below, depending on what you want to do.
5. To specify the updated version of the target feature
A) Select Enabled.
B) In Options , enter the version (eg "1909") you want to specify in the Target Version for Feature Updates box , click OK and go to step 7 below.
You can see the list of Windows 10 versions that will be used as values in the Windows 10 release information panel.
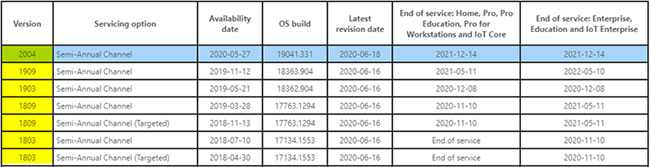 Windows 10 release information panel
6. To undo the specified version of the target feature update, select Not Configured or Disabled , click OK and go to step 7 below. Not Configured is the default setting.
 Select Not Configured or Disabled
7. When done, you can close the Local Group Policy Editor.
Specify the updated version of the target feature using the REG and Registry Editor files
Note : This option will only work in Windows 10 version 1803 and above.
1. Follow step 2 (to specify), step 3 (change the version to specify) or step 4 (undo - default) below, depending on what you want to do.
2. To specify the updated version of the target feature with the REG file:
A) Download the Specify_target_Feature_Update_version_to_1903.reg file.
(Contents of file.reg for reference)
Code:
Windows Registry Editor Version 5.00 [HKEY_LOCAL_MACHINESOFTWAREPoliciesMicrosoftWindowsWindowsUpdate] "TargetReleaseVersion"=dword:00000001 "TargetReleaseVersionInfo"="1903"Or file Specify_target_Feature_Update_version_to_1909.reg.
(The content of the .reg file for reference)
Code:
Windows Registry Editor Version 5.00 [HKEY_LOCAL_MACHINESOFTWAREPoliciesMicrosoftWindowsWindowsUpdate] "TargetReleaseVersion"=dword:00000001 "TargetReleaseVersionInfo"="1909"Or file Specify_target_Feature_Update_version_to_2004.reg.
(The content of the .reg file for reference)
Code:
Windows Registry Editor Version 5.00 [HKEY_LOCAL_MACHINESOFTWAREPoliciesMicrosoftWindowsWindowsUpdate] "TargetReleaseVersion"=dword:00000001 "TargetReleaseVersionInfo"="2004"B) Save the .reg file to the desktop.
C) Double click on the downloaded .reg file to merge it.
D) When prompted, click Run> Yes (UAC)> Yes> OK to approve the merge.
E) Now, you can delete the downloaded .reg file if you want.
Note : You can follow step 3 below if you want to change the version to what you want to specify instead.
3. To change the designation of the target feature update version:
A) Follow step 2 to add the necessary registry keys and values for this.
B) Press the Win+ keys Rto open the Run dialog , enter regedit into Run, and click OK to open Registry Editor.
C) Navigate to the key below in the left pane of the Registry Editor.
HKEY_LOCAL_MACHINESOFTWAREPoliciesMicrosoftWindowsWindowsUpdate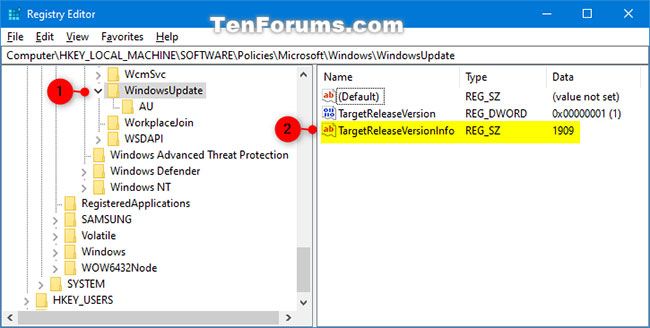 Navigate to the left key of Registry Editor
D) To the right of the WindowsUpdate key , double-click the string value of TargetReleaseVersionInfo (REG_SZ) to modify it.
E) Enter the version (e.g. "1909") you want to specify in the Value data box and click OK.
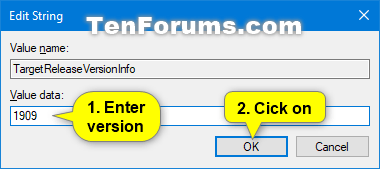 Enter the version you want to specify in the Value data box
F) You can now close Registry Editor.
4. To undo the designation of the target feature update version:
A) Download the Undo_specify_target_Feature_Update_version.reg file.
(The content of the .reg file for reference)
Code:
Windows Registry Editor Version 5.00 [HKEY_LOCAL_MACHINESOFTWAREPoliciesMicrosoftWindowsWindowsUpdate] "TargetReleaseVersion"=- "TargetReleaseVersionInfo"=-B) Save the .reg file to the desktop.
C) Double click on the downloaded .reg file to merge.
D) When prompted, click Run> Yes (UAC)> Yes> OK to approve the merge.
E) Now, you can delete the downloaded .reg file if you want.
Was this article helpful?
Your feedback helps us improve.
Related Articles
 How to update Windows 10 to Windows 10 May 2019 (1903)7 minutes read
 Turn off the Win 10 update, stop Windows 10 from updating automatically8 minutes read
 How to update iTunes to the latest version6 minutes read
 3 ways to update Windows 10 to the latest 2026 update9 minutes read
 From now on, Windows 10 will automatically allocate at least 7GB of space on the system for updating the new version4 minutes read
 How to update Windows 10, Update Win 10 latest version 20246 minutes read
Reader Comments 0
Sign in with email or Google to join the discussion.