Table of Contents
This practical guide walks through how to set internet data usage limit in Windows 11, explains the main requirements, and highlights common issues that may appear along the way.
Set data limit in Windows 11
In Windows 11, you can set a separate data limit for each WiFi and Ethernet network you connect to.
To get started, launch the Settings app on your PC by pressing the Windows + i key combination .
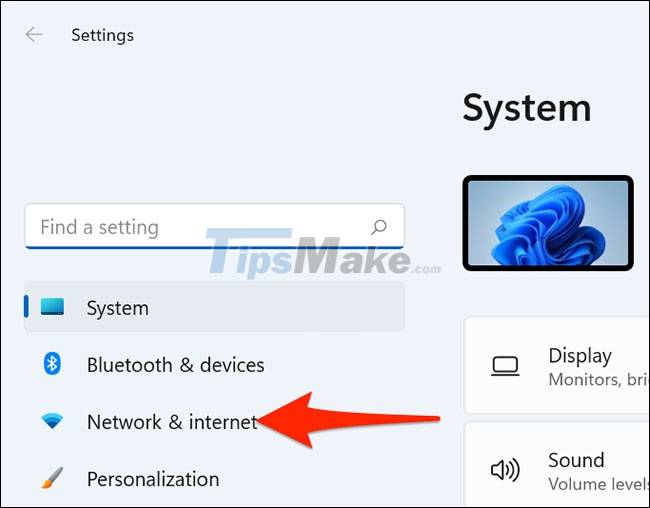
In the Settings window that opens, click on ' Network & Internet ' in the list on the left.
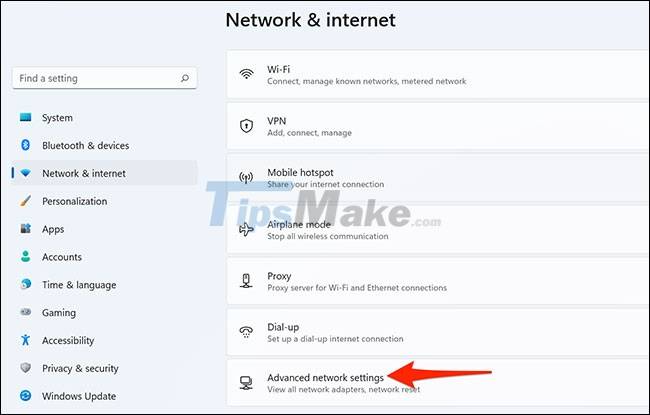
On the ' Network & Internet ' settings screen , scroll down and select ' Advanced Network Settings '.
On the ' Advanced Network Settings ' page that opens, find the ' More Settings ' section and click on ' Data Usage '.

You are now on the data usage settings page. Here, in the top right corner, click on the ' Wi-Fi ' drop-down menu and select the network on which you want to set the data limit.
Then, under the ' Wi-Fi ' drop-down menu , click the ' Enter Limit ' button .

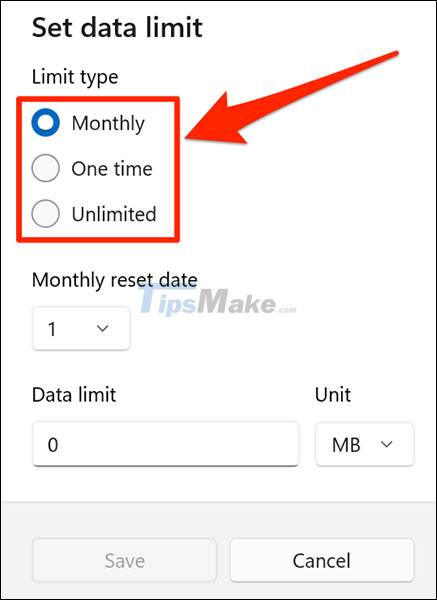
Immediately, the " Set Data Limit " window will open. In the " Limit Type " section, select the type of data limit you want to apply to your connection.
Available options include:
- Monthly : Reset your data limit monthly.
- One Time : The data cap expires after the specified number of days.
- Unlimited : Unlimited data usage. However, data usage statistics will be reset on a specified day of the month. This is useful in figuring out the average amount of data you use over a particular time frame.
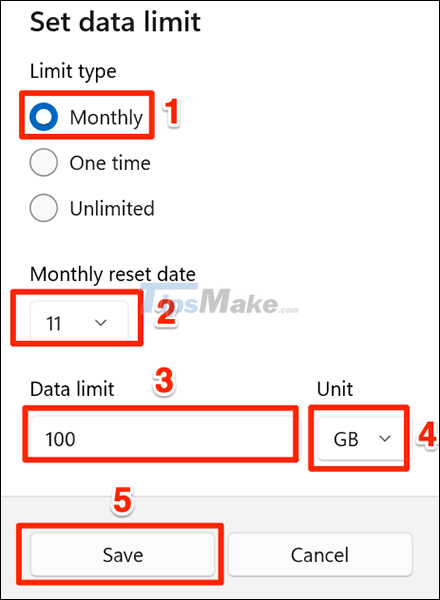
If you choose Monthly , click the ' Monthly Reset Date ' drop-down menu and select the date on which the data cap expires. Click " Data Limit " and enter the amount of data allowed to use. Then click on " Unit " and choose a unit for the data.
Then, at the bottom of the pop-up, click ' Save '.
If you select the One Time option , click the ' Days Until Data Expires ' drop-down menu and select the number of days after which your data expires. Click " Data Limit " and enter the allowed amount of data. Finally, click " Unit " to select the data unit.
Then, at the bottom of the pop-up, hit ' Save '.
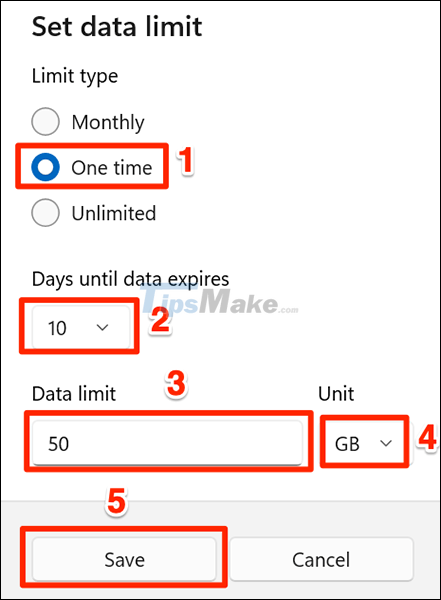
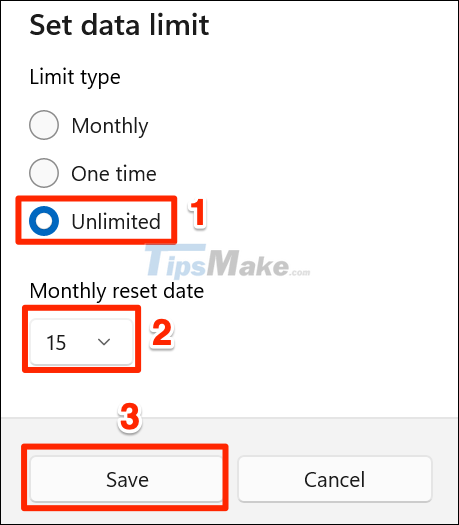
If you choose Unlimited , click " Monthly Reset Date " and select the date on which the data limit expires.
Then, click ' Save ' at the bottom of the pop-up window.
Those are all the steps needed to set a data limit in Windows 11. When you are close to reaching your data limit, the system will send you an alert. You can then continue to use the Internet or stop using it as you please.
Remove the set data limit
To unset data limit settings, first open the Windows Settings app and navigate to Network & Internet > Advanced Network Settings > Data Usage .
On the ' Data Usage ' screen, click ' Remove Limit ' in the top right corner.

In the ' Remove Data Limit ' prompt that opens, click ' Remove '.
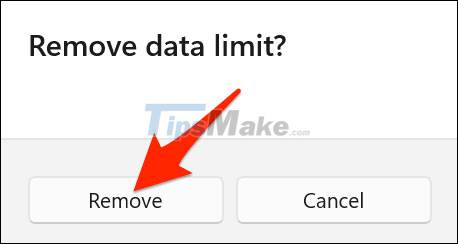
Your data limit has now been removed.
Key Takeaways
Use the information above as a practical reference for how to set internet data usage limit in Windows 11. Review each step carefully, confirm any requirements, and choose the option that best fits your situation.
FAQ
What does this guide explain about Set Internet Data Usage Limit in Windows 11?
It explains the main concepts, practical considerations, and useful steps related to set internet data usage limit in Windows 11 without requiring advanced knowledge.
Who can benefit from learning about Set Internet Data Usage Limit in Windows 11?
This information is useful for readers who want a clear overview, practical guidance, and reliable steps related to set internet data usage limit in Windows 11.
What should I check before applying this information?
Review the requirements, confirm that your device, software, or situation matches the instructions, and back up important data before making major changes.
Related Articles
 Monitor Internet Data Usage on Windows 103 minutes read
 How to Monitor Internet Data Usage on Windows: Clear Instructions9 minutes read
 How to Check Data Usage on AT&T: Step-by-Step Guide5 minutes read
 How to Limit Your Facebook Usage Time - Control Your Facebook Screen Time4 minutes read
 How to Track Internet Data Usage on Windows 104 minutes read
 Monitor and Save Internet Capacity on Windows 106 minutes read
Reader Comments 0
Sign in with email or Google to join the discussion.