Table of Contents
This practical guide walks through how to mount and Mount Storage Devices on Linux Terminal. It organizes the required steps, settings, and checks so you can complete the task with fewer mistakes.
File systems on Linux and Unix-based operating systems such as macOS can also be mounted, unmounted,. via Terminal. In this guide TipsMake explains how to mount and mount storage devices on Linux Terminal.
File System on Linux
File systems on Linux, macOS, and other Unix-based operating systems do not use separate drive identifiers for storage devices like they do on Windows. Windows assigns each drive a letter, such as C: or D:, and the file system for each drive is the directory below that drive letter.
On Linux, the filesystem is an all-in-one directory tree. A mounted storage device has its filesystem appended to the directory tree to indicate it is an integral part of the mounted filesystem.
The newly mounted filesystem is accessible through the directory it is mounted to. This directory is called the mount point (empty directory) for the file system.
Many file systems are mounted automatically during the boot process or when the drive is connected to the computer while the device is running. If system administrators want, they can disable or turn off the auto-mount feature to control connections to the system.
This means that storage devices connected while the computer is running will not mount automatically and require manual mounting. Mounting the file system manually lets you select the mount point directory location and set the file system to read-only mode or read-write mode.
List the File Systems Mounted Using the Mount Command
To list all file systems mounted on your computer, simply enter the Mount Command and select Enter.

Mount will list all connected file systems on the Terminal window.
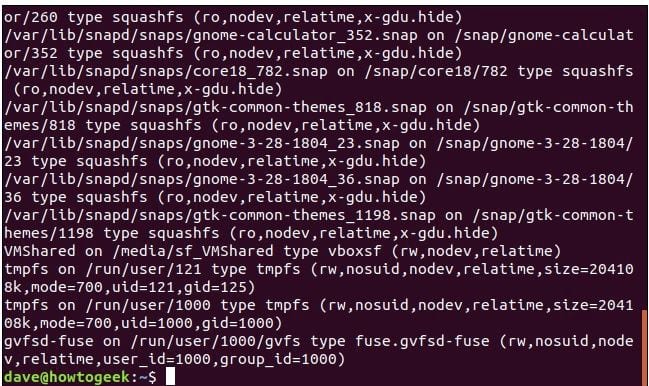
If you want you can tweak the output by telling mount to list only the filesystems you're interested in. The -t (type) Option indicates what type of filesystem to mount.
Mount -T Tmpfs Mount -T ext4

For example, let's say the Mount request only listsTmpfs Filesystems, so you can more easily manage the output.
The tmpfs filesystem appears as if it is a mounted filesystem, but it is actually stored in volatile memory, where tmp stands for temporary, instead of being stored. on persistent storage devices.
If you want, you can replace the tmpfs parameter with the file type you are interested in.
In this example TipsMake uses the command to list all ext4 file systems. On the test computer there is only a single ext4 filesystem located on the sda device - the first storage device mounted, usually the main drive and mounted on /, which is the root of the filesystem tree.
Meaning of other indicators:
- rw: Readable and writable file system.
- relatime : the kernel is using an optimization scheme to log file access and meta data modifications.
- errors=remount -o: If fatal errors are detected, the filesystem will be remounted in read-only mode to allow diagnostics.
List Mounted File Systems Using Df Command
In addition to the mount command, we can also use The df command To display mounted file systems and mount point directory locations.
The df command without parameters gives us the same information overload problems as the mount command. For example, on Ubuntu Linux, a pseudo Squashfs Filesystem is created for applications created with The snap command . We don't need to pay attention to this information at all.
To force df to ignore this or other types of system information, we use the -x (exclude: exclude) option:
Df -X Squashfs
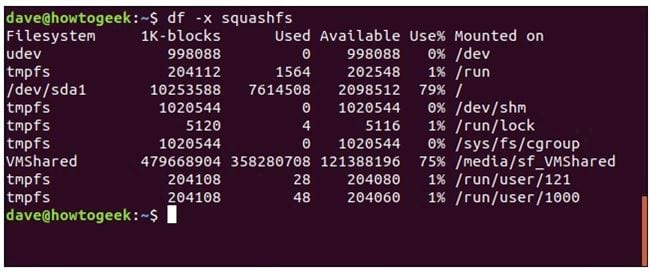
Now you can easily see the file system names, sizes, free and used space as well as the mount point directory.
Remount All File Systems Using the Fstab Command
All file systems mounted during boot have a file called Fstab , which is a file system table located in /etc.
We can use mount to force a "refresh" and remount all filesystems listed in fstab. This is useful If you encounter problems with multiple file systems.
Use sudo and you will receive a message asking for your password:
Sudo Mount -A

On computers with file system problems, remounting helps fix the problems. If not, you will at least receive diagnostic messages and system logs that will guide you to the cause of the problem.
Mount ISO Image
The steps to mount an ISO image and access its contents as part of the file system are straightforward. In the example below TipsMake uses the Tiny Core Linux ISO because of its small size and quick download.
In the same directory containing the ISO image, run the command below. Note: Remember to rename the ISO file you want to mount:
Sudo Mount -T iso9660 -O Loop Tinycore-current. Iso /Mnt
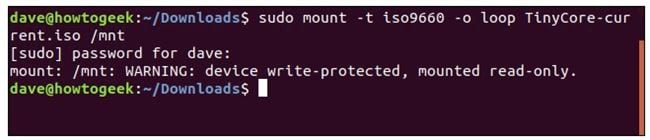
Because you use sudo, you will be asked to enter your password.
The -t (type) Option indicates the type of filesystem being mounted. This is an ISO file so you provide the iso9660 type identifier.
The -o (options) Flag helps pass additional parameters to mount. The parameter in this example is Loop.
Use loop to force mount to use a loop device file connected to the ISO image. A repeater file allows a file (such as an ISO image) to be mounted and processed as if it were a storage device.
Device files are special files used as interfaces for connected devices to display as if they were normal file system files.
Several different types of device files, in this example only the Ext4 File system is mounted and is called Sda .
To be more precise, the ext4 filesystem resides on a storage device connected to the filesystem via the device file /dev/sda And the filesystem on the storage device is located at /.
Of course we will have to provide the ISO image name and tell mount the location of the mounted file system. In this example TipsMake chooses /mnt .
The ISO image is mounted, a message appears in the window saying that the ISO image is mounted in read-only mode in the Terminal window.
Search for the ISO Image
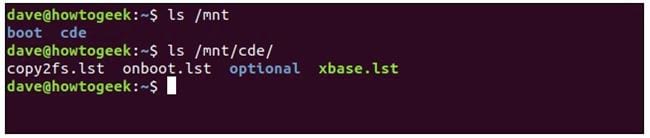
Once mounted, we can navigate to the folders in the ISO image as part of the file system. Note that the ISO image file is mounted at /mnt.
Ls /Mnt Ls /Mnt/cde/
Unmount ISO Image
To unmount a previously mounted file system, we use The unmount command.
First, tell unmount which file system we want to unmount. To do this we just need to provide the mount point of the file system.
Sudo Umount /Mnt

If there aren't any notifications in the window, everything is fine.
Create Mount Point
If you want, you can create and use your get mount point. We will call an Isomnt And mount the ISO image into it. Basically a mount point is just a directory, so we can use Mkdir To create a new mount point.
Sudo Mkdir /Media/dave/isomnt

In the next step we use the same command format as before to mount the ISO image. However, this time we do not mount the file to /mnt But mount it to /media/dave/isomnt/:
Sudo Mount -R -T iso9660 -O Loop Tinycore-current. Iso /Media/dave/isomnt/
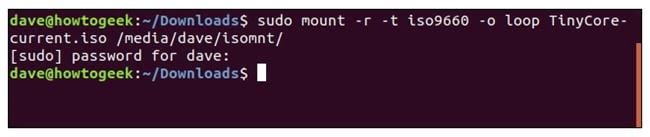
You can now access the mounted file system from the new mount point directory.
Ls /Media/dave/isomnt/cde/optional

Mount Point Link
We can link the mount point to another directory. The mounted filesystem can then be accessed either through the original mount point or through the directory associated with it.
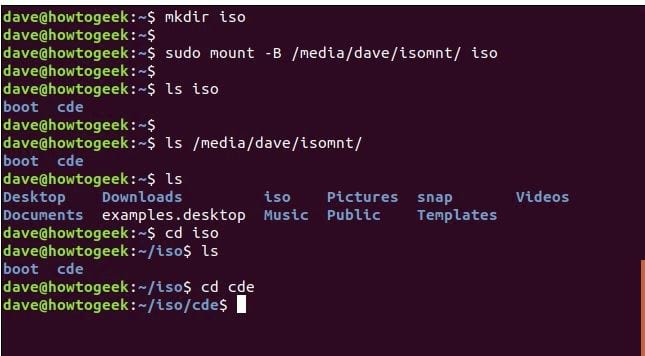
For example, suppose we create a new folder called Iso In the home directory, then link the mount point ISO image /media/dave/isomnt To the iso folder in the home directory.
We can access the ISO image through the original mount point /media/dave/isomnt And through the new iso folder. The -B (bind) Option requires the name of the mount point and the name of the directory to bind.
Mkdir Iso Sudo Mount -B /Media/dave/isomnt/ Iso Ls Iso Ls /Media/dave/isomnt Cd Iso Ls Cd Cde
Use Umount to Link Mount Point
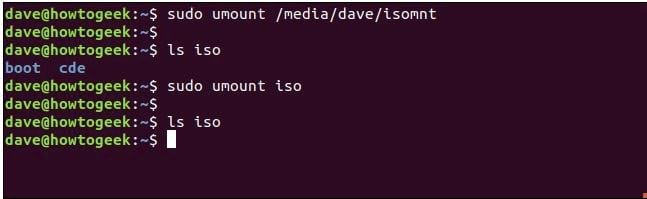
File systems with mount points linked to other directories require unmounting from the original mount point and bind point directories.
Even if we unmount the file system from the original mount point directory, we can still access the file system from the linked directory. Additionally the file system must also be unmounted from that directory.
Sudo Umount /Media/dave/isomnt Ls Iso Sudo Umount Iso Ls Iso
Mount the Floppy Disk
A floppy disk is also a storage device. This means that an sd device file (short for storage device) will be used to connect to the physical device.
We have to set up the sd device file next. To do this, we pipe Df 's output through Greb And search for entries with " Sd ".
Df | Grep /Dev/sd

In the example in this article, there is a single sd device file used which is /dev/sda . The next sd device file will be /dev/sdb . This means that when we connect the floppy drive to the computer, Linux will use /dev/sdb To connect to the floppy drive.
We will tell mount to mount the file system to the floppy disk connected to the mount point /dev/sdb to the /mnt.
Connect the floppy drive through the USB port on the computer, then run the command below:
Sudo Mount /Dev/sdb /Mnt

File System Label
We can use the -l (label) Option with mount to find the label attached to the filesystem (if any).
Use the -t (type) option to tell mount to report only onVfat File systems.
Mount -L -T Vfat
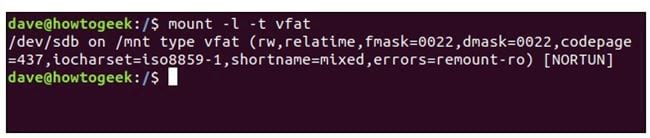
Labels are enclosed in square brackets at the bottom of the list. The label of the floppy drive is NORTUN.
We can access the floppy drive via mount point /mnt:
Cd /mnt
Ls -L AMATCH. C
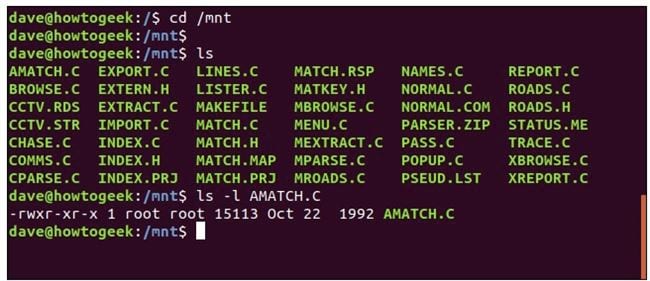
The floppy disk contains C language source code files. The date stamp shows that the file was last modified in October 1992.
If we repeat df through the greb command to list the sd device files, we will see there are 2 floppy drives.
Df | Grep /Dev/sd
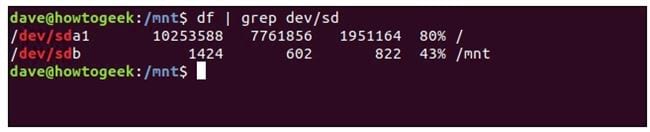
The floppy drive shown is mounted on /dev/sdb. The file system on the floppy drive is mounted at /mnt.
To unmount the floppy drive, we use Umount And use the device file as a parameter.
Sudo Umount /Dev/sdb

Umount Lazy Option
If if using the file system that is being unmounted, the process will fail.
Sudo Umount /Dev/sdb
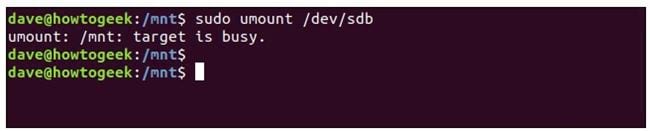
The process failed because the user's current working directory is in the file system you are trying to unmount. Linux is smart enough to not let users see which branch you are on.
To fix this problem, we use the -l (lazy) option. This option makes umount wait until the filesystem can be safely unmounted.
Sudo Umount -L /Dev/sdb
Ls /mnt
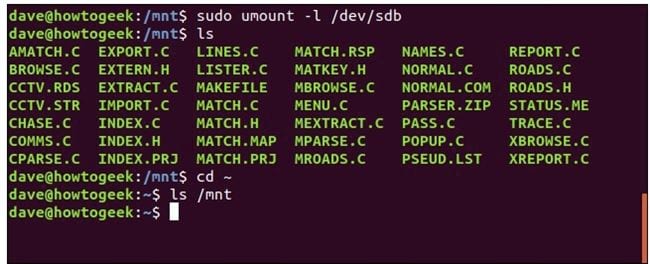
Even though the umount command is being run, the file system is still mounted and the user can list files normally.
As soon as the user changes the directory to the home directory, the soft file system will be released and unmounted. Trying to list files in /mnt will not return any results.
Mount Samba Share
Samba is a collection of software services that enable interchangeable network shares between Linux and Unix operating systems and Windows operating systems.
To mount Samba Share on Linux, follow the steps below:
The Raspberry Pi is connected to the same network as the test device with Samba Share integrated. On Samba there is a copy folder named "share". Your task is to create an SSH connection to it and view the contents of the shared folder. This folder is located on the USB drive mounted on the Pi.
The username is pi and the Raspberry Pi's network name is marineville. local:
Ssh [Email Protected]
Ls /media/pi/USB64/Backup
Exit. Exit
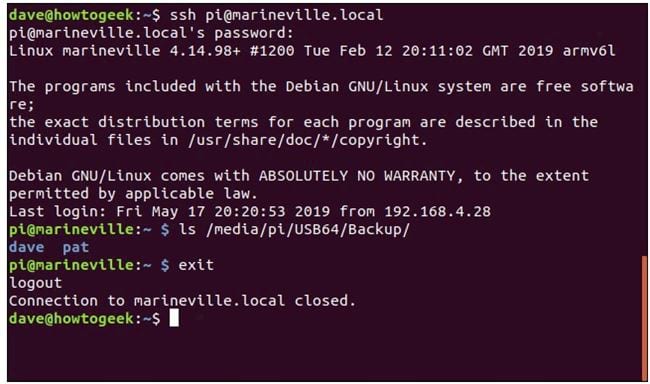
When running the SSH command you will be prompted to enter the Raspberry Pi password.
After entering the password and being authenticated, the command prompt on the Terminal window changes to Pi@marineville Because it is connected to the Raspberry Pi.
The contents of the shared folder are listed at /media/pi/USB64/Backup. The contents include two folders, one called and Dave And one called Pat .
Type Exit To disconnect from the Raspberry Pi and the command prompt will change to Dave@howtogeek.
To use Samba, we must install the Cifs-utils package:
If using Ubuntu or other Debian-based distributions, use apt-get to install this package to your system. On other Linux distributions, use the Linux distribution package management tool instead.
Sudo Apt-get Install Cifs-utils

After the installation process is complete, use the command below to mount the share folder, change the IP address, share name and mount point accordingly:
Sudo mount -t cifs -o credentials=/etc/samba/creds, uid=1000, gid=1000 //192.168.4.13/share /media/dave/NAS
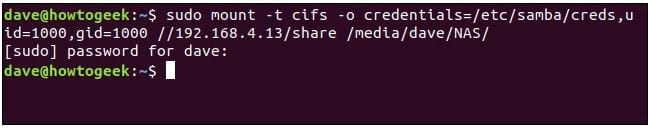
In the command above:
-t cifs : file system type is cifs.
-o credentials=/etc/samba/creds, uid=1000, gid=1000 : optional parameters are the path to a file called creds that is secured and contains the Raspberry Pi user name, password, ID User (UID) and Group ID (GID) are used to establish the root filesystem owner and group.
//192.168.4.13/share: The network location of the device with Samba Share integrated and the Samba name of the shared folder. The root folder of the Share folder is named Backup, but the Samba name of the shared folder is set to Share.
/media/dave/NAS: Name of mount point. Note that you must create a mount point first.
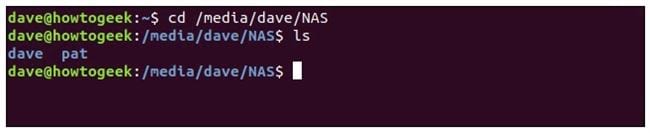
By accessing the mount point at /media/dave/NAS we can access the shared folder on the Raspberry Pi on the network. You will see there are 2 Raspberry Pi folders called Dave And Pat.
Cd /Media/dave/nas
Create and Mount the File System
We can use the dd command to create the image file, then use mkfs to create the file system and mount.
Use the If (input file) Option to tell dd to use the zero value stream from /dev/zero As the input file.
The new output file (of - output file) is called Geek_fs.
We use the Bs (block size) Option to request a block size of 1MB.
Use The count Option to tell dd to include 22 blocks in the output file.
Dd If=/dev/zero Of./geek_fs bs=1M count=20
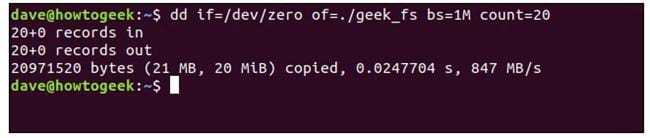
The created image file contains nothing but a value of 0.
Next use The mkfs command To create the file system inside the geek_fs file. The -t (type) Option allows selection of the file system type. In this example TipsMake creates the Ext4 Filesystem.
Mkfs -T ext4./geek_fs
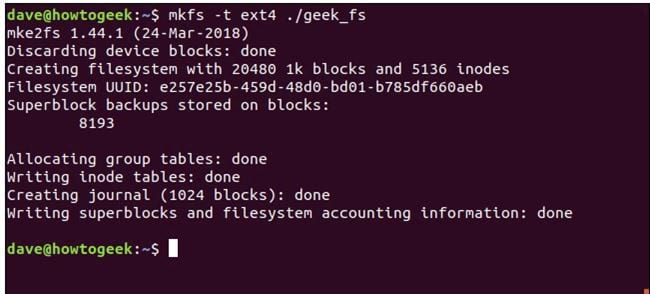
To mount the image file into /media/dave/geek , then use Chown To set the owner and group to allow access to the file:
Sudo Mount./geek_fs /Media/dave/geek
Sudo Chown Dave: Users /Media/dave/geek

To change to the new file system and copy in a file for viewing:
Cd /Media/dave/geek
Cp /Etc/fstab
Ls -l
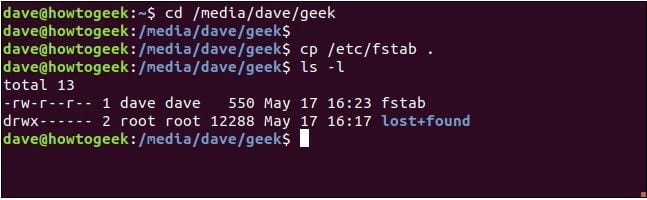
If we use Mount To list mounted filesystems but restrict the output to ext4 filesystems using the -t (type) option, The output shows that there are 2 filesystems. ext4 file is mounted.
Mount -T ext4

Remount the File System
To remount the file system, we use the -o remount option. This process is performed to change the file system from read-only state to read-write state.
Suppose to remount the floppy drive, we will use the -r (read-only) flag, Then mount via grep and look for the floppy drive filesystem details:
Sudo Mount -R /Dev/sdb /Mnt
Mount | Grep /Mnt
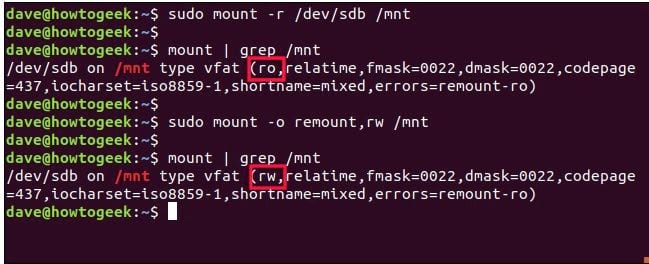
As you can see Ro Is marked to indicate the filesystem is mounted read-only.
Use the -o remount Option with the Rw (read-write) Flag to unmount and remount the filesystem with the new settings:
Sudo Mount -O Remount, Rw /Mnt
Repeating the mount process via grep, you can see that ro is replaced by Rw , meaning the file system is now in read-write mode.
Mount | Grep /Mnt
Move File System
If you want, you can unmount and remount the file system on another mount point with just a single command.
The -M (move) Option in mount allows you to do this. However, the option is no longer active in Linux distributions, we use Systemd instead.
If you try to move system files from /mnt To ./geek , the process will fail and an error message will be displayed in the window as shown in the image below.
Sudo Mount -M /Mnt./geek
Ls./geek
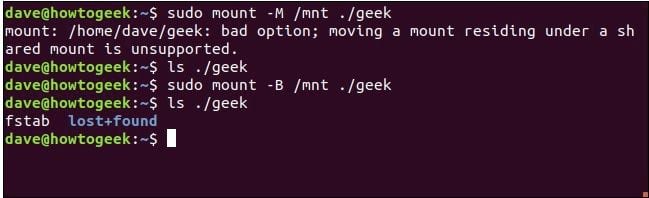
To solve this problem, we use the previous -B (bind) option to bind the original mount point to the new mount point.
Sudo Mount -B /Mnt./geek
Ls./geek
The above article TipsMake has just shown you how to mount and mount a storage device on the Linux Terminal. In addition, if you have any questions or concerns like how to Compare text files on Linux Terminal , readers can leave their comments in the comments section below the article.
FAQ
What do I need before I mount and Mount Storage Devices on Linux Terminal?
Prepare the required device, software, account access, and any files mentioned in the steps. Back up important data before changing system settings.
Why does the process look different on my device?
Menus and options can vary by operating system, app version, device model, or region. Use the closest matching setting and check the official documentation when needed.
What should I do if a step does not work?
Restart the app or device, confirm permissions and connectivity, update the software, and repeat the step carefully. Avoid unofficial downloads or tools.
Related Articles
 How to Mount the Hard Drive and Partition Using the Linux Command10 minutes read
 How to Format a Storage Drive Using Linux Terminal6 minutes read
 Top 7 Best Linux Terminal Emulators6 minutes read
 How to Use Guake Terminal in Linux5 minutes read
 How to Mount a Linux File System Using WSL2 on Windows 106 minutes read
 How to Install Dictionaries in Linux Terminal5 minutes read
Reader Comments 0
Sign in with email or Google to join the discussion.