How to Make a Wine Glass in Blender
Blender is a 3 dimensional software that has a bit of a learning curve. However, with this tutorial, you can finally begin to use Blender. Read on to learn how. Open Blender and delete the default cube.
Table of Contents
Part 1 of 3:
Making the Wine Glass Cup
- Open Blender and delete the default cube.
-
 Be sure that you have the Cycles Render option. Also, make sure that you have Default for the other option.
 -
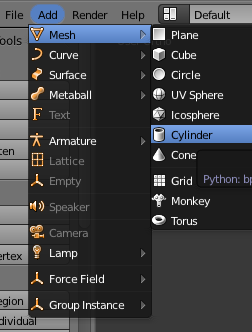 Click on Add >> Mesh >> Cylinder.
 - Change to the front view. Do this by pressing the 1 on the numeric keypad.
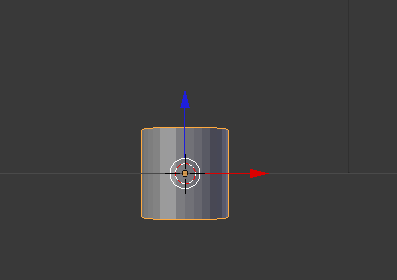
- Zoom in closer or press "." on the numpad to focus on a given selected object.
- Press 5 on the numeric keypad to change the perspective.
- Click on the Viewpoint Standing and select Wireframe. Then change the Object Mode to Edit Mode.

- Press Ctrl R to loop-cut.
-
 Holding the cursor over the center of the cylinder, roll up the mouse wheel. Do this until you see three rings and then click on the cylinder.
 - Press the A key. This will deselect everything.
-
 Press B on your keyboard, position the cursor to the very top left of the cylinder and select the top line. However you do it, you are selecting the top row.
 -
 Click on S. This is for scaling your selection. Reduce it by 1 grid mark and click the left mouse button.
 - Press Ctrl A to deselect.
-
 Press B and select the center ring.
 - Press S (for scale) and Increase by 1 grid mark.
- Press Ctrl A to deselect.
-
 Press B to select the ring above the center one.
 - Press S and increase by 1/2 grid mark.
- Press Ctrl A to deselect.
- Press B to select the ring below the center one.
-
 Press S and decrease by 3 grid marks. This is what it should look like at this point.
 - Press Ctrl A to deselect.
- Press B to select the ring below the center one.
-
 Press S and decrease to 4 grid marks.
 -
 Press and hold the middle mouse button (or wheel) to rotate the object. If you have a grid at the top, right click to select it and press delete. From the options, select Vertices. That is what you will be deleting.
Part 2 of 3:
Making the Wine Glass Stem
- Press 1 on the number pad for the front view.
- With the bottom of your glass still selected, press E to extrude.
- Pull down (extrude) 2 grid marks. Click the mouse button to set the length.
- Press S and then reduce the width by 2 grid marks.

- Press E to extrude.
-
 Pull down to the second major gridline and then go back three minor gridlines.
 - Press E to extrude.
- Bring down 1 grid mark.
- Press S and widen by 2 grid marks.

- Press E to extrude.
- Bring down 1 grid mark.
-
 Press S and widen by 5 grid marks on each side for a total of 10.
 - Press E to extrude.
-
 Bring down 1 grid mark. That is the basic wine glass bottom. If you've done it right, it should be 'sitting' on the major gridline.
 - Change the Viewport Shading to Solid and Edit Mode to Object Mode.

- Zoom out a little bit and press Shift and the middle mouse button to pan your object.
-
 Make sure your wine glass looks about right. It should look something like this screenshot.
- The grid (if you have one) is not a vertex, it is a face. Press one, change to wire frame mode, make sure to be in Ortho instead of perspective (5), then select (B) all the vertices of the top of the class, (Make sure you are in edit mode, press delete, a menu should appear). Move to Delete face, Click it.
- Press Smooth on the left side of your screen to smooth out some of the rough edges on your wine glass.

- On the right side of the screen, click on the wrench (object modifiers).
- Click on Add Modifier >> Subdivision Surface. This will smooth the shape even more.
-
 Change the Views and Render to three (3). You could make it higher, but it would take longer to actually render.
 - Press 5 to change your perspective. Using the scroll wheel, if you have one, zoom out.
Part 3 of 3:
Finishing the Wine Glass
-
 Place the cursor somewhere below your glass, like in the screenshot. This is where the next element of the image will be added.
 -
 Go to Add >> Mesh >> Plane. This will insert a plane below your wine glass.
 -
 With the plane selected, press S to scale it and make it larger. Like the size of a table to your wine glass.
 - With the plane still selected, go to the right of your screen and click on the material icon. (It should actually still be selected).
-
 Select the Diffuse BSDF option, and then select a color similar to the one you see in the screenshot.
 -
 Add another plane for your light source. To do this, click behind your camera to place the cursor there.
- Select Add >> Mesh >> Plane.
- Press R to rotate the plane so that it will provide a reflective surface for your glass and light source.
- Press S to scale the plane. It should look similar to what you see in this screenshot.

- With the plane still selected, go to the material section that you went to before. For the material, select Emission. For Strength, enter 10.
- Right click on the first plane to select it, and then, by using the blue arrow and holding down on the left mouse button, raise the plane until it just covers up the bottom of the glass. Once it does that, lower the plane until it is just below the wine glass.

-
 Change your perspective by pressing 0 (zero). You want to now look at the wine glass through the perspective of the camera.
 - If you need to adjust your view, change your properties.
- Go to View >> Properties (lower left).
- Find the checkbox beside Lock Camera to View. Once this is done, if you need to move your glass; make sure it is selected, then holding down the shift key and your center mouse button (or your scroll wheel) and move the glass. You can also use the scroll wheel to zoom in and out.
- If you haven't done this yet, save your work.
-
 Duplicate your wine glass by pressing Shift D. It will superimpose the new wine glass directly on top of the 'old' one.
 - Move it so that it stays in line with the original wine glass. Do this by pressing X so that it moves on the X axis.
- Since you are still 'in your camera', move your wine glasses so that they are both in the proper perspective.
- You are done with the properties, so go back to View >> Properties, which will close that dialog box.
-
 Look at your progress. Click on the Camera icon on the right and then click on image without changing anything else. It is set at a minimal number (10), so it shouldn't take very long. Here is what it looks like at this point.
 -
 On the right of your screen, look for the Integrator section. If it is collapsed, click on the arrow.
 - Watch your render and see if it is turning out the way you like. If not, press ESC. Press ESC again and then press 0 (zero). This will toggle the view away from the camera.
- Right click on the plane that is 'emitting the light'. Instead of 10 for the strength, change it higher...like 15 or 20.
- Go back to rendering your glasses until you have the look you want.
- Save it. You will want to save a graphic version (not just for Blender) of your file.
- Hover your mouse over your image and press F3. Select your format type and name and you are done.

- Hover your mouse over your image and press F3. Select your format type and name and you are done.
Was this article helpful?
Your feedback helps us improve.
Related Articles
 New finding: Drinking 1 glass of wine has the same effect as 1 hour of gym4 minutes read
 How to Make a Glass Bowl with a Napkin in Blender12 minutes read
 Blender - Free and Powerful 3D Modeling Tool7 minutes read
 Drinking a glass of red wine every week can improve your chances of getting pregnant2 minutes read
 What's New in Blender 3.03 minutes read
 Common mistakes when using blender and how to fix it7 minutes read
Reader Comments 0
Sign in with email or Google to join the discussion.