How to install WordPress plugin
After installing WordPress, the first thing that people need to start learning is how to install WordPress plugins.
Put simply, WordPress plugins are like applications for websites. They allow you to add new features to WordPress like contact forms, slideshows, shopping carts, etc.
There are thousands of free and paid plugins available for WordPress. In this step-by-step guide, TipsMake.com will show you how to install a WordPress plugin.
Install the plugin using the WordPress plugin search feature
The easiest way to install a WordPress plugin is to use the plugin search. The only downside of this option is that a plugin must be in the WordPress plugin directory, which is limited to free plugins.
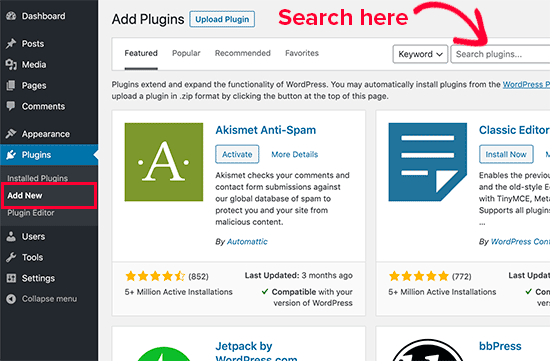
The first thing you need to do is go to Plugin> Add New page within the WordPress admin area.
 Go to Plugin> Add New page
 You should see a screen like the one shown above. Find the plugin by entering the plugin name or function you are looking for. You will then see a series of options like the example below:
 The options
 You can choose the plugin that best suits you, then click the Install Now button next to it.
WordPress will download and install the plugin for you. Then you will notice the Install Now button changes to Activate.
A WordPress plugin may be installed on the site, but it will not work unless you enable it. So go ahead and click the Active button to start using that plugin on your WordPress site.
 Click the Active button to start using the plugin
 You have successfully installed your first WordPress plugin.
Install the plugin using the upload option in the WordPress admin area
Premium WordPress plugins are not listed in the WordPress plugin directory. These plugins cannot be installed by the first method.
That is why WordPress comes with an upload method to install such plugins. This article will show you how to install WordPress plugin with the upload option in the admin area.
First, you need to download the plugin from the source (will be a zip file). Next, you need to go to the WordPress admin area and go to Plugins> Add New page .
Then click the Upload Plugin button on the top of the page.
 Click the Upload Plugin button
 This will reveal the plugin upload form. Here, you need to click the Choose File button and select the plugin file you downloaded earlier to the computer.
 Click the Choose File button
 After selecting the file, you need to click the Install Now button .
Now, WordPress will upload the plugin file from your computer and install it for you. You will see a success message like this after the installation has finished.
 Notice of success
 After installation, you need to click on the Activate Plugin link to start using the plugin.
You will have to configure the settings to suit your needs.
Manually install WordPress plugin using FTP
In rare cases, WordPress hosting providers may have file restrictions, reducing the ability to install plugins from the admin area.
In this situation, it is best to install the plugin manually using FTP.
The least user-friendly FTP manager method for beginners.
First, you will need to download the plugin's source file (it will be a zip file). Next, you need to extract the zip file on your computer.
Extracting the plugin zip file will create a new folder with the same name. This is the directory that you need to manually upload to your site using the FTP client.
You will need to access your server via the FTP manager. If you do not have a FTP username and password, contact your WordPress hosting provider.
Open the FTP client on your computer and connect to your website using the login credentials provided by the web host. Once connected, you need to visit the / wp-content / plugins / directory on your website.
Next, upload the directory you extracted from the zip file to the / wp-content / plugins / directory on the web server.
 Upload the folder you extracted from the zip file to / wp-content / plugins /
 After uploading the files, you need to access the WordPress admin area and click on the Plugins link in the admin menu. You should see your plugin successfully installed on the Plugins page .
 Plugin installed successfully
 You need to click on the Activate link below the plugin to start using it.