Table of Contents
This updated guide examines Click: How to Install Software from Unsigned Developers on a Mac and organizes the essential facts, background, and practical takeaways in clear American English.
Method 1of 2:
Allowing a Program
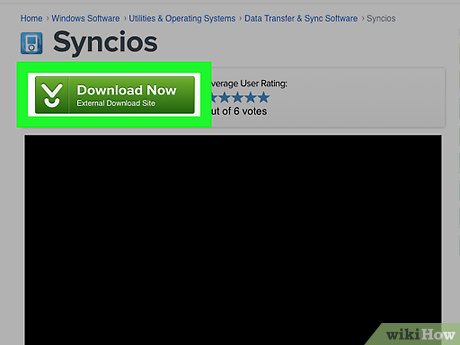 Download the software as you normally would from the Internet. If asked if you want to "keep" or "discard" the file, select keep. Note that you should only do this if you are certain you trust the publisher of the software.
 Open your software's setup file. This will prompt a pop-up with an error message that says "[Name] can't be opened because it was not downloaded from the App Store."
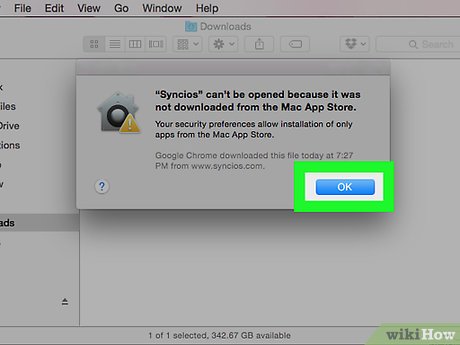 ClickOK. This will close the pop-up window.
 Open the Apple menu
 . Click the Apple logo in the top-left corner of the screen. A drop-down menu will appear.
 ClickSystem Preferences. This option is near the top of the drop-down menu.
 ClickSecurity & Privacy. It's near the top of the System Preferences window.
 Click the lock icon. It's in the bottom-left corner of the window.
 Enter your password, then clickUnlock. This will allow you to edit items in this menu.
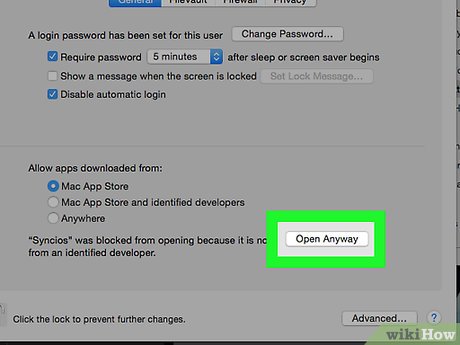 ClickOpen Anyway. It's next to your file's name.
 ClickOpenwhen prompted. Doing so will open your file and continue with the installation.
Method 2of 2:
Allowing All Software
 Open Spotlight
 . Click the magnifying glass icon in the top-right corner of the screen. to allow all software installations, you'll first need to restore an installation option that MacOS Sierra got rid of.
 Type interminal, then click
 Terminal. It should appear directly below the Spotlight search bar.
 Type
Typesudo spctl --master-disableinto Terminal and press⏎Return. This is the code that enables the installation option. Enter your password. This is the password you use to sign into your Mac. Doing so will restore the option you need in the Security & Privacy menu.
 Open the Apple menu
 . Click the Apple logo in the top-left corner of the screen. A drop-down menu will appear.
 ClickSystem Preferences. This option is near the top of the drop-down menu.
 ClickSecurity & Privacy. It's near the top of the System Preferences window.
 Click the lock icon. It's in the bottom-left corner of the window.
 Enter your password, then clickUnlock. You should now be able to edit the settings in this menu.
 Check theAnywherebox. It's below the "Allow apps downloaded from" heading near the bottom of the window. Doing so prompts a pop-up window.
 ClickAllow From Anywherewhen prompted. Doing this will allow you to install software from unsigned developers without having to confirm from within this menu.
- If you don't install any unsigned software within 30 days, you'll have to re-enable this settings.
- Click the lock icon if you'd like to prevent further changes.
 Install your software. You should now be able to install your software as you usually would.
FAQ
What is Click: How to Install Software from Unsigned Developers on a Mac about?
It provides a structured overview of click, explains the main context, and highlights practical takeaways for readers.
Why does this topic matter?
Understanding the main concepts helps readers evaluate the issue, avoid common mistakes, and make better-informed decisions.
How should readers use this information?
Use the guidance as a practical starting point, confirm details that may have changed, and follow current product, safety, or security recommendations.
Related Articles
 How to Transfer Unsigned Text with Unikey4 minutes read
 How to Convert Vietnamese Accented into Unsigned Very Fast Like Unikey3 minutes read
 How to Install the Driver Has Not Been Signed on Windows 106 minutes read
 What Software Developers Need to Do to Earn $$ 500,000 a Year and9 minutes read
 Instructions on How to Install Ubuntu8 minutes read
 TOP-5 Software Developers for an Online Casino6 minutes read
Reader Comments 0
Sign in with email or Google to join the discussion.