How to fix 0x0000007F (UNEXPECTED KERNEL MODE TRAP) error in Windows
Today's article will show you how to fix 0x0000007F: UNEXPECTED KERNEL MODE TRAP in Windows XP, Windows Vista, Windows 7, Windows 8, Windows 8.1 and Windows 10.
Instructions for troubleshooting 0x0000007F (UNEXPECTED KERNEL MODE TRAP)
- About error 0x0000007F
- Describe
- The cause of 0x0000007F error
- Fix 0x0000007F error on Windows
- Method 1: Check new hardware
- Method 2: Check RAM memory
- Method 3: Update or disable the driver
- Method 4: Disable cache from the BIOS
About error 0x0000007F
Describe
The 0x0000007F error is usually triggered by two situations that occur in kernel mode: The CPU generates a condition where the kernel is not allowed to find errors or unrecoverable errors.

The most common cause is hardware failure, mainly due to memory failure or mismatch. If the faulty software is currently installed on the computer, it may cause this error to appear.
On Windows 8 computers, the error code is replaced with UNEXPECTED_KERNEL_MODE_TRAP:

The cause of 0x0000007F error
This error occurs due to one or more of the following causes:
Cause 1: RAM failed
The most common cause of this error is due to RAM failure and frequent read / write errors. If that is the case, you should scan the system memory and replace the failed RAM.
Cause 2: Device driver is broken or outdated
Sometimes device drivers may be misconfigured, corrupted or outdated. It can also happen after updating Windows or downgrading Windows from the new system to the old system.
Fix 0x0000007F error on Windows
Method 1: Check new hardware
If an error occurs after installing new hardware, it is likely that the error is caused by that specific hardware. To fix the problem, simply remove the new hardware and restart the computer. If an error occurs after installing a new hardware driver, switch to method 3.
Method 2: Check RAM memory
Errors can be triggered by memory errors or mismatches.
If the 0x0000007F error occurs immediately after you plug in the new RAM, turn off the computer, remove it, and then restart the computer and check if the error has been fixed.
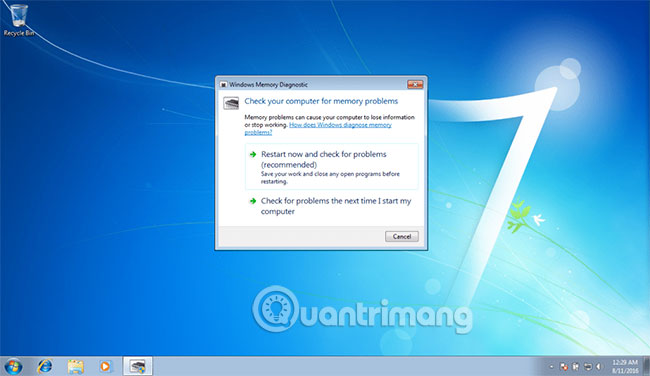
If an error occurs due to RAM error, check RAM with Windows Memory Diagnostic tool.
Please refer to the article: How to check and detect RAM and hardware problems on your Windows computer? to know how to do it.

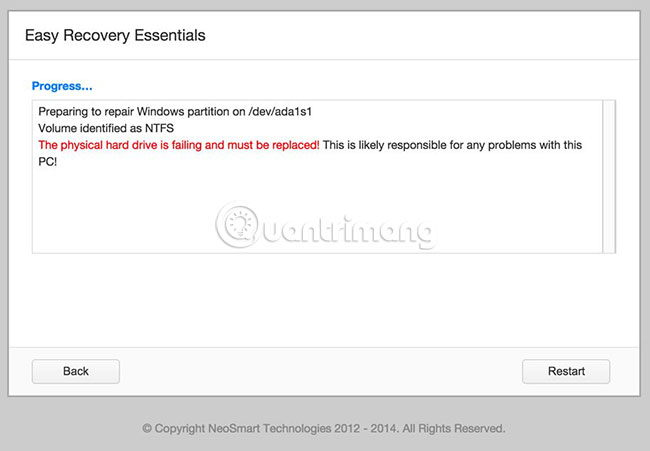
If Windows Memory Diagnostic does not return any results, you can also use the Automated Repair feature of Easy Recovery Essentials to check your RAM, HDD and CPU in one process:
1. Download Easy Recovery Essentials.
2. Burn ISO image. Follow the instructions in the article: Use Daemon Tools to create ISO Image in Win 7 and Tips to burn ISO file from Command Prompt on Windows 10. If not, you can use USB recovery. Follow TipsMake.com 's instructions on how to create a recovery USB.
- Create USB drive to recover Windows 8
- Create USB Recovery in Windows 8.1
- How to create a Windows 10 recovery USB when it fails?
3. Boot into Easy Recovery Essentials .
4. Select Automated Repair.
5. Click Continue and wait for the Automated Repair process to finish. Automated Repair will report any problems found on the hard drive or RAM memory:

Method 3: Update or disable the driver
To check if the 0x0000007F error occurs because the drive is faulty, run the automatic driver update or manually update the drivers to the latest available versions.
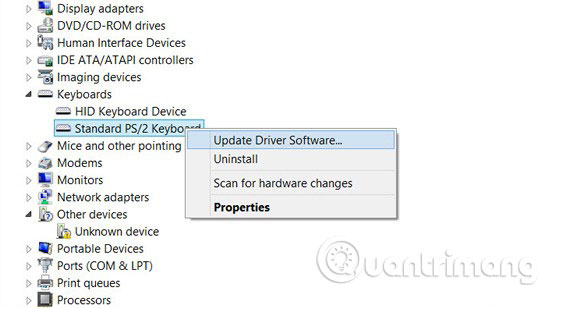
To update the driver manually, follow these steps:
1. Click Start.
2. Enter devmgmt.msc in the search box.
3. Click devmgmt from the results list.
4. Right-click the driver.
5. To update the driver, select Update Driver Software .
6. To disable the driver, select Disable.
7. To uninstall the driver, select Uninstall.

To update the driver automatically, follow these steps:
1. Click Start.
2. Go to Devices and Printers .
3. Right-click on the computer.
4. Select Device Installation Settings .
5. Select Yes, because this automatically .
6. Click Save Changes.
7. Follow the steps needed to continue the process.

You can refer to the article: How to automatically update drivers on Windows using SnailDriver.
Method 4: Disable cache from the BIOS
Follow these steps to open the BIOS menu and disable Cache Memory, then check if the error 0x0000007F appears:
1. Restart the computer.
2. Press F2 or Del key to enter BIOS Setup.

3. Note the main instructions in the upper right corner.
4. Go to the Advanced menu .
5. Select Cache Memory.
6. Make sure Cache Memory is disabled (Disabled).
7. Press F10 to save and exit ( Save & Exit ).
8. Select Yes.
Wishing you a successful fix!