This guide explains how to resolve the Error That the Printer Driver Cannot Be Installed in, starting with the most likely causes and moving through practical troubleshooting steps.
Windows can't install the (Softwarename) printer driver kernel-mode print driver. To obtain a driver that is compatible with the version of Windows you are running, contact the manufacturer.
Therefore, to help you handle the above errors, please refer to the ways to fix the error of not installing the printer driver in kernel-mode mode on Windows which I will guide in detail In this guide. here.
1. Disable the driver installation block function on the computer
To disable the driver installation function on the computer, follow these steps:
Step 1: Press the Windows Key + R keyboard shortcut to open the Run dialog box, then enter the phrase gpedit. msc and click OK to open the Group Policy Editor.

Step 2: In the Group Policy Editor window, expand the Local computer Policy option.
Step 3: Now navigate to the following directory access link:
Computer Configuration —-> Administrative Templates —-> Printers.
Step 4: On the right window, find and double-click the Disallow installation of printers using kernel-mode drivers. At this time, the screen will open in a new window.
Step 5: In the properties window, click Disabled and click OK .

Step 6: Now click Apply and click OK to save the changes. Then close the Group Policy Editor window .
Step 7: Continue, press the Windows key and type cmd , then right-click Command Prompt and select Run as administrator.
Step 8: In the Command Prompt, type the following command and press enter:
gpupdate
If the above statement does not work, enter the command:
gpupdate / force.
Then close the Command Prompt window and try installing the driver to check.
Note: Depending on the version of [ Windows ], the Group Policy Editor may or may not be installed on your computer.
2. Rename the W32x86 / X64 folder
In addition to the above method, you can fix the error that the printer driver cannot be installed in kernel-mode mode by renaming the folder W32x86 / X64 on the computer with the following steps:
Step 1 : Open File Explore r and navigate to the following path:
C: windowssystem32spooldrivers
Step 2 : In the Drivers folder, rename the following folders:
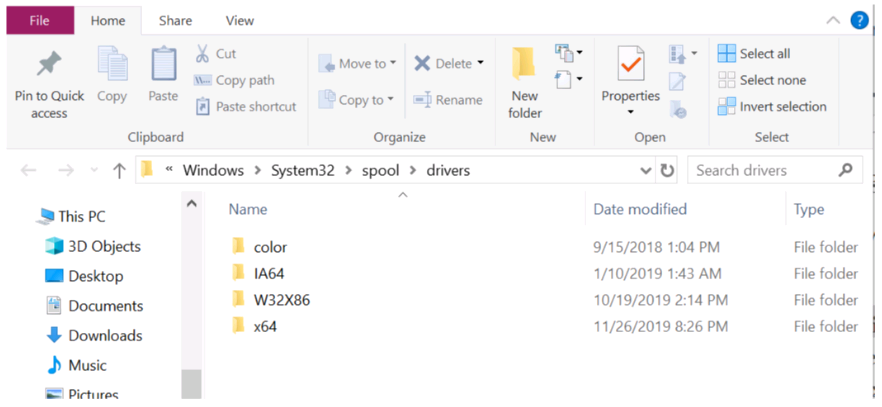
W32x86 X64
You can change it to whatever you want. Renaming these directories will help the computer to uninstall corrupted or missing data drivers.
In addition, it will also help remove the settings of the printer that you have previously set. This way, if you use a working printer, you may need to reinstall the printer driver to get it working again.
3. Reset the point and printer restriction section
Windows will not be able to install the printer driver in kernel-mode if the Group Policy Editor section has prevented the installation. Therefore, you should reset the point and printer restriction by following these steps:

Step 1: You press the shortcut Windows Key + R to open the Run dialog box, then enter the phrase gpedit. msc and click OK .
Step 2 : In the Group Policy Editor window , expand Local Computer Policy . Then navigate to the following directory:
Computer Configuration —-> Administrative Templates —-> Printers
Step 3: On the right pane, find and double-click Point and printer Restrictions , then select Enabled in the properties window.

Step 4: Now, you need to uncheck the following options:
-
Users can only point and print to these servers
-
Users can only point and print to machines in their forest
Step 5: In the Security Prompts section, in the first row named When installing drivers for a new connection , click the Do not show warning or elevation prompt option.
Step 6: Next, at the section titled When updating driver for an existing connection , click the Do not show warning or elevation prompt option.
Step 7: Now click Apply and click OK to save changes.
Step 8: Next, open the Command Prompt as an administrator and enter the following command:
gpupdate
Step 9: Now close the Command Prompt window and check if the error has been resolved.
So I have shown you how to fix the error that the printer driver cannot be installed in the simplest kernel-mode mode. Hopefully this article will be helpful to you. I wish you successful implementation!





Reader Comments 0
Sign in with email or Google to join the discussion.