How to Find Color Codes in Windows 11
On Windows 11, you can identify the code of any pixel on your screen using the Color Picker feature available in PowerToys or Snipping Tool..
On Windows 11, you can identify the code of any pixel on your screen in two different ways, either through the Color Picker feature available in PowerToys or the Snipping Tool screenshot tool application. This makes it easy for users to find the code of any color on their computer very quickly. Here is a guide to finding the color code in Windows 11.
How to Find Color Codes in Windows 11 Using PowerToys
Step 1:
First of all, we need to install PowerToys on the computer , then open the tool. Next, click on System Tools in the interface and select Color Picker. Look to the side and activate Enable Color Picker.

Step 2:
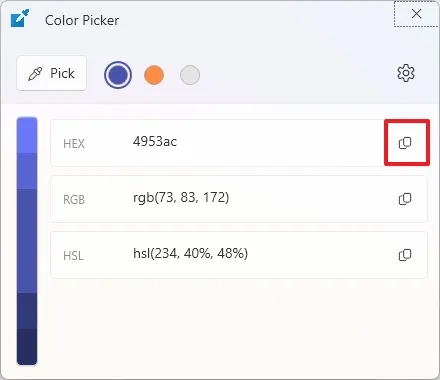
Now we select the color using the shortcut Windows + Shift + C and then click on the color you want to see the color code. As a result, we will see the color code displayed as shown below. Click on the color code to display the color palette.

Step 3:
You can now copy the color code to use for other tasks you want.
How to use Color Picker on Snipping Tool to find color code
Color Picker in Snipping Tool is now implementing color code viewing feature and is applicable for version 11.2504.38.0 and above.
Step 1:
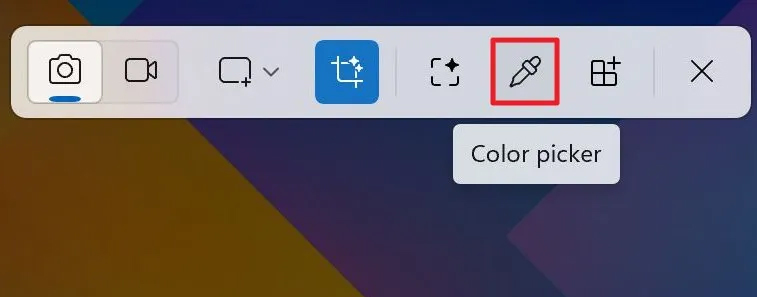
Press Windows + Shift + S to open the Snipping Tool on your computer. Then click on the Color Picker tool to find the color code.
Step 2:
We choose the color format including HEX, RGB or HSL. Then you choose the color you want to find the color code and the color code will be displayed below for you to copy and use.