How to Create a Windows Azure SQL Database
This wikiHow article show you how to create a Windows Azure SQL Database. Also it shows you how to connect to database from your app. Log in to your Windows Azure management portal.
Table of Contents
Part 1 of 4:
Creating a Windows Azure SQL Database
- Log in to your Windows Azure management portal.
- Click on the NEW button in the bottom left corner.
Then, it will show you a wizard. - Choose Data Services from the first pane, then select SQL Database.
- Select Quick Create.
- It will show a dialog, to enter name, select server and data center's region for your database.
- Enter the name for your database, and choose New SQL database server in the SERVER if you don't have any.
- Choose a login name which will be your username to access the database. Enter a strong password to meet the following requirements.
- The password must meet the following requirements:
- More than eight characters in length
- Does not contain all of the login name
- Contains characters from at least three of the following categories:
-English uppercase characters (A through Z)
-English lowercase characters (a through z)
-Base 10 digits (0 through 9)
-Non-alphanumeric characters (example: !, $, %)
- The password must meet the following requirements:
- Click Create SQL Database. Then you will see the following process.
When the process is completed, you will see your database name in "'all items"' list in management portal. Now your database is created successfully!
Part 2 of 4:
Allow your IP address for your client app to connect to the server
- Manage firewalls. To allow your client app to connect to your database, you need to add client pc's IP address to allowed list. To do so -
- Click on SQL Databases in management portal. You will see a list of current databases in your Management Portal.
- Click on Cars database.
- Click on Dashboard in menu.
- Click on 'Manage allowed IP addresses' link in Quick Glance.
- Click on Add to the Allowed IP Address against your current client IP Address
- Click on Save button in the bottom bar.
- Now you are done managing your database connectivity settings. You can now connect your database to your client app.
Part 3 of 4:
Make Some Changes to Database
- Add some table to the database. To do so -
- Click on Databases.
- Click on Cars database
- Click on 'Design your SQL database' link in Cars database management window.
- A new Window will open.
- Put your username and password you entered for your database in this window.
- Click on "Log On" button. Now you will see the SQL DATABASE Management Portal.
- Click on Design in the bottom left corner.
- Click on New Table to create a new table in database.
- Click on "Identity?" against column ID
- Make columns as shown in the image below.
- Click on Save.

- Click on Data.
- Add some rows of data
- Click on Save.
Part 4 of 4:
Checking Database Connectivity
- Copy Connection String from your Cars database Dashboard. To do so -
- Go to Dashboard and click Show Connection Strings in Quick Glance.
- Copy the ADO.NET Connection String
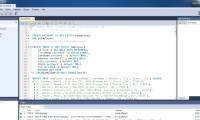
and replace the "default password" with the password your entered in credentials of database. - Make a simple console application in Visual Studio and enter this code in the Main() function.
- Collapse | Copy Code | try
{
Console.WriteLine("Creating Connection");
var conn = new SqlConnection(/* CONNECTION STRING HERE */ );
var cmd = new SqlCommand("Select * From Manufacturers", conn);
Console.WriteLine("Opening Connection!");
conn.Open();
Console.WriteLine("Connection Opened");
Console.WriteLine("Executing Query");
var result = cmd.ExecuteReader();
Console.WriteLine("Query Executed!");
Console.WriteLine("Manufacturers found in database:");
while
(result.Read())
{
object[] rowArr = new object[result.FieldCount];
result.GetValues(rowArr);
Console.WriteLine("t"+rowArr[1]);
}
Console.WriteLine("Closing Connection!");
conn.Close();
}
catch (Exception ex)
{
Console.WriteLine("Error Occuredn"+ ex.Message);
}
Console.Read();
- Run the application.
- It gives the following output, which means that everything is running OK and the SQL query is run against the server successfully, returning the rows of data.

- It gives the following output, which means that everything is running OK and the SQL query is run against the server successfully, returning the rows of data.
Was this article helpful?
Your feedback helps us improve.
Related Articles
 Windows Azure will change its name to Microsoft Azure2 minutes read
 How to install Azure Data Studio on Linux to manage SQL server5 minutes read
 How to create a database in MySQL6 minutes read
 Detecting a vulnerability that makes 3,000 companies using Microsoft Azure vulnerable to hackers reading data over the past 2 years2 minutes read
 Already able to test Windows 11 on Azure Virtual Desktop2 minutes read
 What is Azure Sphere?9 minutes read
Reader Comments 0
Sign in with email or Google to join the discussion.