Table of Contents
This practical guide explains how to check Your Computer's History to See If Someone Has in a clear sequence, including preparation, key settings, common mistakes, and troubleshooting steps.
What This Guide Covers
- Part 1: Check history on Windows computer
- 1. Check recent activities in 'Jump Lists'
- 2. Check the Recent Activity list (old versions of Windows 10 and previous generation Windows)
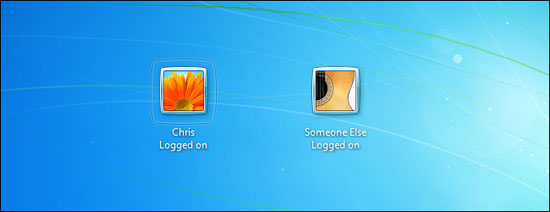
Many users do not have the habit of setting a password for their computer, especially when working in the office. However, this also causes some problems because strangers can illegally access your computer to steal information or use your computer for other purposes.
Part 1: Check history on Windows computer
1. Check recent activities in 'Jump Lists'
If you pay attention, you will see that current new versions of Windows 10 no longer display the list of recent activities on the system (except for newly installed applications) in the Start menu like before. (Skip to the next section below if you're running on an older release of Windows 10, or previous generation versions of Windows).
However, you can still easily check the list of recently accessed files on the system just by right-clicking on applications in the Start menu as well as the taskbar.
For example, do you want to check if someone has secretly opened your Word document? Launch the Microsoft Word application, open any document, then right-click on its icon on the taskbar and look at the ' Recent ' section in the context menu that appears. Here, you will see a complete list of recently opened document files on Microsoft Word, thereby easily detecting any abnormalities if someone secretly peeks at your documents.

You can do the same thing in the Start menu. Right-click any application that you think someone may have recently accessed, including web browsers. However, if you have set your browser to automatically delete your browsing history, nothing will show up.
Alternatively, you can also open File Explorer and see the list of recently accessed files in the ' Quick Access ' section.
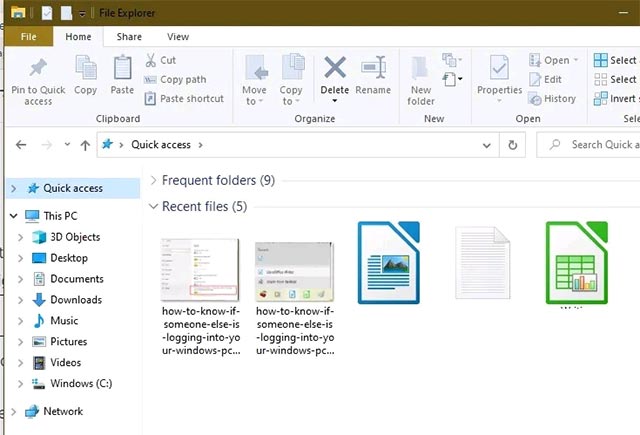
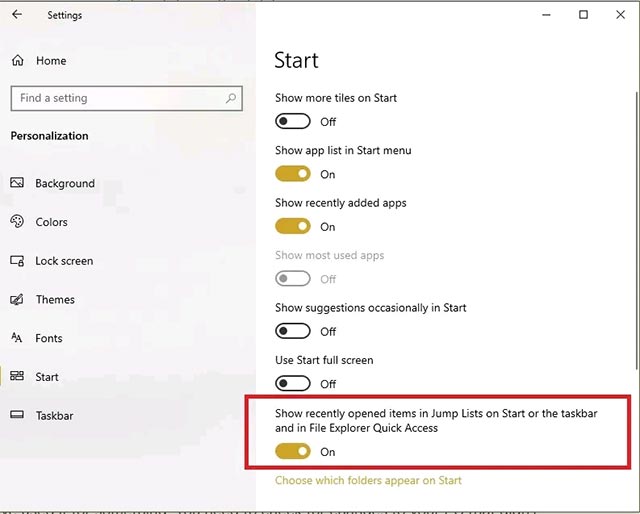
However, if this setting is not enabled by default, you will have to enable it manually by navigating to ' Start -> Settings -> Personalization -> Start '.
Press the switch to the left of the ' Show recently opened items in Jump Lists on Start or the taskbar and in File Explorer Quick Access ' option to turn it on.
2. Check the Recent Activity list (old versions of Windows 10 and previous generation Windows)
On Windows 10, press Windows + E to open File Explorer, where you will view newly opened image files, compressed files, txt files, Word, Excel, and PowerPoint files.
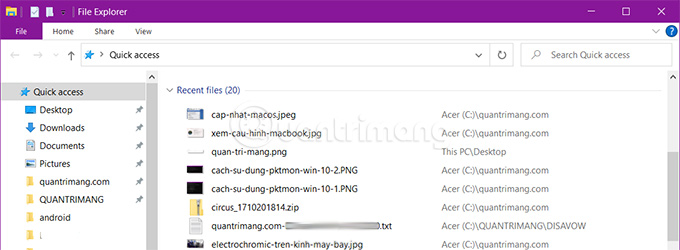
On Windows 7, you click Start Menu , and you will see a list of all recently opened programs, and if a strange program or one you haven't used before appears in this list, it's likely there. the person who opens your computer. Hover over the Recent Items section on the right side of the Start Menu and you will see a list of recently opened files.
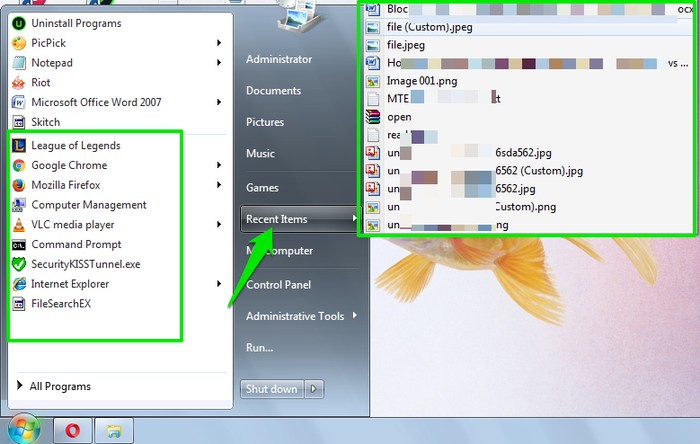
However, the limitation of this solution is that if an unauthorized person accessing your computer is smart enough, they can delete recent activities and recently opened files, so it is difficult for you to Detect whether your computer is being accessed and used by someone?
3. Check Windows Event Viewer
Windows will store a complete record of successful logon attempts as well as failed logon attempts. You can take advantage of this point to check if someone has accessed your computer?
To view successful or failed login attempts, access Windows Event Viewer.
To access Windows Event Viewer, first press the Windows + R key combination to open the Run command window, then enter eventvwr.msc there and press Enter or click OK to open the Event Viewer window.
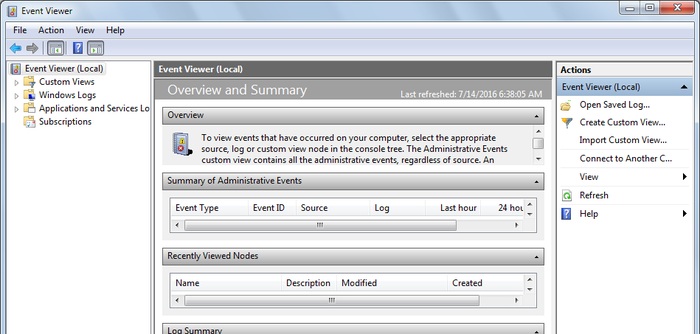
Monitor your computer when you are away
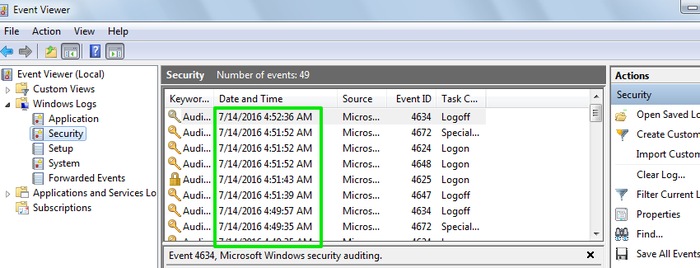
Here, double-click the Windows Logs button , then click Security . In the middle of the list you will see login attempts with login date and time. Each time you log in, Windows records logon attempts for the past approximately 2 to 4 minutes.
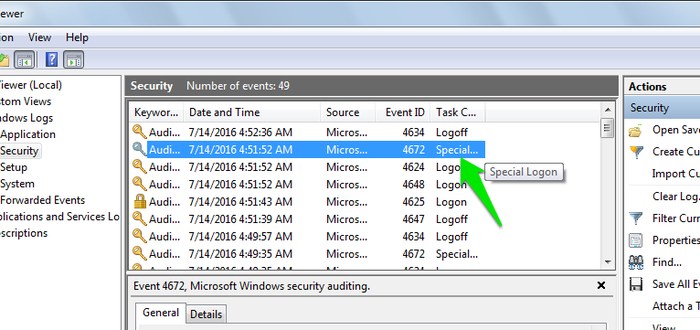
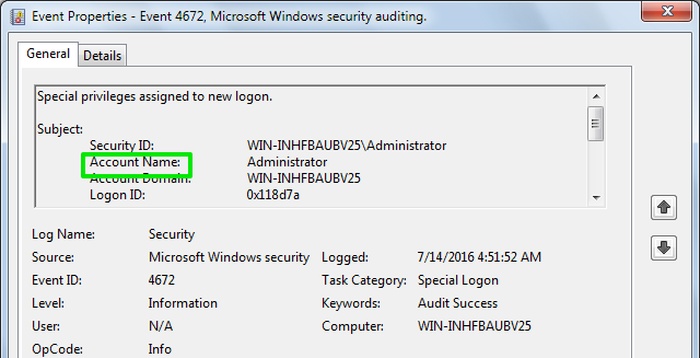
Additionally, you can check the specific account that has accessed your computer before (in case there are multiple accounts). To check, double click on the specific login, at this time the Event Properties window will appear on the screen. And you will see the account name next to Account Name .
4. Display last login details
The last solution you can think of is to set up the display of login information details when the computer starts. This will display the account you used the last time you logged in, whether successful or failed.
You will have to edit the Windows Registry, so before doing so you should create a backup first.
Press the Windows + R key combination to open the Run command window, then enter regedit in the Run command window and press Enter or click OK to open the Windows Registry.
On the Registry Editor window, navigate by key:
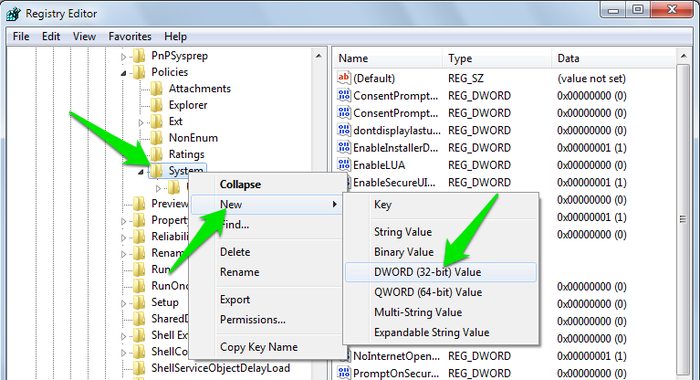
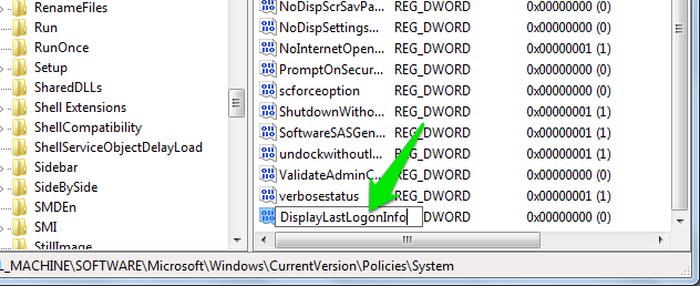
HKEY_LOCAL_MACHINESOFTWAREMicrosoftWindowsCurrentVersionPoliciesSystemNext right-click on the System folder and select New => DWORD value to create a new DWORD and name this DWORD DisplayLastLogonInfo .
Double click on DisplayLastLogonInfo and set the value in the Value Data frame to 1 .
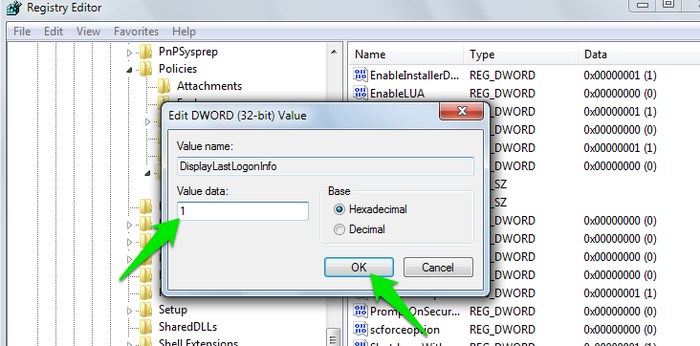
From now on whenever you log in to your computer, you will see details of your last login attempt and any failed login attempts.
5. Enable Logon Auditing
Note: Logon Auditing only works on Professional editions of Windows 7, 8 and Windows 10 and does NOT work on Home editions.
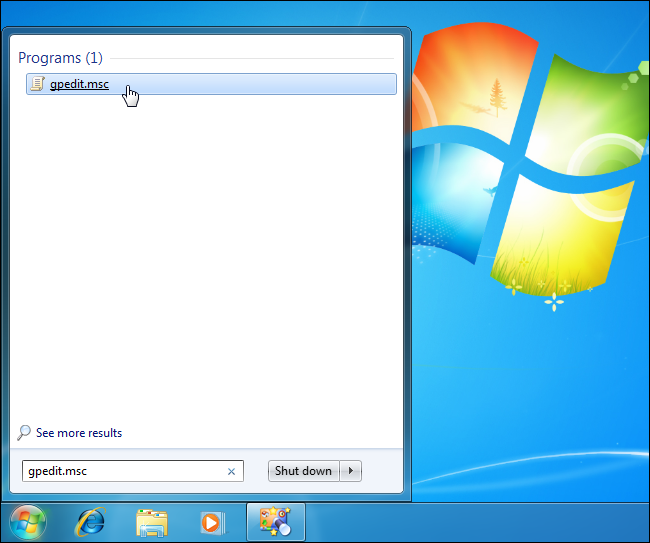
To enable Logon Auditing, first open Local Group Policy Editor. Press the Windows + R key combination to open the Run command window, then enter gpedit.msc there and press Enter to open Local Group Policy Editor.
Or another way is to enter gpedit.msc into the Search box on the Start Menu and press Enter .
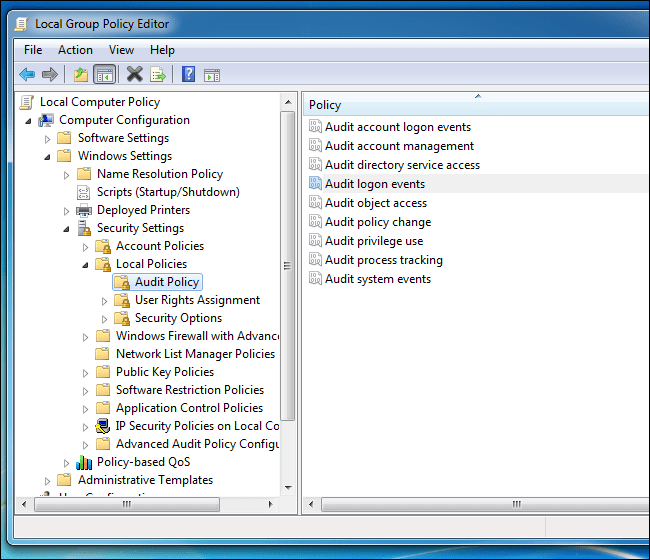
Next on the Local Group Policy Editor window, navigate to the key:
Local Computer Policy => Computer Configuration => Windows Settings => Security Settings => Local Policies => Audit Policy
Double click on the Audit logon events policy setting in the right pane to adjust the options.
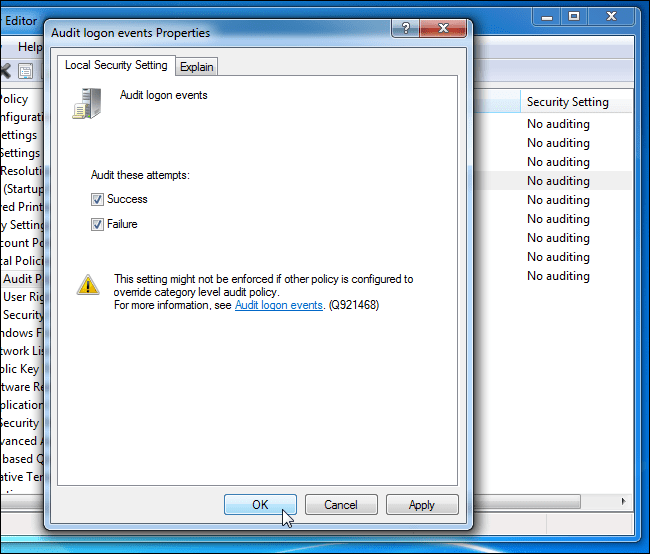
Next on the Properties window, check the Success box to display successful login. Additionally, you can check Failure to display failed login attempts.
6. Check recently used files
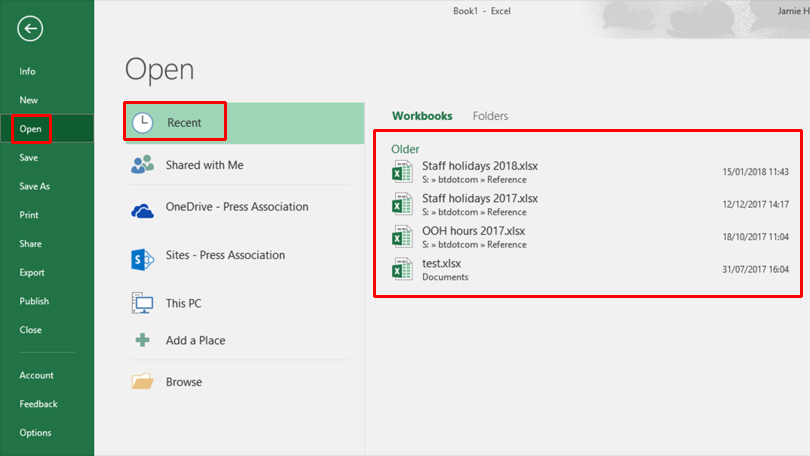
To check recently used files, open any application you use regularly and check the Open recent (or similar) option in the File menu . Not all applications have this option, but it will show users recently opened files, looking for files you don't recognize.
You can also search for files that were modified on specified dates. Open the window and enter a relevant word on the left side of the window, then select the Date modified option and select a date on the calendar that appears.
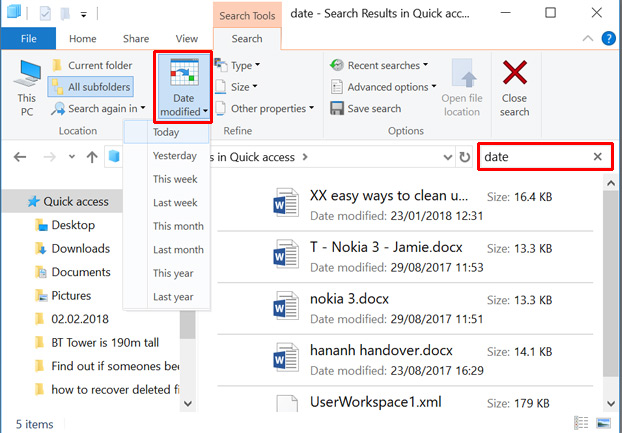
Windows will then search for all files in the Library folder that changed during that day. You can do the same in the C: drive, but Windows changes many files for general use, so doing this may not get the same results.
7. Check web browser history
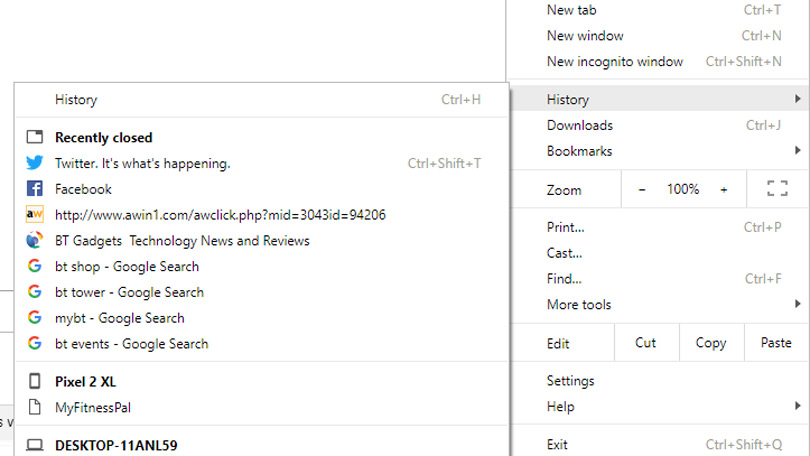
Finally, don't forget to check your web browser history. It will display a list of all recently opened and browsed websites by date. But one thing you need to keep in mind is that browsing history can be easily deleted, but you can completely trace deleted browsing history.
The best way to prevent someone from using your computer is to set a Windows user account password. Then whenever you leave your computer but don't want to turn it off, press Windows + L to lock the screen.
Part 2: Check activity history on Mac
On a Mac OS computer, you can only check if anyone is using your computer when you leave it and it is in Sleep mode , meaning it only saves wake-up activities. computer from Sleep mode . You can follow these steps:
Open the Console dialog box by pressing Command + Spacebar, or click on the Spotlight icon and search for it. Type the word "wake" into the search bar, then scroll down to the bottom of the list and you'll find the most recent logins.
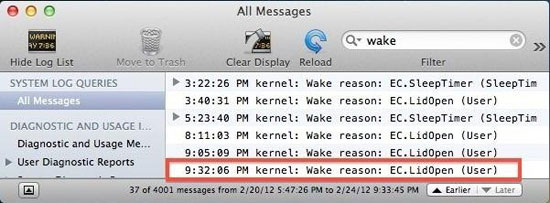
A few simple, yet effective tips to help you check on people using your computer when you're not there. This is quite useful for controlling your children's or young children's computer usage, but in other cases you should set a password for your computer to ensure safety.
Refer to some more articles below:
Good luck!
Final Thoughts
Use the instructions and checks above in order, verify the result after each major step, and keep a backup whenever the process changes important files or system settings.
FAQ
What should I check before starting?
Confirm that your device or software version matches the instructions, save important data, and note the original settings before making changes.
What should I do if the steps do not work?
Restart the app or device, install available updates, review any error message, and repeat the steps carefully in the same order.
Can I undo the changes?
Many changes can be reversed, but the exact method depends on the feature. A backup or restore point gives you the safest way to recover.
Related Articles
 How Do I Know If Someone Has Accessed and Used Your Computer?8 minutes read
 Check BIDV Transaction History: Complete Guide4 minutes read
 How to Recover Deleted Browsing History on Windows: Step-by-Step Guide5 minutes read
 How to Detect Remotely Accessed Computers: Complete Guide12 minutes read
 History of Computers: Overview of the Formation and Development19 minutes read
 Steps to View Logs and Usage History of Windows 10 Computers4 minutes read
Reader Comments 0
Sign in with email or Google to join the discussion.