Table of Contents
This practical guide walks through how to check all information about RAM on Windows 11, explains the main requirements, and highlights common issues that may appear along the way.
How to check the amount of RAM using the Settings Windows application
The easiest way to check how much RAM is available is in the Settings app.
First you need to open the Windows Settings app by pressing the Windows + i key combination, or right-click the Start button at the far left of the taskbar and select 'Settings' from the list that appears.
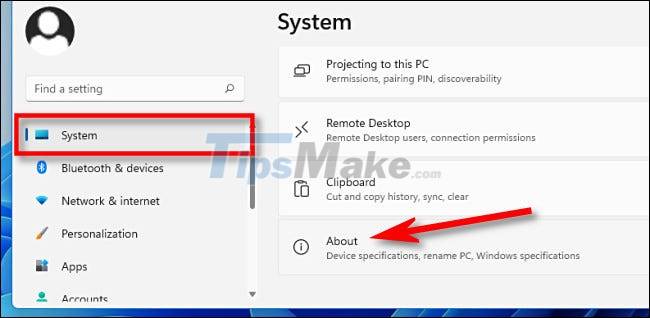
When the Settings application interface opens, look to the list on the left and click on the 'System' item. In the "System" settings screen, which appears on the right, scroll to the bottom of the list and click "About".
Expand the 'Device Specifications' section at the top of the list by clicking on it. Just below, you'll see how much RAM your PC has under 'Installed RAM'. In the example in the post is '16.0 GB'.
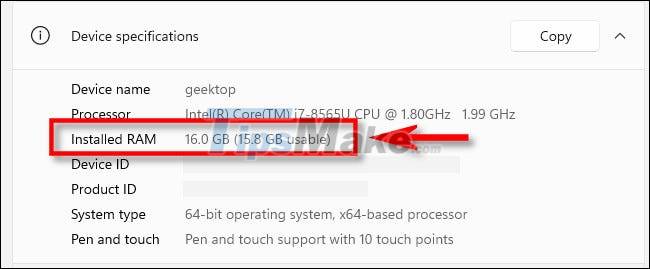
Besides RAM, this screen also shows all the basic information about system configuration that you need. To copy these specifications to send to others — possibly for troubleshooting — click the 'Copy' button next to 'Device Specifications'. All information will be copied as plain text so you can paste or send it to anyone.
How to check the speed and type of RAM in Windows 11
Knowing the type and speed of RAM is essential when upgrading a system.
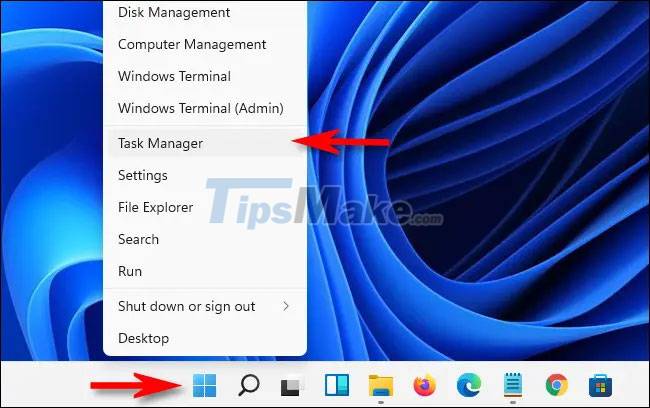
First, open the Task Manager by right-clicking the Start button and selecting 'Task Manager' in the menu that appears.
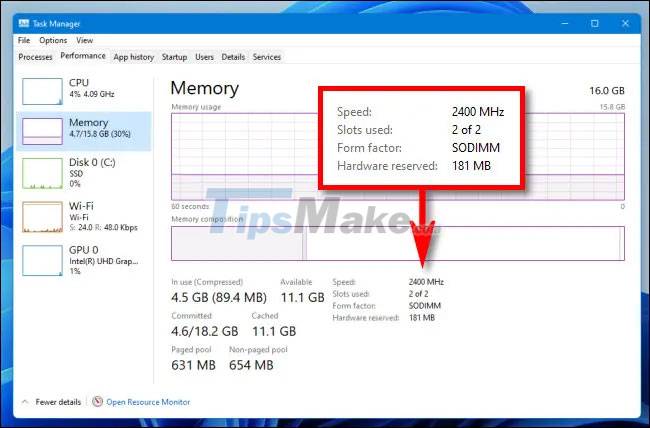
On the Task Manager interface, click the 'Performance' tab at the top, then click the 'Memory' item.

On the Memory information screen, look in the upper right corner of the window. Here you will see the total amount of RAM of your PC (such as '16.0 GB').
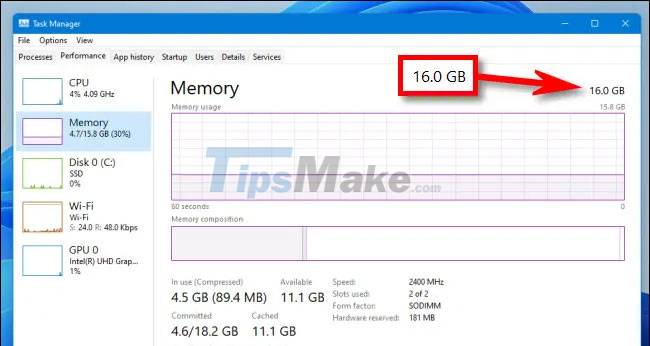
To see the speed and type of RAM, look towards the center of the "Memory" screen. You'll find a short list that shows the speed, form factor of the RAM, as well as the number of physical RAM slots it uses.
When you're done, close Task Manager. Wishing you a successful completion!
Key Takeaways
Use the information above as a practical reference for how to check all information about RAM on Windows 11. Review each step carefully, confirm any requirements, and choose the option that best fits your situation.
FAQ
What does this guide explain about Check All Information About RAM on Windows 11?
It explains the main concepts, practical considerations, and useful steps related to check all information about RAM on Windows 11 without requiring advanced knowledge.
Who can benefit from learning about Check All Information About RAM on Windows 11?
This information is useful for readers who want a clear overview, practical guidance, and reliable steps related to check all information about RAM on Windows 11.
What should I check before applying this information?
Review the requirements, confirm that your device, software, or situation matches the instructions, and back up important data before making major changes.
Related Articles
 4 Ways to Check Windows 10 System Configuration Details6 minutes read
 4 Simple Ways to Check the Configuration and Hardware Information7 minutes read
 4 Best Ways to Check RAM Capacity on Windows 116 minutes read
 How to Check If Your Payment Card Information Is Leaked3 minutes read
 Guiding to Check and Supplement Vinaphone Subscription Information6 minutes read
 How to Check Your Facebook Information Is Leaked or Not3 minutes read
Reader Comments 0
Sign in with email or Google to join the discussion.