Table of Contents
This guide explains how to change AVI to MOV on PC or Mac, with clear steps, practical tips, and important checks before you begin.
Using a Windows PC
-
 Go to https://www. videolan. org/vlc/download-windows. html in a web browser. You can use any web browser on your PC.
 -
 Click Download VLC. It's the large orange button on the right side of the VLC download page. This downloads the VLC install file to your computer.
 -
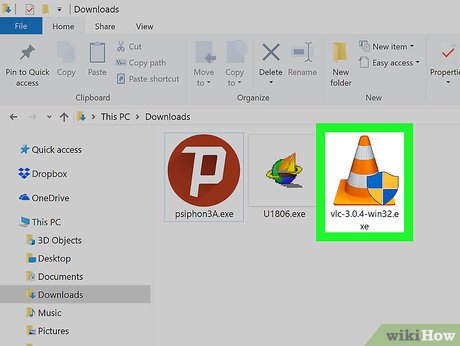 Double-click the VLC install file and follow the on-screen instructions. The VLC download file is vlc-x. x. x-win32. exe . "x. x. x" represents the latest version number. By default, your downloaded files can be found in your Downloads folder. You can also open downloaded files from within your web browser. Double-click the file and follow the on-screen instructions to install VLC.
 -
 Open VLC. It's the app that has an icon of an orange traffic cone. If you see the VLC app on your desktop, double-click it to open it. If you do not see VLC on your desktop, click the Windows Start button in the lower-left corner in the task bar. It's the button with the Windows logo. Type "VLC" to locate the VLC app in the Start Menu. This displays the VLC app in the Start menu. Double-click VLC to open it.
 -
 Click Media. It's the first option in the Menu bar at the top of the VLC app. This displays a drop-down menu below the "Media" tab.
 -
 Click Convert/Save. It's towards the bottom of the "Media" drop-down menu. This opens a window called "Open Media" which you can use to select files to convert.
 -
 Click + Add... It's to the right of the box in the center of the window. This opens a file browser window you can use to browse for and select files.
 -
 Select an AVI file and click Open. Use the file browser to navigate to an AVI file. You can use the sidebar on the left to click different folders on your computer. When you find the AVI file you want to convert, click it to highlight it. AVI files have a file extension that says ". avi". Click Open at the bottom of the file browser. This loads the AVI file into the VLC app.
 -
 Click Convert/Save. It's at the bottom of the "Open Media" window. This opens the VLC File Converter.
 -
 Select "Video - H.264 + MP3 (MP4)". Use the drop-down menu next to "Profile" to select an MP4 format for the video.
 -
 Click the wrench icon. It's next to the drop-down menu next to "Profile". This lets you edit the Profile.
 -
 Select "MP4/MOV". Under the "Encapsulation" tab, there are a variety of video formats. Click the radial button next to "MP4/MOV".
 -
 Click the Video Codec tab. It's the second tab at the top of the "Profile edition" window.
 -
 Select "MPEG-4" and click Save. Use the drop-down menu next to "Codec" to select "MPEG-4". Then click Save at the bottom of the window to save the video profile.
 -
 Click Browse. It's next to the bar that says "Destination File". This lets you select a location to save the converted file to, as well as edit the file name and extension.
 -
 Select "All (*.*)" next to "Save as type". Use the drop-down menu next to "Save as type" to select the file type. Select "All (*.*)". It's the second of two options.
 -
 Add .mov after the file name. In the box labeled "File Name", add the file extension ". mov" to the end of the file name. If there is a different file extension (such as ". mp4"), delete the file extension and replace it with ". mov".
 -
 Click Save. It's at the bottom of the file browser. This tells the file converter what to save the file as.
 -
 Click Start. It's at the bottom of the file converter window. This starts the conversion process. It may take a while for the file to finish converting. Especially if it's a larger file.
Using Mac
-
 Open the App Store. It's the app that has a blue icon with a white capital "A".
-
 Type Free WMV AVI Converter in the search bar and press ↵ Enter. The Search bar is in the upper-right corner of the App Store.
 -
 Click GET below Free WMV AVI Converter. It's the app with a blue arrow over a filmstrip and video. It has a green sign that says "Free" over it. Click GET below Free WMV AVI Converter to download the app from the App Store.
 -
 Open Free WMV AVI Converter. After you download Free WMV AVI Converter from the App Store, you can open it by clicking on it in your Applications folder in The Finder. You can also click OPEN below to Free WMV AVI Converter in the App Store.
 -
 Click Add File. It's in the upper-left corner of the Free WMV AVI Converter app. It's next to an icon that resembles a sheet of paper with a plus (+) sign next to it. This opens a file browser window you can use to select files.
 -
 Browse and select a AVI file. Use the file browser window to navigate to the AVI file you want to select. AVI files have a ". avi" file extension on the end of them. When you find the file you want to convert, click on it to select it. Selected files have highlighted text.
 -
 Click Open. It's in the lower-right corner of the file browser window. This loads the avi file into Free WMV AVI Converter.
- You can select more than one file by holding ⇧ Shift while selecting files.
-
 Click the drop-down menu next to "Profile". It's at the bottom of the Free WMV AVI Converter app on the left side. This displays a list of file formats you can convert the AVI file to.
 -
 Select "MOV - QuickTIme Video (*. mov)." It's in the column on the right side of the drop-down menu. It's next to the QuickTime logo with the blue "Q".
- If you don't see this option in the menu to the right, click Free Video in the column to the right. This displays a list of video formats you can convert to for free.
-
 Click Browse (Optional). If you want to save the converted MOV file to a specific location, you can do so by clicking "Browse" at the bottom of the Free WMV AVI Converter app, below the "Profile" drop-down menu. This opens a file browser window you can use to navigate to the location you want to save the converted file(s).
 -
 Click a save folder and click Open (Optional). After you open the file browser window, navigate to a folder you want to save the converted MOV file to. Then click Open in the lower-right corner of the file browser window. This selects the location you want to save the AVI file to after it is converted to a MOV file. If you do not select a new location, it will be saved in the same folder as the original AVI file.
 -
 Click Convert. It's the large blue button in the lower-right corner of the Free WMV AVI Converter app. This converts all checked files in the list to the file format you selected (MOV). A blue bar below "Progress" displays the total percentage of each video that has been converted. Longer videos may take a while to convert.
 -
 Click Completed. It's the blue button in the lower-right corner. This takes you back to the main screen of the Free WMV AVI Converter app. The MOV files you just converted can be found in the folder you chose to save them in.
FAQ
What should I know about Change AVI to MOV on PC or Mac?
Focus on the key features, requirements, limitations, and practical use cases explained in this guide.
How do I get the best results with Change AVI to MOV on PC or Mac?
Follow the recommended steps, use current software or information, confirm compatibility, and review settings before major changes.
Are there any risks or limitations?
Potential limitations depend on compatibility, data quality, cost, privacy, support, and how the product or method is used.
Related Articles
 How to Change DNS Server on the Most Popular Routers9 minutes read
 3 'Legitimate' Reasons to Change DNS Server12 minutes read
 Fix Can Not Change Static IP, Fix Can Not Change DNS on7 minutes read
 Change IP Address: How to Change the IP Address for the Phone9 minutes read
 How to Change DNS on Windows and Mac Computers4 minutes read
 How to Change Your Computer Password for the Most Popular Operating Systems7 minutes read
Reader Comments 0
Sign in with email or Google to join the discussion.