How to build an authentication system in Django using OAuth
Django provides a default authentication system for developers. However, you can create a secure login system with social media accounts in Django using OAuth.
Table of Contents
User authentication in Django
The default authentication system that Django provides uses traditional methods, which involves collecting data such as username, email, password, first name, last name, etc.
By design, Django's authentication system is very generic and does not provide many of the features used in most web authentication systems today. To complement that, you'll want to use third-party packages like the django-allauth package .
How to enable OAuth in Django
To authenticate users with OAuth in a Django application, you can use the Django package named django-allauth .
Django Allauth is a package that handles authentication, registration, account management, and third-party account authentication for the Django project. The following steps will show you how to set up Django Allauth for your Django project.
Step 1: Install and set up Django-Allauth
Create a virtual environment and install django-allauth via pip:
pip install django-allauthNote that you must be using Python 3.5 or higher and Django 2.0 or higher to do this.
Step 2: Add required applications to Django for Django-Allauth
After installing django-allauth , open the settings.py file and add the following application to the INSTALLED_APPS list :
INSTALLED_APPS = [ """ Thêm app khác tại đây """ # Djang Allauth configuration apps 'django.contrib.sites', 'allauth', 'allauth.account', 'allauth.socialaccount', ]Here are some points to note about some of the above apps:
- allauth.socialaccount allows users to log in via social networking applications.
- django.contrib.sites integrates into the Django framework so django-allauth works.
Step 3: Determine the Authentication Backend for your project
You can do this by configuring AUTHENTICATION_BACKENDS in the settings.py file . For django-allauth , you should add:
AUTHENTICATION_BACKENDS = [ 'django.contrib.auth.backends.ModelBackend', 'allauth.account.auth_backends.AuthenticationBackend', ]The above code defines 2 backends:
- The first is the default bakend used by Django.
- The second validates the authentication backend for django-allauth .
Step 4: Add the page ID
In the settings file, you should add an ID for the page. For example:
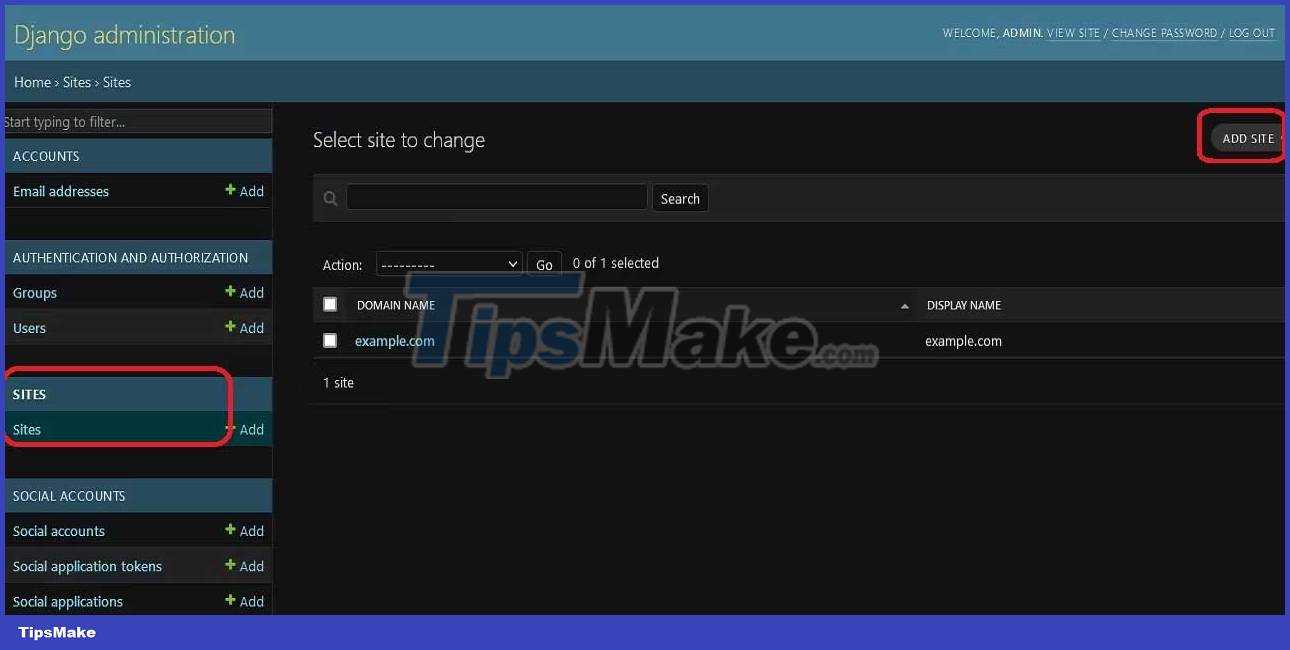
SITE_ID = 1By default, there is a page named example.com in the admin panel. You can decide to edit this page or add new ones yourself. In both cases, you need to log in to the admin panel and navigate to the Sites app .
To get the page ID for a Django page, open CLI and run the command:
python manage.py shellNext, write this script into the Python shell:
from django.contrib.sites.models import Site current_site = Site.objects.get_current() site_id = current_site.id site_name = current_site.name print("Site ID:", site_id) print("Site Name:", site_name)The above code will print the name of the page along with its ID.
Step 5: Configure URL
In the urls.py file , configure the URL pattern for django-allauth . The code will look like this:
from django.urls import path, include urlpatterns = [ # Djang-allauth url pattern path('accounts/', include('allauth.urls')), ]With this setup, you can start the programming server and navigate to http://127.0.0.1:8000/accounts/. If you have DEBUG set to True , you will see a list of available URL patterns for django-allauth .

If you've completed the steps above, your project is ready for social validation.
How to implement Google login/registration in Django app
After setting up django-allauth , you're ready to let users authenticate themselves with social media accounts like Google.
Step 1: Register a social network account provider in the installed application
In the settings.py file , you can add social network account providers in INSTALLED_APPS . Here is Google.
Step 2: Create IDclient and secret key on Google
To complete this step, you must create a Google account. If this already works, follow these next steps:

- Go to the Google Cloud console to create a new project. First, click on the drop-down menu as shown in the image above.
- Next, click NEW PROJECT .
- Enter a name for the project, then click the CREATE button.
- Once you have selected the project, click the hamburger menu. Select APIs & Services > Credentials.
- Next, click on CONFIGURE CONSENT SCREEN and select External.
- On the next page, enter a name for the app and include an email where needed. You can also explore configurations for some customization. Once completed, click SAVE AND CONTINUE .
- In the left-hand menu, select Credentials . Then, click CREATE CREDENTIALS > select OAuth client ID .
- Next, select Application type and enter a name for the same. In this tutorial, Application will be Web application .
- Next, add URLs for Authorized JavaScript origins and Authorized redirect URIs . The web host must have native JavaScript, and the system will send the user to the redirect URL after authentication. The redirect URL usually contains your-host-name/accounts/google/login/callback/ . For programming mode it will be: http://127.0.0.1:8000/accounts/google/login/callback/ . Click CREATE when done.
- After creating the authentication, you can copy the Client ID or Client secret to a safe place or download them as a JSON file.
Step 3: Add client ID and secret key to Django app
After creating the necessary authentications, go to http://127.0.0.1:8000/admin, select Social applications and create a new social application. Follow these steps:
- Add supplier. User authentication provider. Here is Google .
- Enter a name for the new social app.
- Paste the information into the Client ID you copied from Google.
- For the Secret key , paste it into the Client secret you copied from Google.
- The Key field does not apply to authenticating with Google, so ignore it.
- Finally, choose a site that links to the social media app.

Step 4: Check Google authentication
Exit the admin panel and go to http://127.0.0.1:8000/accounts/login/ . You'll see the option to sign in via Google.

Click on it to redirect to the consent screen. Next, select an account to log in.
Once you have selected an account, you will be redirected to http://127.0.0.1:8000/accounts/profile/ . This means the application is working perfectly. You can create custom templates to replace the default selection.
It's done! It's simple right?
Was this article helpful?
Your feedback helps us improve.
Related Articles
 How to put Django app into maintenance mode8 minutes read
 How to Create a CRUD App with Django's Class Based Viewers12 minutes read
 How to Install and Configure PostgreSQL in Django8 minutes read
 How to use AWS S3 Bucket to store static and media files in Django9 minutes read
 How to Add Search to a Django App7 minutes read
 How to upload photos using Django app6 minutes read
Reader Comments 0
Sign in with email or Google to join the discussion.