How to create a movie ticket booking system using Django
Programming a movie ticket booking system using Django is not difficult. Below is a detailed step-by-step guide on how to book movie tickets using Django.
Table of Contents
Programming a movie ticket booking system using Django is not difficult. Below is a detailed step-by-step guide on how to book movie tickets using Django .

First, we'll create a home page that lists all the movies currently available for booking. When customers want to book tickets, they must create an account, then click the Book button. The booked ticket will then appear in the pending section. Here, you have the option to cancel tickets, pay and see the total number of tickets booked.
Ticket booking system using Django
Here are the steps to create a ticket booking website using Django:
Start the project directory
To start the project, use this command:
django-admin startproject core cd core To start the app use this command:
python manage.py startapp homeNow add this app to 'settings.py'
INSTALLED_APPS = [ "django.contrib.admin", "django.contrib.auth", "django.contrib.contenttypes", "django.contrib.sessions", "django.contrib.messages", "django.contrib.staticfiles", "home", ]File structure:

Set up files
Models.py : This file is used to create models: BaseModel , MovieCategory , CartItems . Templates are used for storing information in the database.
from django.db import models from django.contrib.auth.models import User import uuid class BaseModel(models.Model): uid = models.UUIDField(default=uuid.uuid4, editable=False, primary_key=True) created_at = models.DateField(auto_now_add=True) updated_at = models.DateField(auto_now_add=True) class Meta: abstract = True class MovieCategory(BaseModel): category_name = models.CharField(max_length=100) class Movie(BaseModel): category = models.ForeignKey(MovieCategory, on_delete=models.CASCADE, related_name="pizzas") movie_name = models.CharField(max_length=100) price = models.IntegerField(default=100) images = models.CharField(max_length=500) class Cart(BaseModel): user = models.ForeignKey(User, null=True, blank=True, on_delete=models.SET_NULL, related_name="carts") is_paid = models.BooleanField(default=False) class CartItems(BaseModel): cart = models.ForeignKey(Cart, on_delete=models.CASCADE, related_name="cart_items") movie = models.ForeignKey(Movie, on_delete=models.CASCADE) views.py : This code defines the viewers that handle different web pages in the Django web application. View windows include the home page, login page, registration page, shopping cart, and remove items from cart.
- User Authentication : It uses Django's inbuilt authentication system for user registration and login. Users can create an account using a username and password. This code checks for available usernames and handles authentication.
- Show movies : The 'home' viewer retrieves a list of movies from the database and passes them to the 'home.html' template for display. This allows users to view a list of movies on the home page.
- Cart management : Users can add keys to the cart. The 'add_cart' page will handle this problem by linking the movie to the user's cart located in the database. The 'cart' page shows the contents of the user's shopping cart.
- Error handling and reporting : This code handles errors and exceptions. It displays appropriate error messages using Django's 'messages' framework to notify users of errors such as incorrect login information or registration issues.
- Authentication decorator : '@login_required' is used to protect specific viewers. It ensures only authenticated users have access to the shopping cart or remove them from it. If the user is not authenticated, the application will return them to the login page.
{% load static %} Hello, world! GeeksforGeeks ????????
{% block start %}{% endblock %} Create GUIs
Base.html : This is the basic HTML file of the web that displays the site's logo. This file is inherited by all other HTML files.
{% load static %} Hello, world! GeeksforGeeks ????????
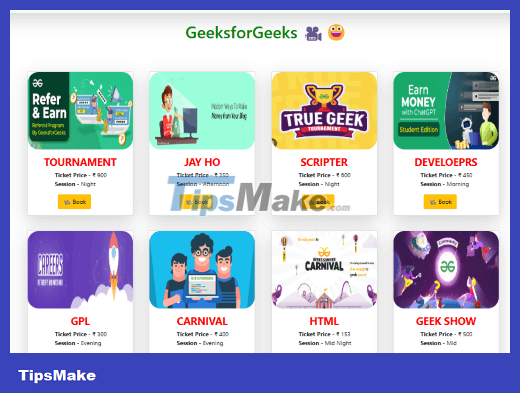
{% block start %}{% endblock %} Home.html : This is the HTML file used to view the home page of the website. You can see all the website's products here and add them to your cart if you want.
{% extends "base.html" %} {% load static %} {% block start %} {% for movie in movies %} 
{{movie.movie_name}}
Ticket Price - ₹ {{movie.price}}
Session - {{movie.category.category_name}}
???? Book
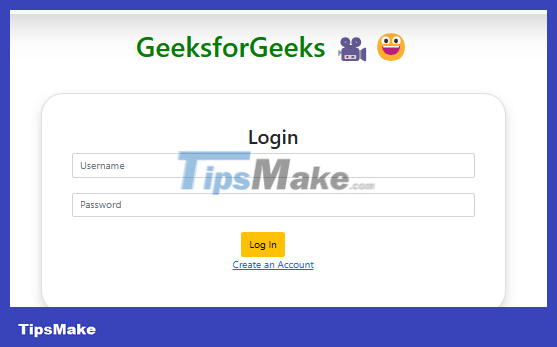
{% endfor %} {% endblock %} Register.html : This HTML page is used to collect user information and use it to register users.
{% extends "base.html" %} {% load static %} {% block start %} {% if messages %} {% for message in messages %} {{ message }} {% endfor %} {% endif %} {% csrf_token %}Register
Already have an Account
{% endblock %} Cart.html : It displays relevant information such as serial number, ticket cancellation options, photos, movie name and link to pay. This dynamic content is generated based on the items in the user's cart.
{% extends "base.html" %} {% load static %} {% block start %}{% for cartItems in carts.cart_items.all %} {% endfor %}
| S.No. | Cancel Toicket | Book | Movie Name | Watch |
|---|---|---|---|---|
| {{forloop.counter}} | ???? Cancel Tickets |

|
{{cartItems.movie.movie_name}} |
???? Pay Now |
{% endblock %} Urls.py : This code is responsible for routing and serving web pages in the Django application when handling media files and static files based on the application's settings.
from django.contrib import admin from django.urls import path from home.views import * from django.conf.urls.static import static from django.conf import settings from django.contrib.staticfiles.urls import staticfiles_urlpatterns urlpatterns = [ path('', home, name='home'), path('cart/', cart, name='cart'), path('remove_cart_item/', remove_cart_item, name='remove_cart'), path('add_cart/', add_cart , name="add-cart"), path('login/', login_page, name="login"), path('register/', register_page, name="register"), path("admin/", admin.site.urls), ] if settings.DEBUG : urlpatterns +=static(settings.MEDIA_URL, document_root = settings.MEDIA_ROOT) urlpatterns += staticfiles_urlpatterns() Project implementation
Run this command to apply the migration:
python3 manage.py makemigrations python3 manage.py migrateRun this server with the help of the following command:
python3 manage.py runserverResult:

Hope this article is useful to you!
Was this article helpful?
Your feedback helps us improve.
Related Articles
 How to build an authentication system in Django using OAuth7 minutes read
 How to put Django app into maintenance mode8 minutes read
 How to Create a CRUD App with Django's Class Based Viewers12 minutes read
 How to Implement ChatGPT in Django4 minutes read
 How to Install and Configure PostgreSQL in Django8 minutes read
 How to use AWS S3 Bucket to store static and media files in Django9 minutes read
Reader Comments 0
Sign in with email or Google to join the discussion.