Table of Contents
What Are Docker and Docker Compose?
This guide provides a clear overview of docker, including what Docker and Docker Compose are, Set Up the Nest.js Project. Use it to understand the topic, compare the available options, and make a more informed decision.
These images are then run as executable components in an isolated container environment. Running applications in these containers ensures consistent application performance across different production systems without any compatibility issues.
On the other hand, Docker Compose is a tool used in conjunction with Docker to simplify the process of defining and managing multi-container applications.
While Docker is primarily used to manage individual containers, Docker Compose allows you to manage the configuration of multiple containers that need to run as a single application.
This is especially useful when an application includes multiple services that need to work together, such as several dependent API and database services.
Before diving into the code, you need to install Docker Desktop on your local machine.
Set Up the Nest.js Project
This tutorial will walk through the process of setting up two Docker containers that work seamlessly as a single Nest.js application. The first container will contain a Docker image instance of the Nest.js web server, while the second container will execute the Docker PostgreSQL database image.
To get started, install the Nest.js command line tool:
npm i -g @nestjs/cliNow, create a new Nest.js project by running the command below in your terminal.
nest new docker-nest-appNext, the CLI tool will display several package managers for you to choose from to create a project. Click the preferred option. This example uses npm.
Finally, you can navigate to the project folder and start the development server.
cd docker-nest-app npm run startCreate Database Module
First, install the dependencies:
npm install pg typeorm @nestjs/typeorm @nestjs/configNext, in the project root directory, create an .env file and add the following database connection configuration values:
DATABASE_HOST="db" DATABASE_PORT=5432 DATABASE_USER="testUser" DATABASE_PASSWORD="mypassword123"Finally, let's go ahead and create the database module.
nest g module databaseNow, after the module is created, open the database file /database.module.ts and include the following database configuration code:
import { Module } from '@nestjs/common'; import { TypeOrmModule } from '@nestjs/typeorm'; import { ConfigModule, ConfigService } from '@nestjs/config'; @Module({ imports: [ ConfigModule.forRoot(), TypeOrmModule.forRootAsync({ imports: [ConfigModule], useFactory: async (configService: ConfigService) => ({ type: 'postgres', host: configService.get('DATABASE_HOST'), port: configService.get('DATABASE_PORT'), username: configService.get('DATABASE_USER'), password: configService.get('DATABASE_PASSWORD'), synchronize: true, }), inject: [ConfigService], }), ], }) export class DatabaseModule {}After setting up the Docker PostgreSQL image using this TypeORM configuration, the Nest.js application will establish a connection to the database.
Update File App.module.ts
Finally, update the main application module file to incorporate the configuration for the database module.
import { Module } from '@nestjs/common'; import { ConfigModule } from '@nestjs/config'; import { AppController } from './app.controller'; import { AppService } from './app.service'; import { DatabaseModule } from './database/database.module'; @Module({ imports: [ ConfigModule.forRoot({ envFilePath: '.env', }), DatabaseModule, ], controllers: [AppController], providers: [AppService], }) export class AppModule {}Set Up Dockerfile
The Dockerfile records the necessary set of instructions that the Docker engine needs to create a Docker image. It includes the application's source code and all its dependencies.
In the project root directory, create a new file and name it Dockerfile. Then add the following:
FROM node:16.3.0-alpine3.13 WORKDIR /app COPY package*.json ./ RUN npm install COPY . . RUN npm run build CMD [ "npm", "run", "start:dev" ]In there:
- FROM specifies the base image that Docker should use to build the application's image.
- WORKDIR instructs Docker to set the /app directory as the working directory for the application in the container.
- COPY package*.json./ copies all files with that filename format from the current directory in the application to the app directory.
- RUN npm install installs the required packages and dependencies required by the application in the Docker container.
- COPY. instructs Docker to copy all the application's source code files from the current directory to the /app directory.
- RUN npm run build builds the Nest.js application before creating the Docker image. It compiles TypeScript code to JavaScript and stores the output of the build process in a dist directory.
- CMD defines the command to run when the container starts. In this case, we will run the command npm run start:dev to start the server in development mode.
This configuration allows the application to actively monitor code changes. When changes are detected, the container is automatically rebuilt.
Create Docker Compose File
In the root of the project directory, create a new docker-compose.yml file and add the following content:
version: '3.9' services: server: build: . ports: - '3000:3000' depends_on: - db db: image: 'postgres' ports: - '5432:5432' environment: POSTGRES_PASSWORD: 'mypassword123' POSTGRES_USER: 'testUser' volumes: - data:/var/lib/postgresql/data volumes: data:Docker Compose will use these instructions to build and run two images in two Docker containers. The first container, the server, will store the application's images; runs on port 3000.
The second container will store the PostgreSQL database image. You do not need to specify a Dockerfile for this image—Docker will use the PostgreSQL image available on the Docker image registry to build it.
Start Docker Container
Finally, continue building the images and start the container by running the following command:
docker compose upAfter this process completes successfully, you will see the same log information on the terminal.
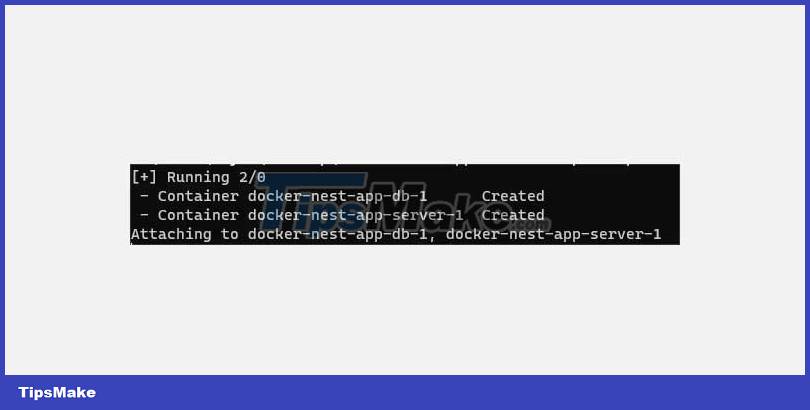
Now that both your web server and database container are running, go ahead and add more functionality to your Nest.js application. For example, you can build Nest.js CRUD REST API.
Push the Docker Image to Docker Hub
Follow these steps:
1. Go to Docker Hub, sign up and login account dashboard.
2. Click the Create repository button, enter the name of the repository , determine its visibility by selecting Public or Private , then click Create .
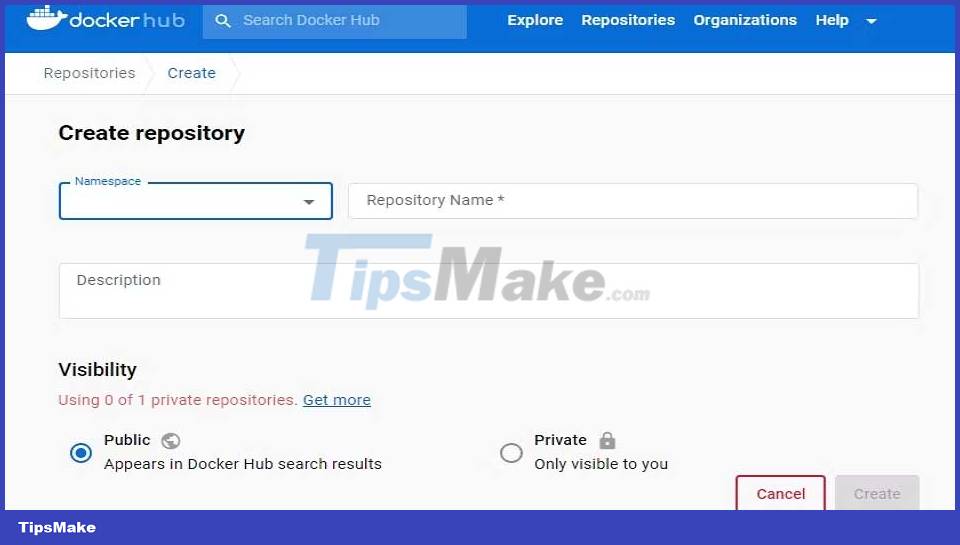
3. Now, you need to log in to the account through the terminal by running the command below, then provide the Docker username and password.
docker login4. Next, update the Docker image name to match this format: / with the command:
docker tag /5. Finally, push the Docker image.
docker push /Docker's containerization technology allows you to package an application along with all of its dependencies into a Docker image. These images can then run smoothly in containers across different development and production environments without any issues.
Conclusion
Understanding Docker makes it easier to compare options, avoid common mistakes, and apply the information in this guide more effectively. Review the relevant requirements before making changes or choosing a solution.
FAQ
What is Docker?
What Are Docker and Docker Compose.
Why is Docker important?
Understanding Docker helps you evaluate features, compatibility, performance, and potential limitations before you choose a product or follow a procedure.
What should you consider when using or choosing Docker?
Consider your specific goal, compatibility requirements, available features, cost, security, and the practical recommendations described in this guide.
Related Articles
 Containerize Go App with Docker9 minutes read
 What Is Docker Compose? Summary of Knowledge About Docker Compose10 minutes read
 How to Containerize a Rust App with Docker7 minutes read
 Memorize These 7 Commands to Stop Messing Around with Docker Containers8 minutes read
 10 Best Docker Alternatives 20229 minutes read
 How to Use Docker Container7 minutes read
Reader Comments 0
Sign in with email or Google to join the discussion.