Table of Contents
This practical guide explains how to build a qr code generator using react with clear steps and useful context. It also covers common requirements, potential problems, and the details that can help you get better results.

QR Code (Quick Response) is a two-dimensional barcode that can store and transmit information in a machine-readable format. Such information may include links to company web sites, restaurant menus, product details or instruction pages.
QR code technology aims to help businesses provide users with quick access to product-related information. This can increase competitive advantage.
Here's how to make a QR code generator in React with a practical example .
Before Start
You need:
- Basic knowledge of HTML input components, JavaScript and useState React hooks.
- Understand how to implement conditional rendering in React.
- Installed Node on local machine and know how to use package manager (npm or yarn).
What Is QR Code Library?
QRCode is a third party library used to generate 2D barcodes. Currently QRCode is the most popular QR code library, with more than 1 million weekly installs and support for client & server applications.
To install QRCode in an existing React application, open a terminal, navigate to the project directory and run the following code:
yarn add qrcodeOr if you prefer npm, use:
yarn add qrcodeProject Setting
The project's repository contains 2 branches: starter and final . You can use the starter as a base to build your project or the finale to preview the finished trial.
Clone the Starter App
Open a terminal and run the following command to clone the starter branch of the repository to the local machine:
git clone -b starter https://github.com/TipsMakecode/qr-code-generator.gitRun the following terminal command, in the project directory to install the dependencies:
YarnOr:
npm installTo start the application, run:
yarn startOr:
npm startGreat, you will see the UI appear on the browser:

Implement Logic in Steps
Open the file src/App.jsx and replace its contents with the following code:
import { useState } from "react"; import "./styles.scss"; import QRCode from "qrcode"; const App = () => { const [url, setUrl] = useState(""); const [dataUrl, setDataUrl] = useState(""); const handleQRCodeGeneration = () => { QRCode.toDataURL(url, { width: 300 }, (err, dataUrl) => { if (err) console.error(err); // set dataUrl state to dataUrl setDataUrl(dataUrl); }); }; return ( setUrl(e.target.value)} /> { /* code to conditionally display the QR code and a download button would go here */ } ); }; export default App;The code will run like this:
- Enter the QRCode at the top level.
- Generate url state to store entered URL and dataUrl state to contain generated QR code in DataURL form.
- Create the arrow function handleQRCodeGeneration , while it calls the toDataURL method of the QRCode object with the following arguments:
- The first is the URL to encode
- The second is an options object that defines the width of the QR code
- The third is a callback function that returns the dataURL version of the URL entered.
- Call the handleQRCodeGeneration arrow function in the form element when submitting the form.
- Update url status for user input value.
You can now show a conditionally generated view in a div element when the dataUrl state changes:
{dataUrl && ( 
Run the application in the browser and confirm the results:
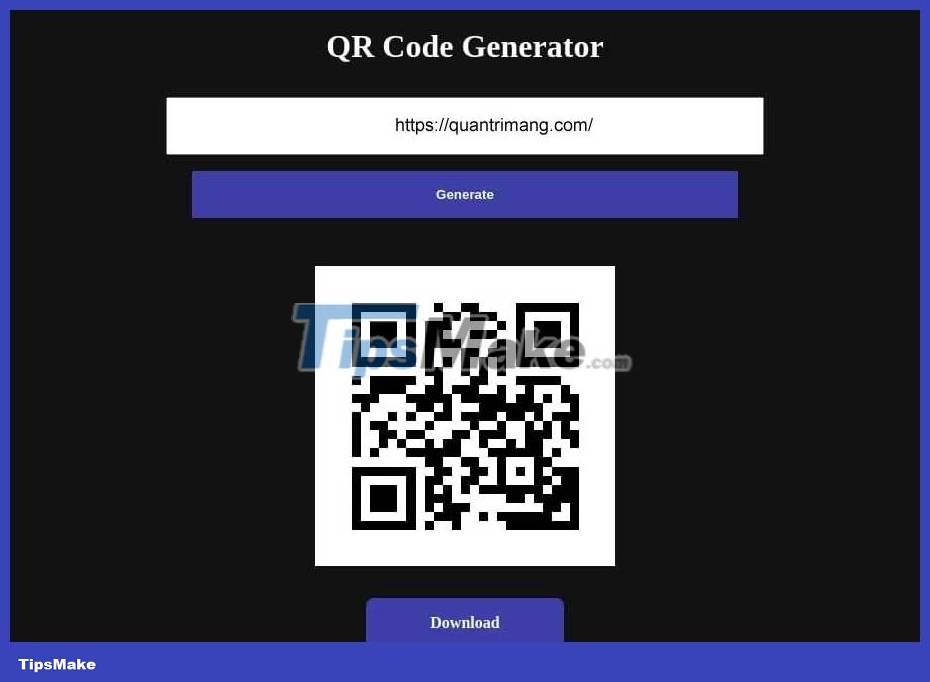
Good luck!
Conclusion
Understanding QR Code makes it easier to compare options, avoid common mistakes, and apply the information in this guide more effectively. Review the relevant requirements before making changes or choosing a solution.
FAQ
How do you build a qr code generator using react?
Follow the steps in this guide in order, confirm the required settings or tools, and verify the result before making additional changes.
Is it safe to build a qr code generator using react?
It is generally safe when you follow the recommended instructions, use trusted tools, and avoid changing settings you do not understand.
What should you do if the process does not work?
Recheck the requirements, restart the device or application when appropriate, and review each step for missed settings or compatibility issues.
Related Articles
 4 Best QR Code Generator Tools for PDF7 minutes read
 How to Speed Up React Apps with Code Splitting8 minutes read
 How to Generate QR Codes with Me QR Generator on Phones and Computers5 minutes read
 How to Create QR Codes on Android with QR Code Generator4 minutes read
 Instructions to Turn Off the Creation of the Facebook Security Code2 minutes read
 Best React Usages in 20236 minutes read
Reader Comments 0
Sign in with email or Google to join the discussion.