Table of Contents
This updated guide explains how to Add Subtitles to a Downloaded Video through clear steps, practical examples, and important checks that help prevent common errors.
Part 1 of 4:
Creating a Subtitle File on Windows
-
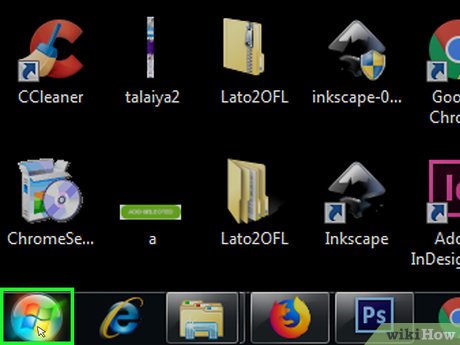 Open Start. Click the Windows logo in the bottom-left corner of the screen.
-
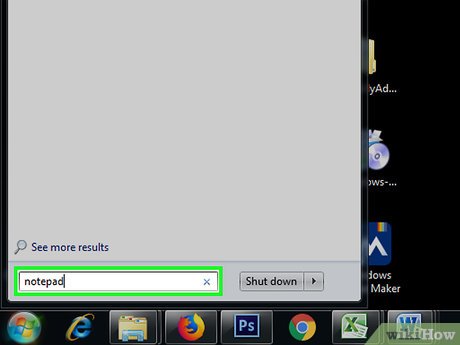 Type in Notepad. This will search your computer for the Notepad program.
 -
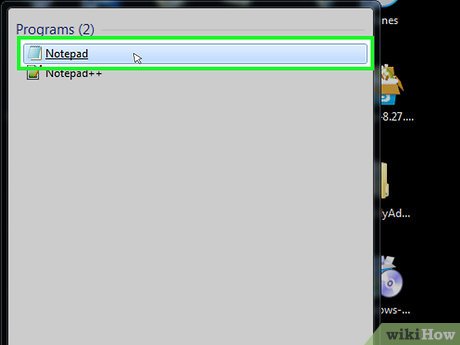 Click notepad. It's at the top of the Start menu. Doing so opens Notepad, which is your computer's default text-editing program.
 -
 Enter your first subtitle's order. Type in 0, then press ↵ Enter to start a new line.
- For your second subtitle, you'll type in 1, the third will use 2, and so on.
-
 Create a timestamp for your subtitle's text. Each part of the timestamp should be in HH:MM:SS. TT format, with a beginning and an end separated by spaces and a two-dash arrow as follows: HH:MM:SS. TT --> HH:MM:SS. TT.[1]XResearch source
- For example, if you wanted to place your first subtitle on the video between 5 and 10 seconds into the video, you'd type in 00:00:05.00 --> 00:00:10.00 here. In some cases it might be required to separate seconds and milliseconds by a comma instead of a period.
-
 Press ↵ Enter. This will create a new line, which is where your subtitle's text will go.
 -
 Enter your subtitle's text. Type in whatever you want your subtitle to say. As long as you don't press ↵ Enter at any point until you're done writing the subtitle, it will all appear on one line.
- You can also create a second line of text by pressing ↵ Enter once and then typing in your second line's text.
-
 Press ↵ Enter twice. This will place a space between your previous subtitle and the place in which you'll begin your next subtitle.
 -
 Create the rest of your video's subtitles. Each subtitle will require an order number, a timestamp, at least one subtitle text line, and a blank line between it and the next order number.
 -
 Click File. It's in the top-left corner of the Notepad window. A drop-down menu will appear.
 -
 Click Save As.... You'll find this in the File drop-down menu. Doing so opens the Save As window.
 -
 Enter your video's name. For the subtitle file's name in the "File name" text field, you'll enter the name of the video for which you're creating the subtitles. The name must be identical to the name of the video as it appears on your computer (including case-sensitive information).
- For example, if the name of the video as it appears on your computer is "Kermit Has the Moves", you'd type in Kermit Has the Moves here.
-
 Click the "Save as type" drop-down box. It's near the bottom of the window. A drop-down menu will appear.
 -
 Click All Files. You'll see this option in the drop-down menu.
 -
 Change the file to an SRT file. Type . srt at the end of the file's name.
- Using the above example, your SRT file would be named Kermit Has the Moves. srt here.
-
 Change the encoding if your subtitles aren't in English. If you aren't using English subtitles, you'll need to do the following:
- Click the "Encoding" box in the bottom-right corner of the window.
- Click UTF-8 in the drop-down menu.
-
 Click Save. It's at the bottom of the window. This will save your SRT file in your preferred location. Now that you've created the subtitle file, you'll need to add it to your video.
Part 2 of 4:
Creating a Subtitle File on Mac
-
 Open Spotlight. Click the magnifying glass-shaped icon in the top-right corner of the screen. A search bar will appear.
-
 Type in textedit. This will search your Mac for the TextEdit program.
 -
 Double-click TextEdit. It's at the top of the list of results. This will open the TextEdit program, which is your Mac's default text-editing program.
 -
 Enter your first subtitle's order. Type in 0, then press ⏎ Return to start a new line.
- For your second subtitle, you'll type in 1, the third will use 2, and so on.
-
 Create a timestamp for your subtitle's text. Each part of the timestamp should be in HH:MM:SS. TT format, with a beginning and an end separated by spaces and a two-dash arrow as follows: HH:MM:SS. TT --> HH:MM:SS. TT
- For example, if you wanted to place your first subtitle on the video between 5 and 10 seconds into the video, you'd type in 00:00:05.00 --> 00:00:10.00 here.
-
 Press ⏎ Return. This will create a new line, which is where your subtitle's text will go.
 -
 Enter your subtitle's text. Type in whatever you want your subtitle to say. As long as you don't press ⏎ Return at any point until you're done writing the subtitle, it will all appear on one line.
- You can also create a second line of text by pressing ⏎ Return once and then typing in your second line's text.
-
 Press ⏎ Return twice. This will place a space between your previous subtitle and the place in which you'll begin your next subtitle.
 -
 Create the rest of your video's subtitles. Each subtitle will require an order number, a timestamp, at least one subtitle text line, and a blank line between it and the next order number.
 -
 Click Format. It's at the top of the screen. Clicking it prompts a drop-down menu.
 -
 Click Make Plain Text. This is in the Format drop-down menu.
 -
 Click File. It's in the upper-left side of the screen. Clicking it prompts a drop-down menu.
 -
 Click Save As. This option is in the drop-down window. A Save window will open.
 -
 Enter your video's name. For the subtitle file's name, you'll need to enter the name of the video for which you're creating the subtitles. The name must be identical to the name of the video as it appears on your computer (including case-sensitive information).
 -
 Add the subtitle file's extension. After the video's name, you'll need to type . srt to replace the . txt tag there.
 -
 Click Save. It's at the bottom of the window. This will save your SRT file in your preferred location. Now that you've created the subtitle file, you'll need to add it to your video.
Part 3 of 4:
Adding the Subtitle File with VLC
-
 Place the subtitle file in the same location as the video. You can do this by selecting the subtitle file, pressing Ctrl+C (Windows) or ⌘ Command+C (Mac) to copy it, going to the folder in which your video is saved, and pressing Ctrl+V (Windows) or ⌘ Command+V (Mac).
 -
 Open the video in VLC. This will vary slightly depending on
- Windows - Right-click the video, select Open with , and click VLC media player in the pop-out menu.
- Mac - Select the video, click File , select Open With , and click VLC in the pop-out menu.
- If you don't have VLC Media Player installed on your computer, you can download and install it for free.
-
 Click the Subtitle tab. It's at the top of the VLC window. A drop-down menu will appear.
- On a Mac, Subtitle is at the top of the screen.
-
 Select Sub Track. This option is in the Subtitle drop-down menu. Doing so prompts a pop-out menu.
 -
 Click Track 1. It's in the pop-out menu. You should see your subtitles appear when appropriate.
 -
 Import manually your subtitle file. If your video isn't displaying your subtitles, you can add manually their file to the video, allowing them to remain until you close VLC:
- Click Sub Track
- Click Add Subtitle File...
- Select your subtitle file.
- Click Open
Part 4 of 4:
Adding the Subtitle File with HandBrake
-
 Open HandBrake. This app's icon resembles a pineapple next to a drink.
- If you don't yet have HandBrake, you can download it for free from the HandBrake website at https://handbrake. fr/.
-
 Click File when prompted. It's in the pop-out menu on the left side of HandBrake. Doing so will open a File Explorer (Windows) or Finder (Mac) window.
- If not prompted, click Open Source in the upper-left side of the window and then click File in the resulting pop-out menu.
-
 Select your video. Go to the location of the video to which you may need to add subtitles, then click the video.
 -
 Click Open. It's in the lower-right side of the window.
 -
 Click Browse. This option is in the middle of the page. Doing so opens another window.
 -
 Enter a file name and select a save location. Type in the name that you may need to use for your subtitled video, then select a folder (e. g., Desktop ) in which to save the video.
 -
 Click OK. It's in the bottom-right corner of the window.
 -
 Click the Subtitles tab. You'll find this tab near the bottom of the HandBrake window.
 -
 Click Import SRT. It's on the left side of the window.
- On a Windows computer, you may first have to remove the default subtitle track by clicking the red X to the right of the track.
- On a Mac, you'll click the Tracks drop-down box and then click Add External SRT... in the resulting drop-down menu.
-
 Select your SRT file. Find the SRT file that you created earlier, then click it.
 -
 Click Open. Doing so will add the SRT file to HandBrake.
 -
 Check the "Burn In" box. It's to the right of the subtitle file's name. This will ensure that the subtitle file always plays on the video, making the video compatible with any other video player in the future.
 -
 Click Start Encode. This option is at the top of the HandBrake window. Doing so will prompt HandBrake to begin adding your subtitle file to the video.
- Once the encoding process is complete, your subtitled video will appear in the save location that you selected.
FAQ
What is the easiest way to Add Subtitles to a Downloaded Video?
Start with the requirements in this guide, then follow each step in order. Check the result after every major change so problems are easier to identify.
Can beginners follow these instructions?
Yes. The process is organized into practical steps, and you can repeat any step before moving forward.
What should I check if the method does not work?
Confirm your software or device version, permissions, settings, file format, and internet connection when the task depends on online services.
Related Articles
 How to Browse Youtube Video Subtitles Quickly4 minutes read
 How to Add Subtitles to YouTube Videos: Clear Instructions9 minutes read
 How to Turn Off Automatic Subtitles in X Videos3 minutes read
 Guide to Creating Automatic Video Subtitles in Canva AI5 minutes read
 Guide to Creating Parallel Subtitles in CapCut4 minutes read
 2 Steps to Help Users View Subtitles on YouTube5 minutes read
Reader Comments 0
Sign in with email or Google to join the discussion.