Deploying IPsec Server and Domain Isolation with Windows Server 2008 Group Policy - Part 3
In this section, we will show you how to configure NAP IPsec Enforcement policy on NPS, then switch to using them for testing.
 Deploying IPsec Server and Domain Isolation with Windows Server 2008 Group Policy - 1
 Deploying IPsec Server and Domain Isolation with Windows Server 2008 Group Policy - 2
Thomas Shinder
Network Administration - In the second part of this article series, I talked about the Network Policy Server. In this third part we will introduce the following procedures :
- Add a network policy server to the NAP Exempt Group
- Restart the Network Policy Server
- Request a computer certificate for the Network Policy Server
- See the health certificate and the computer installed on the Network Policy Server
- Install Network Policy Server, the Health Registration Authority and the Subordinate CA
- Configure Subordinate CA on the Network Policy Server
- Activate the permissions for the Health Registration Authority to request, issue, and manage certificates
- Configure the Health Registration Authority to use subordinate CA to issue health certificates.
In the third part of this series, we will continue the discussion about NPS servers. First we will configure NAP IPsec Enforcement policy on NPS. After finishing creating the policy, we will switch to client systems to be able to use them for testing purposes.
Configure the NAP IPsec enforcement policy on the network policy server
In this section, we will perform the following procedures:
- Configure NAP with NPS NAP wizard
- Configure the Windows Security Health Validator
- Configure NAP CLIENT Settings in Group Policy
- Limit the scope of NAP CLIENT Group Policy using Security Group Filtering
The following is the start!
Configure NAP with a wizard
The NAP configuration wizard will help you set up NPS as a NAP health policy server. The wizard usually provides the settings used for each NAP enforcement method and automatically creates customized NAP policies to use for your network design. You can also access the NAP configuration wizard from the NPS interface.
- Click Start , click Run , type nps.msc , and then press ENTER.
- In the left pane of the NPS console, click NPS (Local) .

Figure 1
- In the details pane, under Standard Configuration , click Configure NAP . The NAP configuration wizard will start. In the Select Network Connection Method for Use with NAP page , in the Network connection method section , select IPsec with the Health Registration Authority (HRA) , and then click Next .
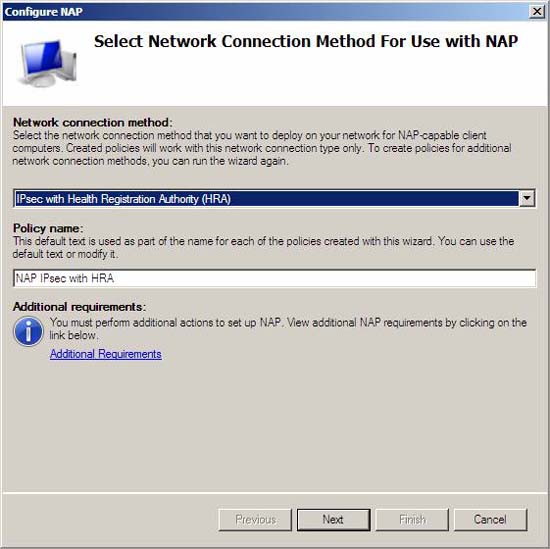
Figure 2
- On the Specify NAP Enforcement Servers Running HRA page , click Next . Because this NAP health policy server has installed HRA, we do not need to add RADIUS clients.

Figure 3
- On the Configure User Groups and Machine Groups page , click Next . You do not need to configure groups for this test environment.
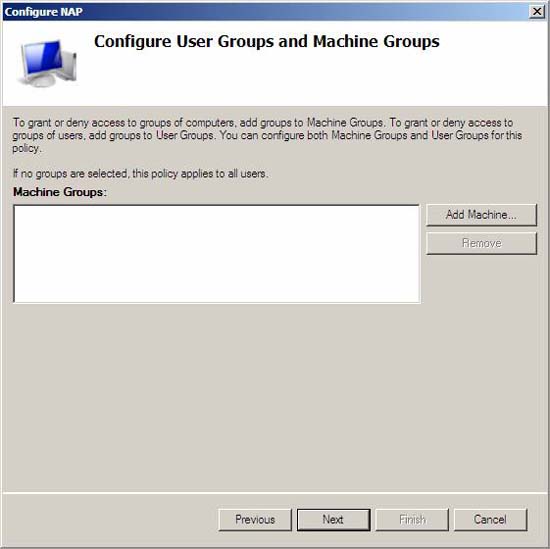
Figure 4
- On the Define NAP Health Policy page , verify that the Windows Security Health Validator and Enable auto-remediation checkboxes of the client computers are checked, and then click Next .
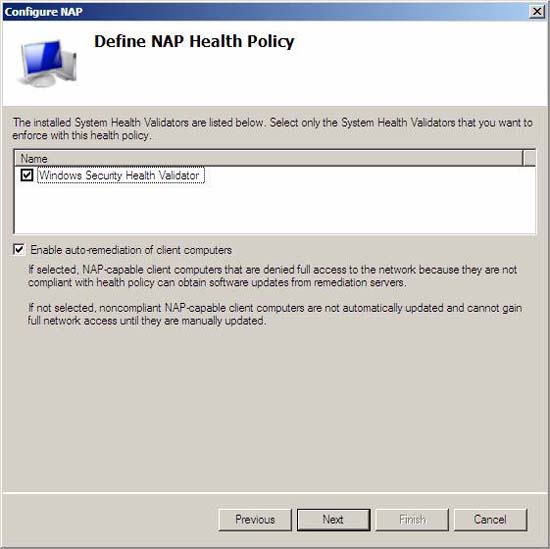
Figure 5
- On Completing NAP Enforcement Policy and RADIUS Client Configuration , click Finish
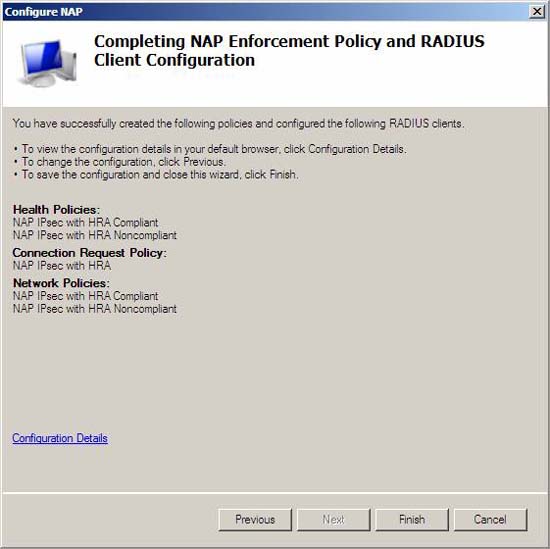
Figure 6
- Leave the Network Policy Server console open and perform the procedure below.
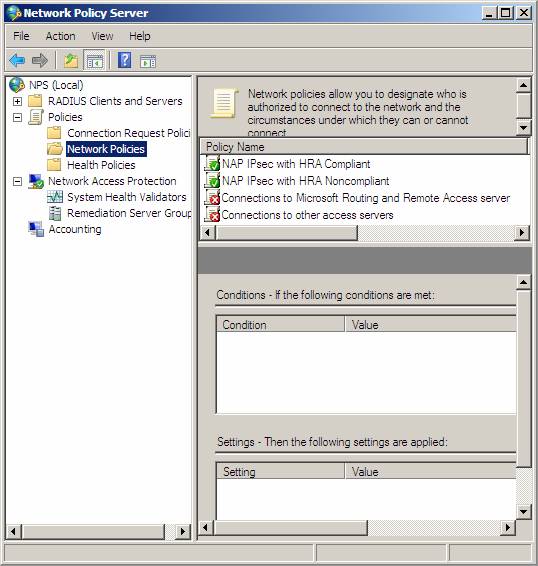
Figure 7
Configure the health policy validator (SHV)
By default, Windows SHV is configured to require a firewall, virus protection and spyware protection and automatic updates. With the test network, we will start by only asking Windows Firewall to be enabled. We will then implement the policies to show how the machines can be made consensus and disagree.
Follow the steps below on WIN2008SRV1 :
- In the left pane of the Network Policy Server console, open Network Access Protection , and then click System Health Validators . In the middle pane of the interface, under Name , double-click the Windows Security Health Validator .

Figure 8
- In the Windows Security Health Validator Properties dialog box, click Configure
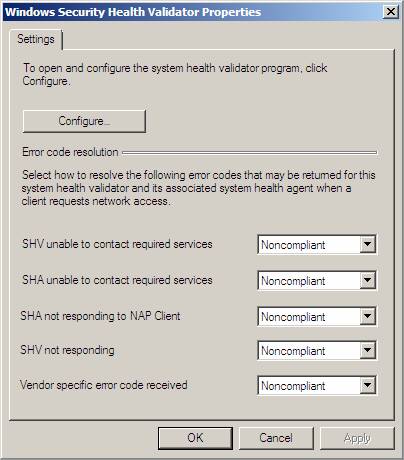
Figure 9
- Delete all checkboxes except A firewall is enabled for all network connections .
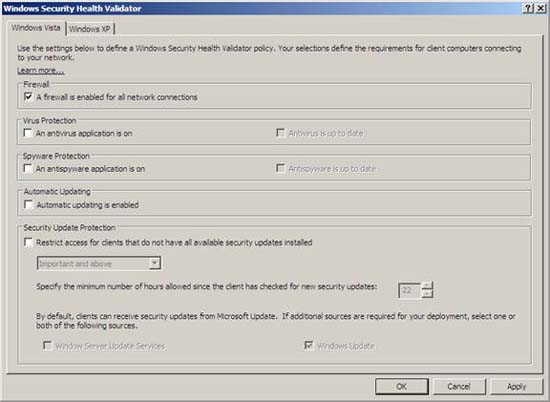
Figure 10
- Click OK to close the Windows Security Health Validator dialog box, then click OK to close the Windows Security Health Validator Properties dialog box
- Close the Network Policy Server console .
Configure NAP CLIENT settings in Group Policy
The following NAP client settings will be used in the Group Policy object (GPO) using the Group Policy Management console in WIN2008DC :
- NAP enforcement clients - Tell clients about which execution methods to use for NAP. In the example we are using HRA / IPsec enforcement client.
- NAP Agent service - This is a client-side service that allows the client to know about NAP
- Security Center user interface - Allows the NAP client service to provide information to users interested in the current security status of the machine.
After these settings are configured in a GPO, security filters will be added to perform the settings on the machines you specify. The following section describes these steps in detail.
Follow the steps below on WIN2008DC to create a Group Policy Object and GP settings for GPOs for NAP Clients:
- On WIN2008DC , click Start , click Run , type gpme.msc, and then press ENTER
- In the Browse for a Group Policy Object dialog box, next to msfirewall.org , click the icon to create a new GPO, type NAP Client GPO to name the new GPO, and then click OK .
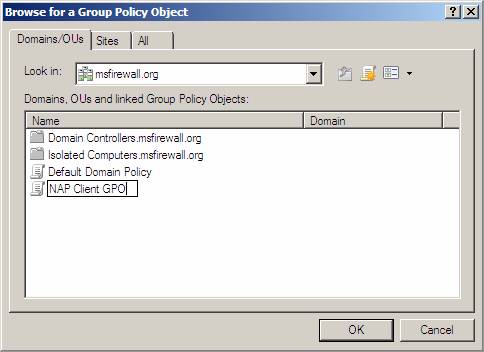
Figure 11
- The Group Policy Management Editor window will open. You navigate to Computer Configuration / Policies / Windows Settings / Security Settings / System Services .
- In the details pane, double-click the Network Access Protection Agent .
- In the Network Access Protection Agent Properties dialog box, check the Define this policy setting check box , select Automatic and then click OK .
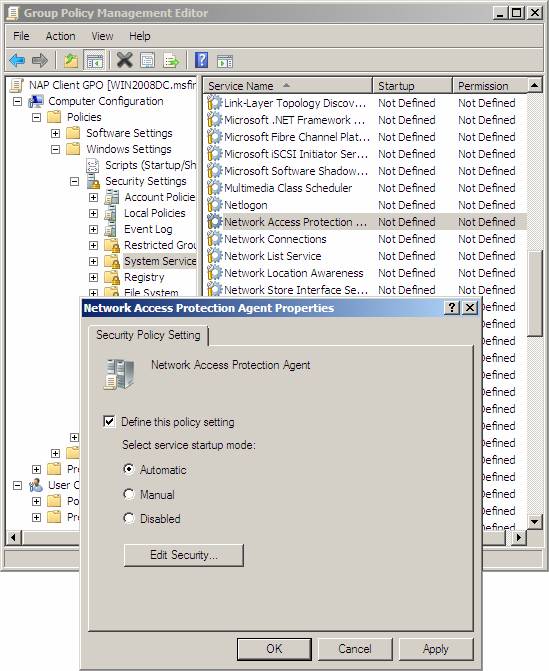
Figure 12
- In the left pane of the console, open Network Access ProtectionNAP Client ConfigurationEnforcement Clients .
- In the details pane, right-click IPSec Relying Party , then click Enable.

Figure 13
- In the left pane of the interface, under the NAP Client Configuration , open the Health Registration SettingsTrusted Server Groups . Right-click on the Trusted Server Groups and then click New .

Figure 14
- In the Group Name window, type HRA Servers then click Next.
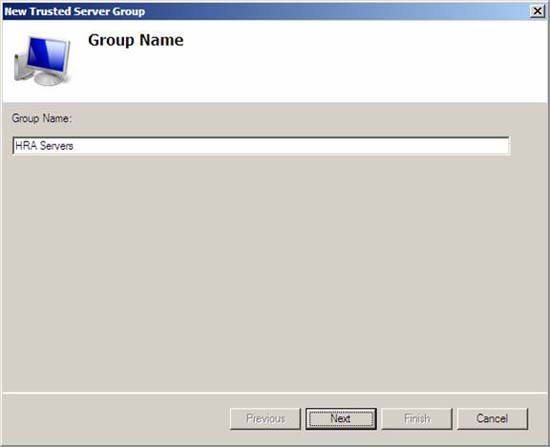
Figure 15
- In the Add Servers window, below Add URLs of Health Registration Authority that you want to trust to , type https://win2008srv1.msfirewall.org/domainhra/hcsrvext.dll and then click Add . This is the website that will handle domain authentication requests for health certificates.
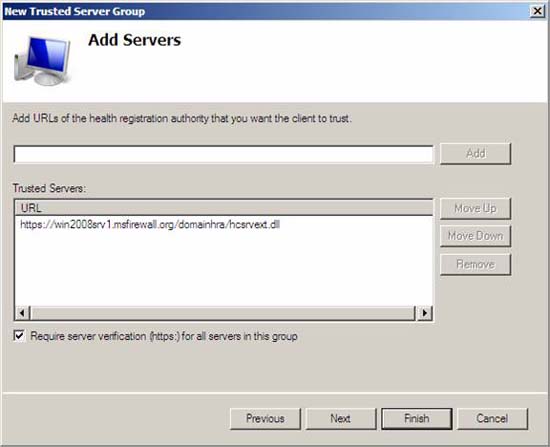
Figure 16
- Click Finish to complete the process of adding HRA trusted server groups.
- In the console tree, click Trusted Server Groups, then in the details pane, click Trusted HRA Servers . Verify that you typed in the details pane under Properties . The URL must be correctly entered, otherwise the client will not be able to obtain a health certificate and will be denied access to the protected IPsec network.
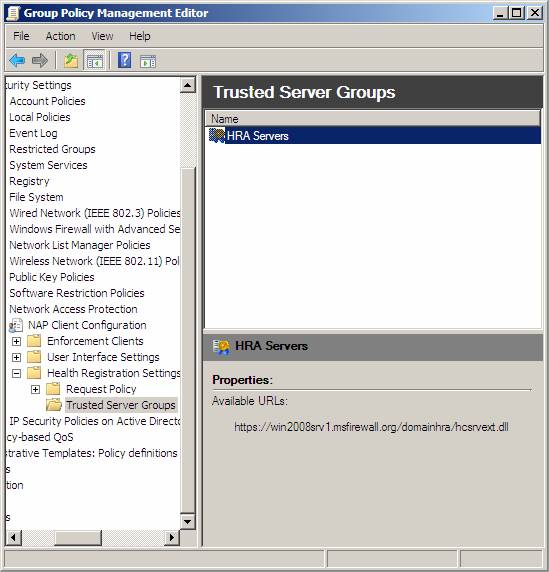
Figure 17
- In the left pane of the console, right-click on the NAP Client Configuration , then click Apply .
- In the interface tree, navigate to Computer ConfigurationPoliciesAdministrative TemplatesWindows Components Security Center .
- In the details pane, double-click Turn on Security Center (Domain PCs only) , select Enabled , and then click OK .
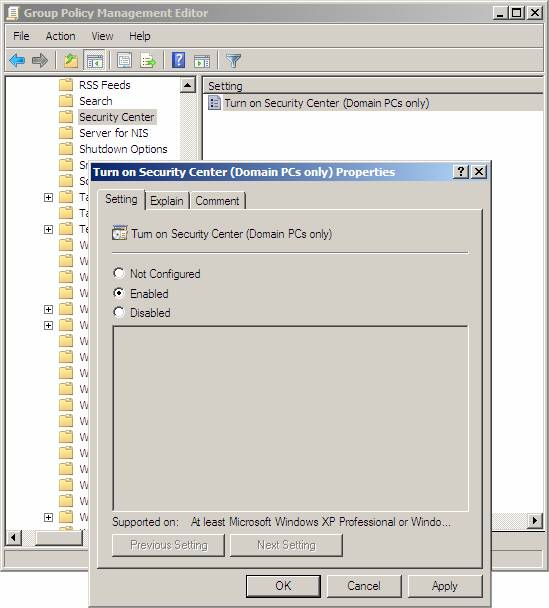
Figure 18
- Return to Network Access ProtectionNAP Client ConfigurationEnforcement Clients button . Right-click Enforcement Clients then click Refresh . If the IPsec Relying Party status is Disabled , right-click it again and click Enable . Then click on the NAP Client Configuration button again, then right-click it and click Apply .
- If you are prompted to apply the settings, click Yes .
Limit the scope of NAP CLIENT Group Policy Object with Security Group Filtering
Next, configure security filters for the NAP client. This will prevent NAP client settings from being used by servers in the domain.
- In WIN2008DC , click Start , click Run , type gpmc.msc and press ENTER.
- In the policy group management interface tree, go to the Forest section : msfirewall.orgDomainsmsfirewall.orgGroup Policy ObjectsNAP Client GPO . In the details pane, in the Security Filtering section, click Authenticated Users , and then click Remove .
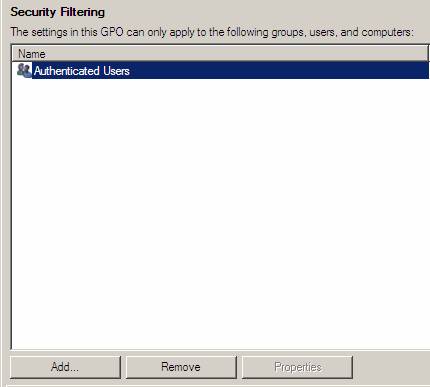
Figure 19
- When prompted to execute the removed privilege, click OK .
- In the details pane, under Security Filtering , click Add .
- In the Select box , User, Computer, or Group , under the object name to select (examples) , type NAP client computers and then click OK .
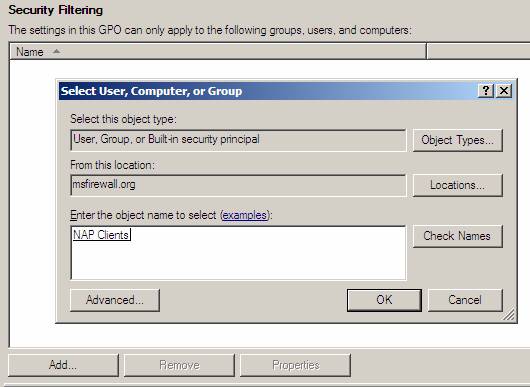
Figure 20
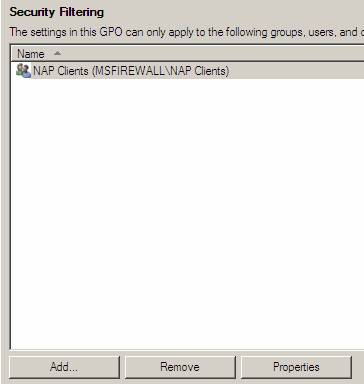
Figure 21
- Close the Group Policy Management administration interface.
Note that at this time, the NAP client security group currently has no members. So VISATASP1 and VISTASP1-2 will be added to this security group after each machine is joined to the domain.
Configure to test VISTASP1 and VISTASP1-2
Now we will configure the client components for the system. In this section, we will perform the following tasks:
- Join VISTASP1 into the domain
- Add VISTASP1 to the NAP CLIENTS Group
- Confirm NAP Group Policy Settings on VISTASP1
- Export Enterprise Root CA Certificate from VISTASP1
- Imporrt Root CA Certificate into VISTASP1
- Configure the Configure NAP Client Settings settings on VISTASP1-2
- Mark NAP Agent on VISTASP1-2
- Configure Windows Firewall with Advanced Security to allow VISTASP1 and VISTASP1-2 to PING to each other.
Join VISTASP1 into the domain
When configuring VISTASP1 , use the instructions below. When configuring VISTASP1-2 , perform the health certificate issuance procedure before joining VISTASP1-2 to the msfirewall.org domain. VISTASP1-2 will not be joined to the domain to verify health certificate issuance procedures to illustrate other health certificates on domain clients and workgroup environments.
We'll take a look at how the domain joins the computers that receive the certificates when joining VISTASP1 to the domain, then configure VISTASP1 to a NAP client and see if the member computers are not domain members will receive How only health and network access.
Follow the steps below to join the computer to the domain:
- Click Start , right-click Computer , and then click Properties .
- In the System window, click the Advanced System Settings link .
- In the System Properties dialog box, click the Computer Name tab, and then click Change .
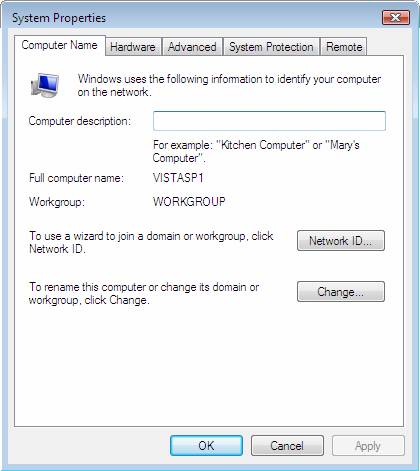
Figure 22
- In the Computer Name / Domain Changes dialog box, select Domain , then type msfirewall.org .
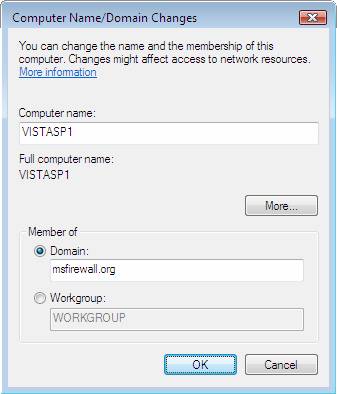
Figure 23
- Click More and in Primary DNS suffix of this computer , type msfirewall.org .
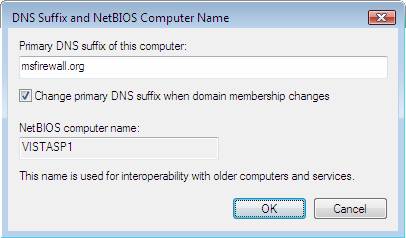
Figure 24
- Click OK twice.
- When prompted for username and password, type your domain administrator account, then click OK .
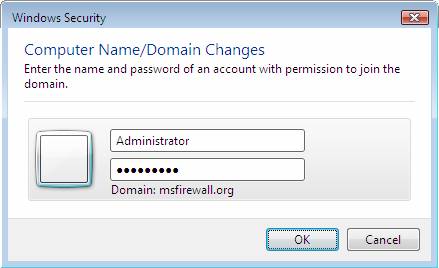
Figure 25
- When you see the dialog box appear to the msfirewall.org domain, click OK.
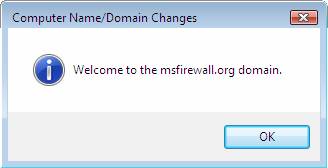
Figure 26
- When you see the dialog box prompting you to restart the computer, click OK .
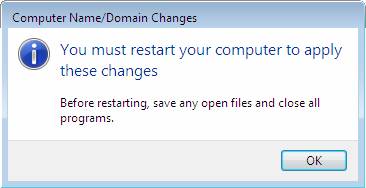
Figure 27
- In the System Properties dialog box, click Close .
- In the dialog box that prompts you to restart the computer, click Restart Later . Before you restart the computer, you must add it to the NAP client computer security group.

Figure 28
Put VISTASP1 into the NAP CLIENTS Group
After joining the domain, VISTASP1 must be added to the NAP Clients group so that it can receive NAP client settings from the configured Group Policy Object.
Perform the following steps on WIN2008DC machine:
- On WIN2008DC , click Start , point to Administrative Tools , and then click Active Directory Users and Computers.
- In the left pane of the console, click msfirewall.org .
- In the details pane, double-click NAP Clients .
- In the NAP Clients Properties dialog box, click the Members tab, and then click Add .
- In the Select Users, Contacts dialog box , Computers, or Groups, click Object Types , select the Computers check box , and then click OK .
- In the Enter the object names to select (examples) section , type VISTASP1 , then click OK .
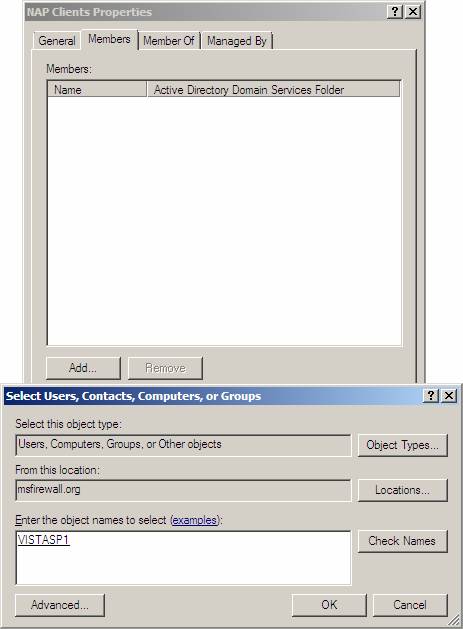
Figure 29
- Verify that VISTASP1 is displayed under Members , then click OK .
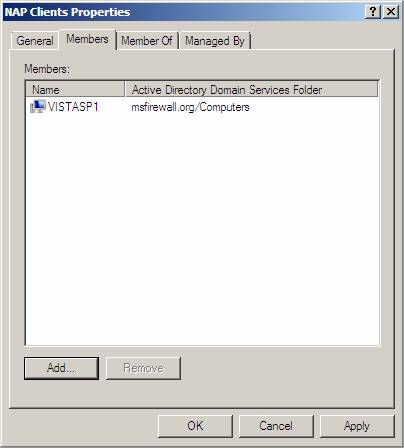
Figure 30
- Close the Active Directory Users and Computers console .
- Restart VISTASP1 .
- After VISTASP1 is restarted, log in as the msfirewall.org domain administrator.
Confirm the NAP Group Policy settings on VISTASP1
After restarting, VISTASP1 will receive GP settings to enable the NAP Agent service and IPsec enforcement client. The command window will be used to verify these settings.
- On VISTASP1 , click Start , click Run , type cmd , and then press ENTER.
- In the command window, type netsh nap client show grouppolicy and press ENTER.
- In the command output, under Enforcement clients , verify that the Admin status of IPSec Relying Party is Enabled . In the command output, under Trusted server group configuration , verify that the Trusted HRA Servers are displayed next to Group , that Enabled is also displayed next to Require Https , and that the Domain HRA Web site URL you have configured in The previous procedure is also displayed next to Url.
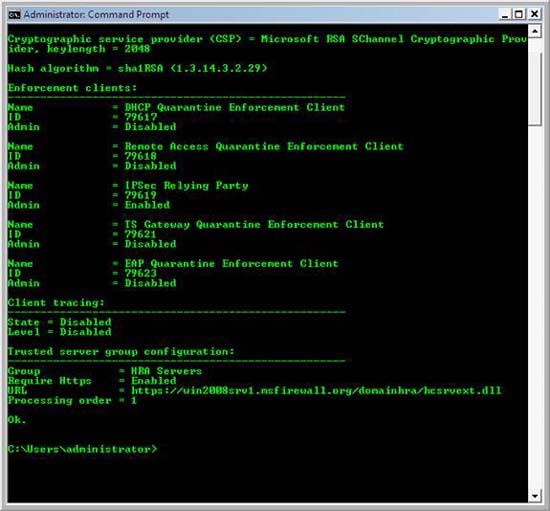
Figure 31
- In the command window, type netsh nap client show state and then press ENTER.
- In the command output, under Enforcement client state , verify that the Initialized status of IPSec Relying Party is Yes .
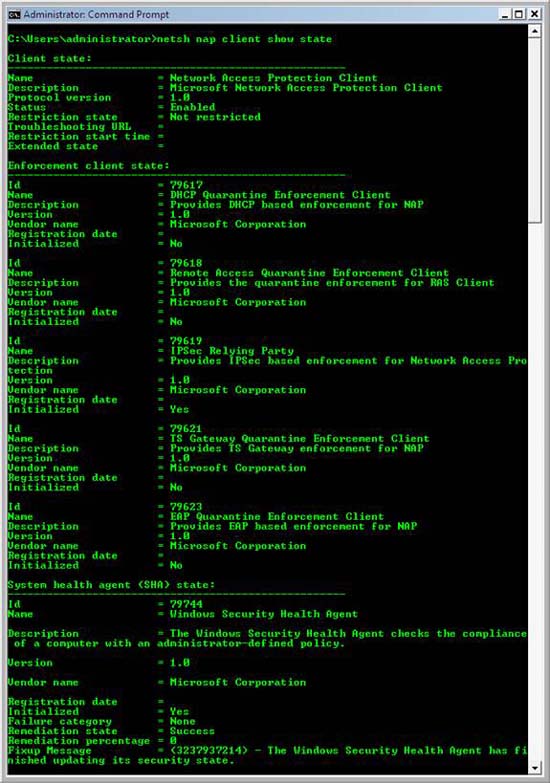
Figure 32
- Close the command window.
Export the Enterprise Root CA certificate from VISTASP1
Since VISTASP1-2 is not joined to the domain and does not trust msfirewall.org root CA, it will fail to trust the SSL certificate on WIN2008SRV1 . To allow VISTASP1-2 to access the Health Registration Authority with SSL, you must use a CA certificate to import the Trusted Root Certification Authorities section on VISTASP1-2 . This can be done by exporting the certificate from VISTASP1 and then importing it into VISTASP1-2 .
- On VISTASP1 , click Start , and enter Run in the Search text box and then press ENTER.
- In the Run box, enter mmc and click OK .
- On the File menu, click Add / Remove Snap-in .
- Click Certificates , click Add , select Computer account , click Next .
- Verify that Local computer: (the computer this console is running on) has been selected, click Finish and then click OK .
- In the interface tree, open Certificates (Local Computer) Trusted Root Certification AuthoritiesCertificates . In the details pane, right-click and point to then click Export .
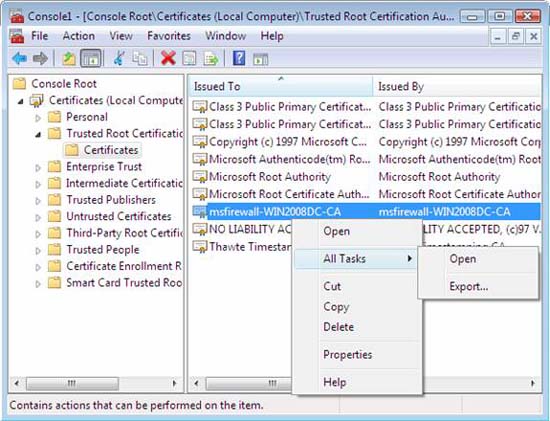
Figure 33
- In the Welcome to the Certificate Export Wizard page , click Next .
- On the Export File Format page, click Next .
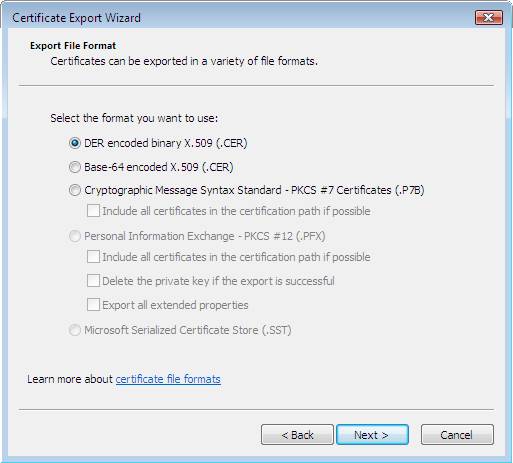
Figure 3 * 4
- On the File to Export page, type the path and name for the CA certificate file in the File name text box. In this example, we will enter c: cacert . Click Next .
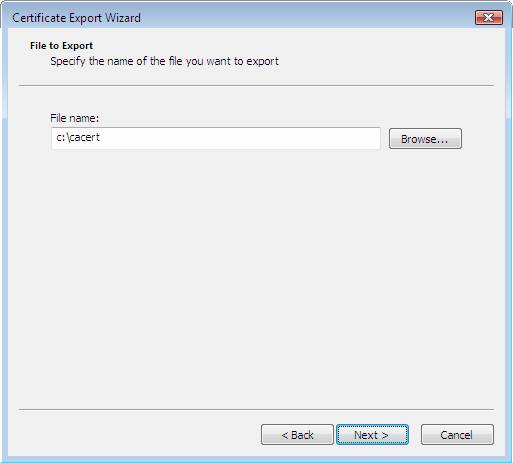
Figure 35
- Click Finish on the Completing the Certificate Export Wizard page.
- Verify that The export was successful is displayed, and then click OK .
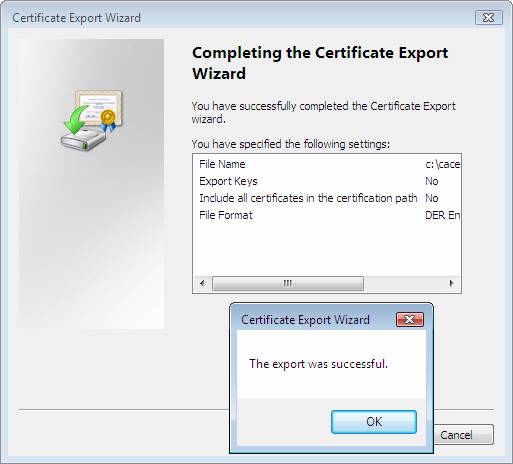
Figure 36
- Copy the CA certificate file to VISTASP1-2
Import the Root CA certificate into VISTASP1-2
At this point, let's install the CA certificate on VISTASP1-2 . After installing the certificate, VISTASP1-2 will confirm our CAs for use with the Health Registration Authority after configuring using NAP for this machine.
Follow the steps below on VISTASP1-2 :
- On VISTASP1-2 , click Start , then go to Run in the search box .
- Enter mmc in the Run dialog box, and then press ENTER.
- On the File menu, click Add / Remove Snap-in .
- Click Certificates , click Add , select Computer account, and then click Next .
- Verify that Local computer: (the computer this console is running on) has been selected, click Finish and then click OK .
- In the console tree, open Certificates (Local Computer) Trusted Root Certification AuthoritiesCertificates .
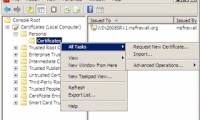
- Right-click Certificates , point to All Tasks, and then click Import .
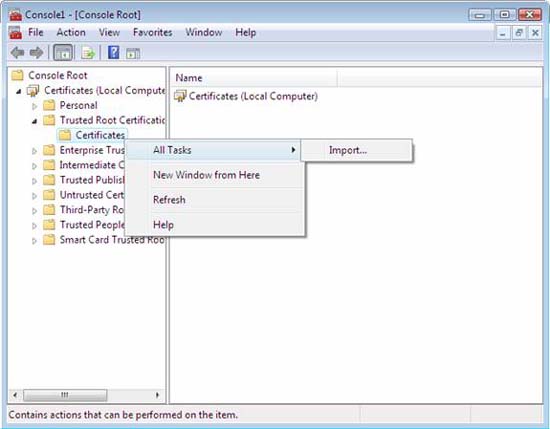
Figure 37
- In the Welcome to the Certificate Import Wizard page, click Next .
- On the File to Import page, click Browse .
- Go to the location where you saved the original CA certificate from VISTASP1 and open Open .
- On the File to Import page, verify the location of the original CA certificate file that is displayed under File name and then click Next .
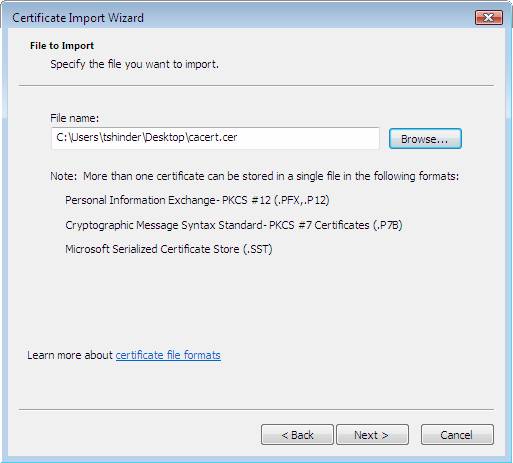
Figure 38
- On the Certificate Store page, select Place all certificates in the following store , verify that Trusted Root Certification Authorities are displayed under Certificate store, and then click Next .

Figure 39
- On the Completing the Certificate Import Wizard page , click Finish .
- Verify that The import was successful is displayed, and then click OK .
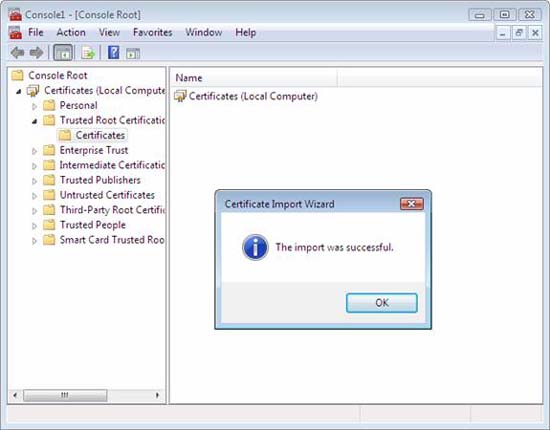
Figure 40
Configure the NAP Client settings on VISTASP1-2
Because VISTSP1-2 is not joined to the domain, it cannot receive NAP settings from Group Policy. However, we can still configure this machine to be able to receive NAP settings by working with our NAP architecture. After demonstrating that we can create non-domain machines that work with NAP, we will join VISTASP1-2 to the domain so that it can receive its NAP settings from Group Policy.
- On VISTASP1-2 , click Start and enter Run in the search box .
- Enter napclcfg.msc , and then press ENTER.
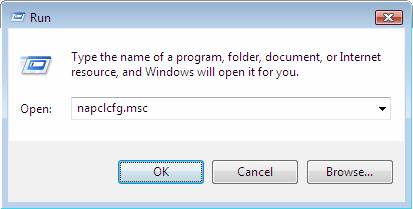
Figure 41
- In the NAP Client Configuration interface tree, open the Health Registration Settings .
- Right-click on Trusted Server Groups , then click New .

Figure 42
- In Group Name , type Trusted HRA Servers and then click Next .
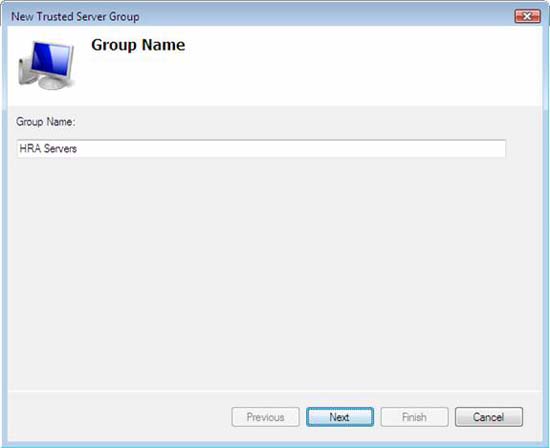
Figure 43
- In Add URLs of health registration authority that you want to trust to client , type https://win2008srv1.msfirewall.org/domainhra/hcsrvext.dll and then click Add . This is the website that will handle the requested domain requests for health certificates. Since this is the first server on the list, the clients will try to gain health certification from this first trusted server.
- In Add URLs of health registration authority that you want to trust the client , type https://win2008srv1.msfirewall.org/nondomainhra/hcsrvext.dll , then click Add . This is the website that will handle anonymous requests for health certificates. Since this is the second server on the list, the clients will not make requests for this server unless the first server fails to provide the certificate.
- Click Finish to complete the process of adding trusted server groups.
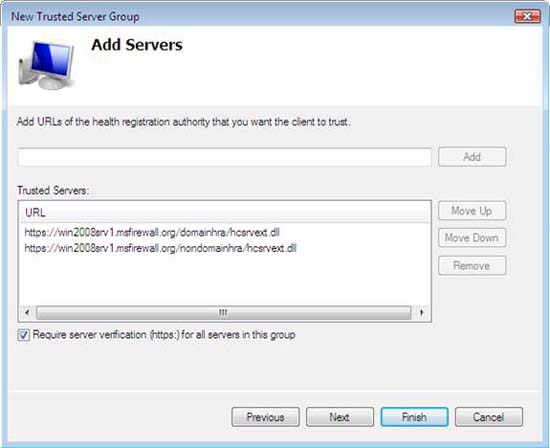
Figure 44
- In the left pane of the console, click Trusted Server Groups .
- In the right pane of the interface, click HRA Servers .
- Verify that the URL you typed in the details pane under Properties . URLs must be entered correctly or the clients will not be able to obtain a health certificate, which will be denied access to the IPsec network.
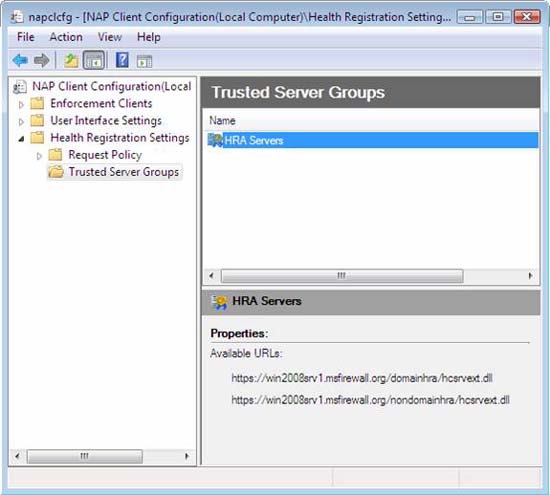
Figure 45
- In the NAP Client Configuration console tree, click Enforcement Clients .
- In the details pane, right-click IPSec Relying Party, then click Enable .
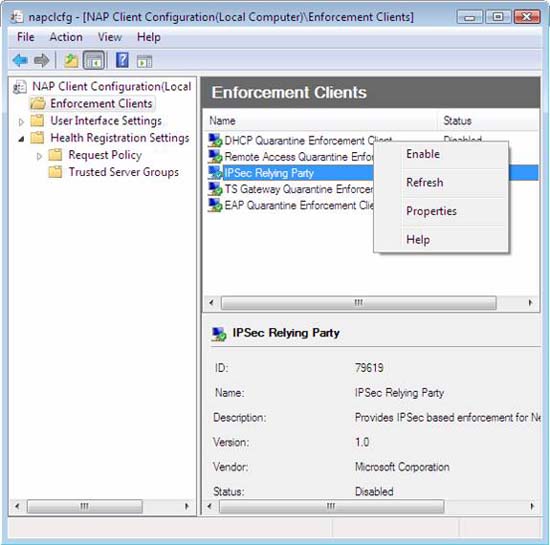
Figure 46
- Close the NAP Client Configuration window .
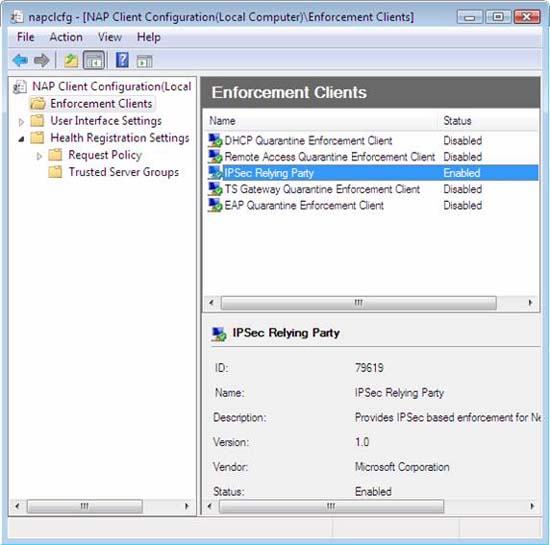
Figure 47
Initialize the NAP Agent on VISTASP1-2
Now we need to start the NAP Client Service on VISTASP1-2 .
Follow the steps below on VISTASP1-2:
- On VISTASP1-2, click Start , point to All Programs , click Accessories , right-click Command Prompt, and then click Run as administrator .
- In the command window, type net start napagent and then press ENTER.
- At the output of the command, verify that the following text is displayed. Network Access Protection Agent service was started successfully.
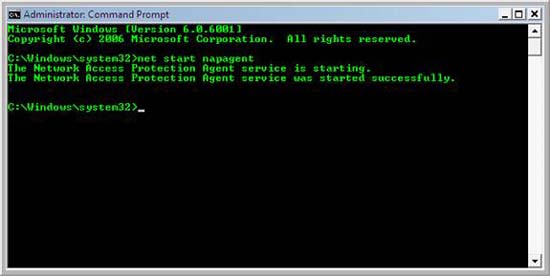
Figure 48
- Leave the command window open to perform the procedure below.
Confirm NAP policy settings on VISTASP1-2
VISTASP1-2 will receive NAP client settings from the internal policy. We can verify these settings from the command line.
Follow the steps below on VISTASP1-2:.
- At the command prompt, type netsh nap client show configuration and then press ENTER.
- In the command output, under Enforcement clients , verify that the Admin status of IPSec Relying Party is Enabled . In the Trusted server group configuration section , verify that the Trusted HRA Servers displayed next to Group and Enabled are displayed next to Require Https and that DomainHRA and the NonDomainHRA Web site URLs you have configured in the previous procedure are displayed side by side. next to the URL .
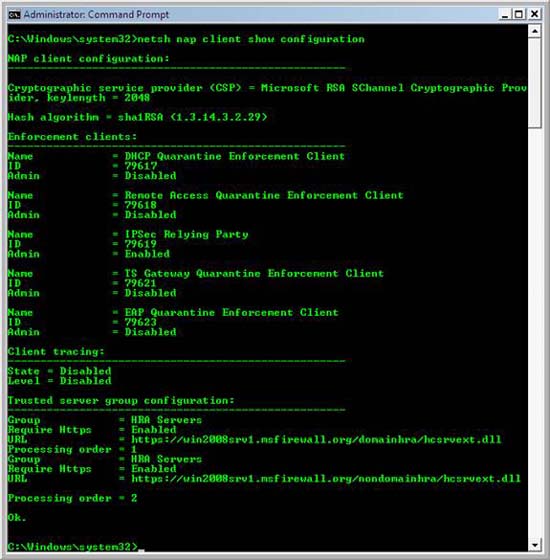
Figure 49
- In the command window, type netsh nap client show state , then press ENTER. In the command output, under Enforcement client state , verify that the Initialized status of IPSec Relying Party is Yes .
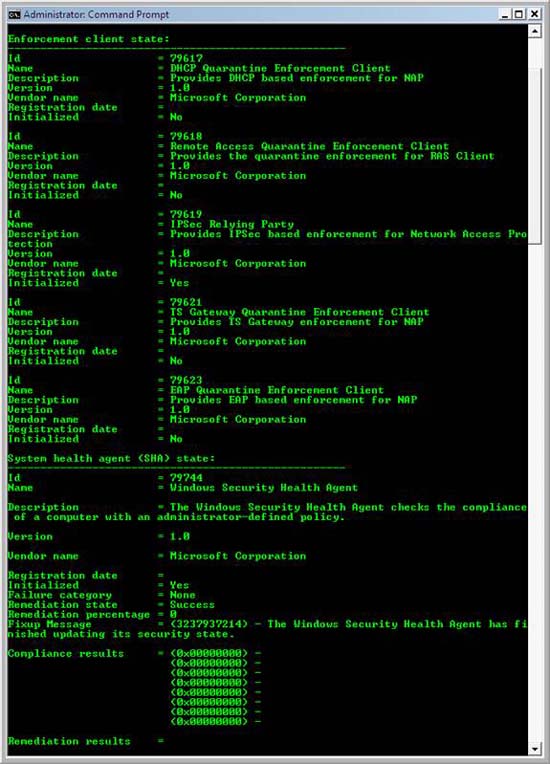
Figure 50
- Close the command prompt
Configuring Windows Firewall with Advanced Security to enable Ping between VISTASP1 and VISTASP1-2
Ping will be used to verify the network connection of VISTASP1 and VISTASP1-2 . To enable VISTASP1 and VISTASP1-2 in response to the ping command, a free rule for ICMPv4 must be configured in Windows Firewall.
Follow the steps below on VISTASP1 and VISTASP1-2 so that these machines can ping each other through Windows Firewall with Advanced Security:
- Click Start, type Run in the search dialog box and press ENTER. Type wf.msc in the Run text box, and then press ENTER.
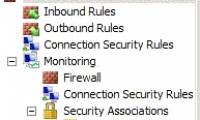
- In the left pane of the console, right-click the Inbound Rules and then click New Rule .
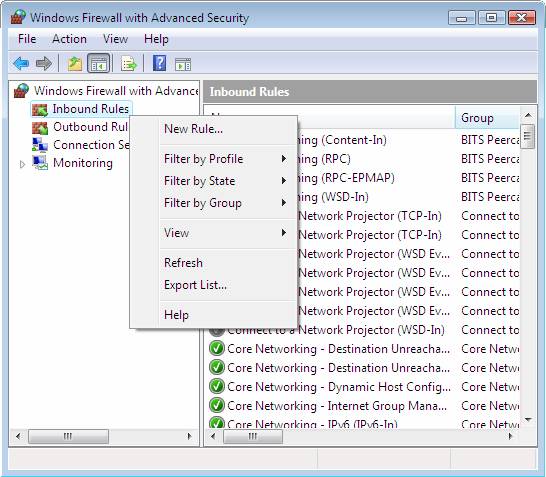
Figure 51
- Select Custom then click Next .
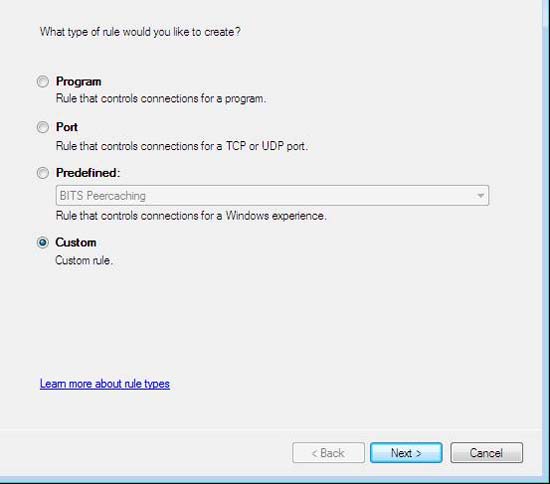
Figure 52
- Select All programs then click Next .
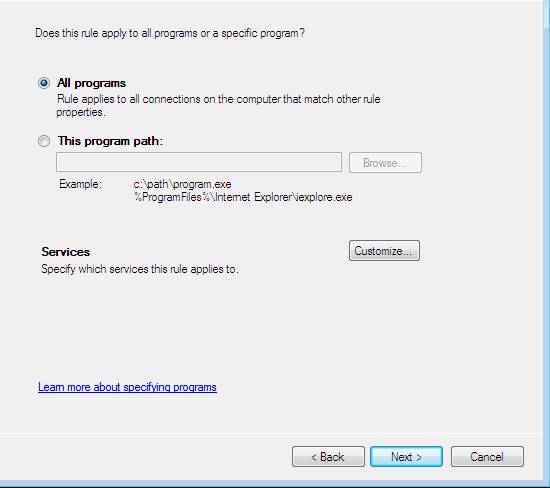
Figure 53
- Next to Protocol type , select ICMPv4 then click Customize .
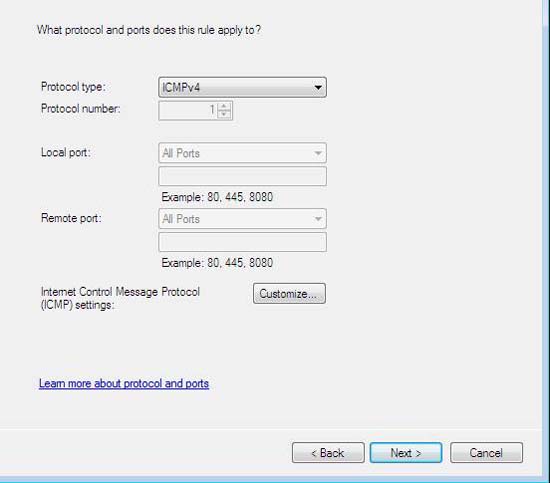
Figure 54
- Select Specific ICMP types , check the Echo Request checkbox, click OK , and then click Next
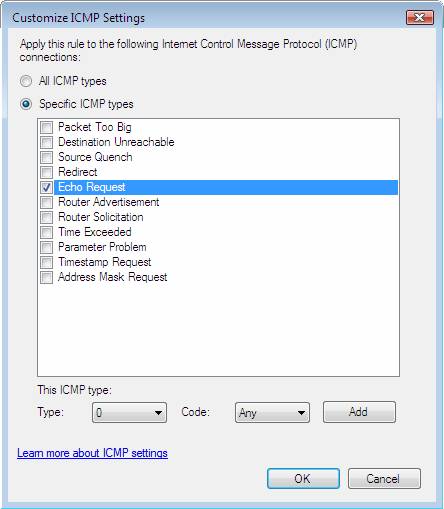
Figure 55
- Click Next to accept the default range.
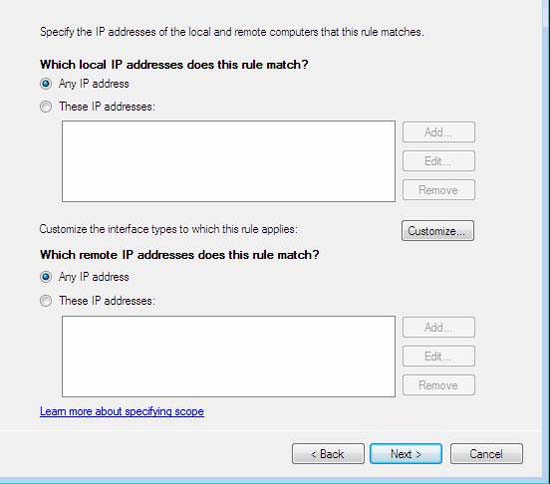
Figure 56
- On the Action page, verify that the Allow the connection option is selected, and then click Next
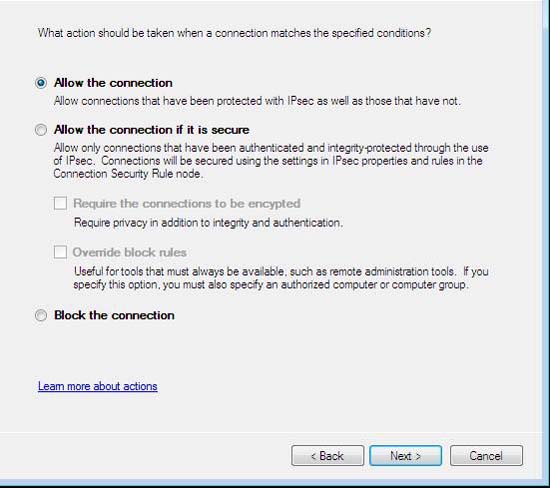
Figure 57
- Click Next to accept the default policy.
- In the Name window, under Name , please type Allow Ping Inbound then click Finish

Figure 58
- Close Windows Firewall with Advanced Security console
The next section is going to check to confirm that VISTASP1 and VISTASP1-2 can ping each other.
Conclude
In this third part we have configured the NAP IPsec policy, and then configured the clients to test. In the next part of this series, we will examine the clients and see how the assigned and removed security certificates are automatically coupled to how clients are connected and destroyed. How to connect to the network.
Was this article helpful?
Your feedback helps us improve.
Related Articles
 Deploying IPsec Server and Domain Isolation with Windows Server 2008 Group Policy - Part 218 minutes read
 Deploying IPsec Server and Domain Isolation with Windows Server 2008 Group Policy - Part 411 minutes read
 Deploying IPsec Server and Domain Isolation with Windows Server 2008 Group Policy - Part 115 minutes read
 Overview of Windows Server 2008 Firewall with advanced security features - Part 313 minutes read
 Overview of Windows Server 2008 Firewall with advanced security features (continued part 3)10 minutes read
 How to reset Local Group Policy settings on Windows 104 minutes read
Reader Comments 0
Sign in with email or Google to join the discussion.