Create an explosion effect piece by piece
It is interesting to know that Photoshop can make visual effects like those in movies, such as vampires, rain falling ...
It is interesting to know that Photoshop can do the same visual effects as in movies, such as vampires, rain falling . Here are the pieces exploding effect.
Open the image you want to do (Figure 1), double-click on the image to convert to Layer 0, press Ctrl + Shift + N to create a new Layer, Layer 1, and drag Layer 1 under Layer 0.

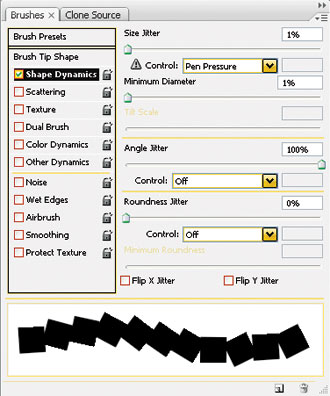
Go to Edit> Fill menu and choose White for Layer 1 . Select Layer 0, click the Add layer mask icon in the bottom row of the Layer palette, go to Edit> Fill menu and select black, the mask icon on the Layer changes to black and the image is covered with a white layer. Select the Brush tool, go to Windows> Brushes menu, click on the small triangle button to the right of the Brush panel, select Square Brushes> OK click on the line Brush Tip Shape on the left, select the square style, select the parameters: Diameter: 30px; Angle: 00; Roundness: 100%; Spacing: 100%. Click Shape Dynamics with the parameters shown in Figure 2.

Continue to click Scattering: Select Both Axes ; Scatter: 500%; Control: Off; Count: 1; Count Jitter: 0%. Select the white facade color, click the square mouse to fill the bowl surface so that a part of it appears there (except for the face, don't paint again), double-click on Layer 0, the Layer panel Style appears, select Drop Shadow with the following parameters: Blend Mode: Multiply; Opacity: 75%; Angle: 30; Select Use Global Light, other parameters to default> OK (Figure 3).

On this layer, right-click and choose Duplicate Layer , select the mask icon, go to Filter> Blur> Radial Blur menu with the parameters: Amount: 20%; Blur Method: Zoom; Quality: Good> OK . Finally select the Flatten Image menu to merge it into one (Figure 4).

With only palm trees and a few layers of effects, you have created a unique effect.
- How to create sky effect for photos with B612
- How to use Photoshop CS6 (Part 4): Create a fading effect
- How to create One Piece cover images for Facebook and YouTube
- The largest-ever explosion in the universe created a giant hot-air sphere that could hold 15 Milky Way galaxies
- How to write text to change colors on Facebook to create special effects
- How to create snowfall effect with DesktopSnowOK


 How to create clipping mask in GIMP
  How to create spherical images in GIMP
  How to sign a document with GIMP
  How to create movie posters in GIMP
  How to Color Inside the Lines in FireAlpaca
  How to swap and combine faces in GIMP