Configure Windows XP SP2 network protection technologies on a computer (Part II)
 Part I: Using Windows Security Center
The default settings from Windows XP SP2 help you protect your computer. If the default settings do not have the necessary security requirements, you can use the instructions in this document to configure a safer setting. These settings allow efficient computer use while still reducing the risk of malicious code attacks. In the previous section, we showed you how to set up security from the starting point: Security Center, this tutorial will show you how to prevent unauthorized access through Internet Explorer web browser.
Configure Internet Explorer
Internet Explorer security features help prevent access to information that you do not allow access, such as credit card information entered when shopping on the Internet. Internet Explorer security features also help protect your computer from unsafe software.
These security features include:
- Ability to lock pop-up windows . When you browse the web, unwanted advertising windows will not appear automatically. Any pop-up windows that you click are not locked and you can specify which domains can be allowed to appear pop-up windows.
Note : This setting may affect some functions of the website and web applications. - Ability to upgrade, disable, or re-enable web browser add-ons . Add-on management allows users to view and control the list of add-ons - loaded by Internet Explorer. Users can enable or disable each add-on individually and view information about how many add-ons are used by Internet Explorer.
Pop-up Blocker is enabled by default but does not block pop-ups from websites within the internal web content area or pages that are added to the trusted website content area.
If you have disabled Pop-up Blocker, then you can enable it with one of the following 3 methods:
- Reminder at the first event: a dialog box appears before the first pop-up window appears asking customers to activate Pop-up Blocker.
- Use the tools menu
- Use Internet Options from Control Panel.
If a site opens a pop-up window that is locked by Internet Explorer, a message will appear in the status bar. If you click on the notification in the status bar, you can see a menu with the following options:
- Show Blocked Pop-up Window (Display a locked Pop-up window). This option will display a pop-up window, which is not locked at this time.
- Allow Pop-up Windows from This Site (Allow pop-up from this page). This option adds the current page to the allowed list.
- Pop-up Windows Block (Lock pop-up windows). This option converts the status of Pop-up Blocker between on and off.
- Pop-up Windows Options ( Pop-up options). This option will open the pop-up management window.
Microsoft Research Center has shown that some add-ons are the main cause of instability problems in Internet Explorer. Those add-ons may affect Internet Explorer's reliability and may pose a security risk because they may contain malicious code.
To change Internet Explorer default settings, you must perform these procedures on your computer:
- Change the pop-up lock
- Manage Add-ons.
The request to perform the task
Important : You must log into the computer
Note : You do not have to log on as a member of the administrator security group to perform this task
To change the pop-up lock
first.
Click Start , point to All Programs , and then click Internet Explorer .2.
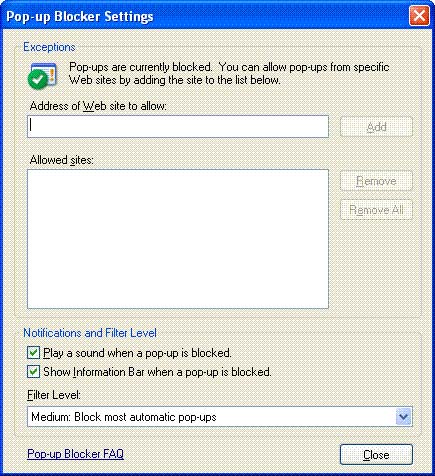
In Internet Explorer , click Tools , point to Pop-up Blocker , then click Pop-up Blocker Settings . 
Figure 14: Pop-up Blocker settings
3.
In the Notifications and Filter Level area, select the checkboxes to activate the way you are notified when a pop-up is blocked.4.
Under Filter Level choose one of the High, Medium and Low levels- High: Block all pop-ups , to block all pop-ups
- Medium: Block most automatic pop-ups , to block pop-ups automatically
- Low: Allow pop-ups from secure sites , allow pop-ups from secure sites .
5.
In the Exceptions area, type the address of the website you want to allow pop-ups and then click Add.6.
Repeat step 5 for all websites where you want to allow pop-ups.7.
Click close then close Internet Explorer .To manage add-ons
Note : If Internet Explorer is open, you can open the add-on management section by clicking Tools , Internet Options , and then going to step 4 below:
first.
Click Start , and then click Control Panel .2.
On the Pick a category window, click Network and Internet Connections .3.
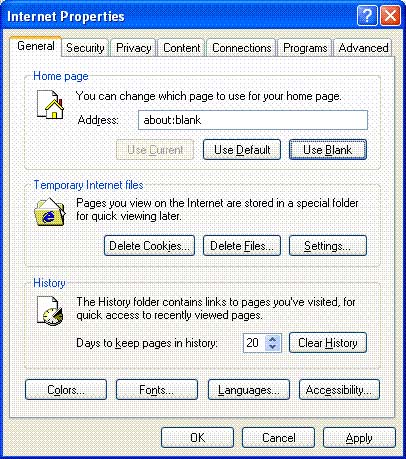
Under or Pick a Control Panel icon , click Internet Options . 
Figure 15: Internet Properties
4.
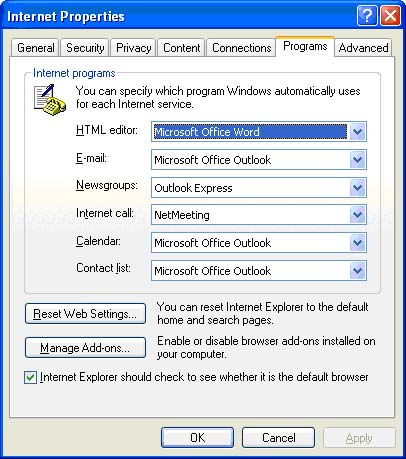
Click the Programs tab 
Figure 16: Programs tab of Internet Properties section.
Note : Figure 16 shows the list of default Internet programs. The list on your computer may be different.
5.
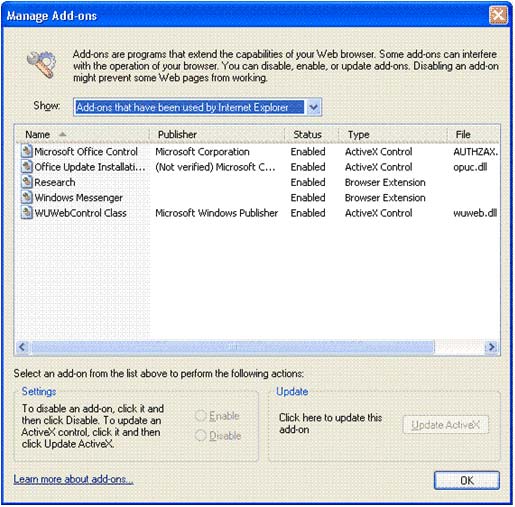
Click Manage Add-ons . 
Figure 17: Manage Add-ons
6.
To list the add-ons you want to manage, in the Show check box, select:Add-ons currently loaded in Internet Explorer ,
Or
Add-ons that have been used by Internet Explorer .
Note : Add-ons currently loaded in Internet Explorer are only available if the Add-ons are already installed on your computer.
7.
When the list shows the Add-ons you want to manage, click the Add-on you want to disable. Under settings, click Disable and then click OK .Note : To activate an add-on that has been disabled, select the add-on then click Enable .

Figure 18: Add-on status box.
8.
The add-on status box appears, click OK.9.
To update the ActiveX control, click the control in the list, and then click Update ActiveX , then OK.ten.
Click OK to close the Manage Add-ons window11.
Click OK to close Internet Properties and then close Network and Internet Connections.Verify Internet Explorer settings are applied
When you verify Internet Explorer settings, some tabs and options in the dialog boxes may not be available, this depends on the machine configuration.
To verify Internet Explorer settings are applied
first.
From Security Center , under Manage security settings for , click Internet Options .2.
Click Privacy3.
In the Pop-up Blocker area , verify that the Pop-ups Block is selected and then click Settings .4.
Verify that the desired exceptions, notifications, filter levels are applied to your computer, then click Close to close the Pop-up Blocker Settings.5.
Click the Programs tab.6.
Click Manage Add-ons and verify that the appropriate Configuration or Disable is set for each Add-on and then click OK to close Manage Add-ons.7.
Close Internet Properties then close the Security Center.8.
Close Control Panel  Part III: Configuring Outlook Express
 Part IV: Configuring Wireless Network Security
 Configure Windows XP SP2 network protection technologies on a computer (Part III)
 DNS protection for Windows (Part 2)
 6 steps to have a safer computer
 Reduce the attack side of administrator accounts
 Group Policy special security settings
 Use SPIKE and BURP for computer security