The quickest and simplest way to take a screenshot on a computer or laptop.
The fastest way to take screenshots on computers, laptops, Windows PCs (Win 7, 10, 11), and MacBooks using only the keyboard without installing complicated software..
Taking screenshots on desktop computers, laptops, Windows PCs (7, 10, 11), and Macbooks is quite simple, yet many people still don't know how to do it. Mastering this technique can significantly increase productivity and save time.
Why is it important to know how to take a screenshot on a computer?
For both work and entertainment purposes, we often need to take screenshots to record important information on our computers. Here are some reasons and benefits of taking screenshots on your computer:
- Information sharing: Information exchange is becoming increasingly convenient and widespread. Beyond text and documents, you can now quickly send important information or documents via images.
- Saving important information : Saving information is extremely necessary, whether it's important information, code snippets, or capturing images and documents for email to minimize changes. Furthermore, this process offers many other essential benefits.

The fastest way to take a screenshot on a computer or laptop PC using keyboard shortcuts.
On Windows computers or Macbooks, you can quickly take screenshots using only the available keyboard shortcuts without needing any supporting software. Let's explore the detailed keyboard shortcuts for taking screenshots on Windows and Macbooks below:
Keyboard shortcuts for taking screenshots on Windows 7/10/11
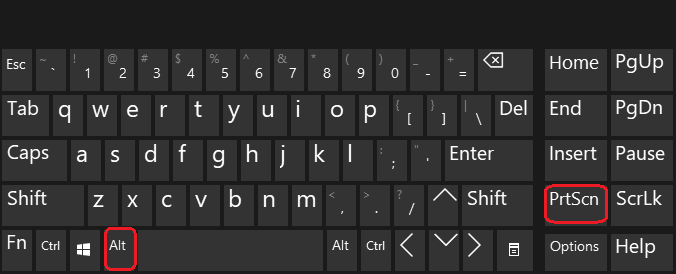
The fastest way to take a screenshot on a Windows computer is by pressing the PrtScn key (saving to clipboard) or Windows + PrtScn (automatically saving the image to the PicturesScreenshots folder) . This method works for Dell, HP, Asus, and laptops/PCs running Windows 10/11 without needing any third-party software.
Additionally, you can use other keyboard shortcuts with different functions and image save locations to take screenshots on your Windows computer, specifically as follows:
- Capture the entire computer screen and save it immediately: Press Windows + PrtScn. The screen will dim slightly and the image will be saved to This PC > Pictures > Screenshots.
- Capture the entire computer screen & Copy (Clipboard): Press the PrtScn key (hoPrtSc/Print Screen). The image will be saved to the clipboard; you need to paste it (Ctrl + V) into Paint, Zalo, or Word to save it.
- Select area capture (Snipping Tool): Press Windows + Shift + S. Drag the mouse to select the area you want to capture. The image will be saved to clipboard.
- Capture the currently active computer window: Press Alt + PrtScn to capture only the window of the application that is currently open.
Note: If your laptop keyboard has a PrtScn key that shares a key with another key (e.g., F12), you need to press Fn + PrtScn simultaneously.
| Keyboard shortcuts | Function | Image location / Results | PrtScn (Print Screen) | Capture the entire screen and copy the image to the Clipboard. | Users need to paste (Ctrl + V) into Paint, Word, or another application to save. | Windows + PrtScn | Capture the entire screen and automatically save the image. | The images are saved in the Pictures -> Screenshots folder. | Alt + PrtScn | Capture the active window . | Images are stored in the Clipboard and need to be manually pasted to view or save. | Windows + H | Capture the entire screen and open a quick sharing interface (Email, Teams, OneNote, etc.). | It doesn't save automatically; only use it when you want to send or share. | Ctrl + Alt + S | Select a custom shooting area on the screen (depending on device support). | The image is temporarily stored in the Clipboard. |
|---|
The fastest keyboard shortcuts for taking screenshots on a Macbook.
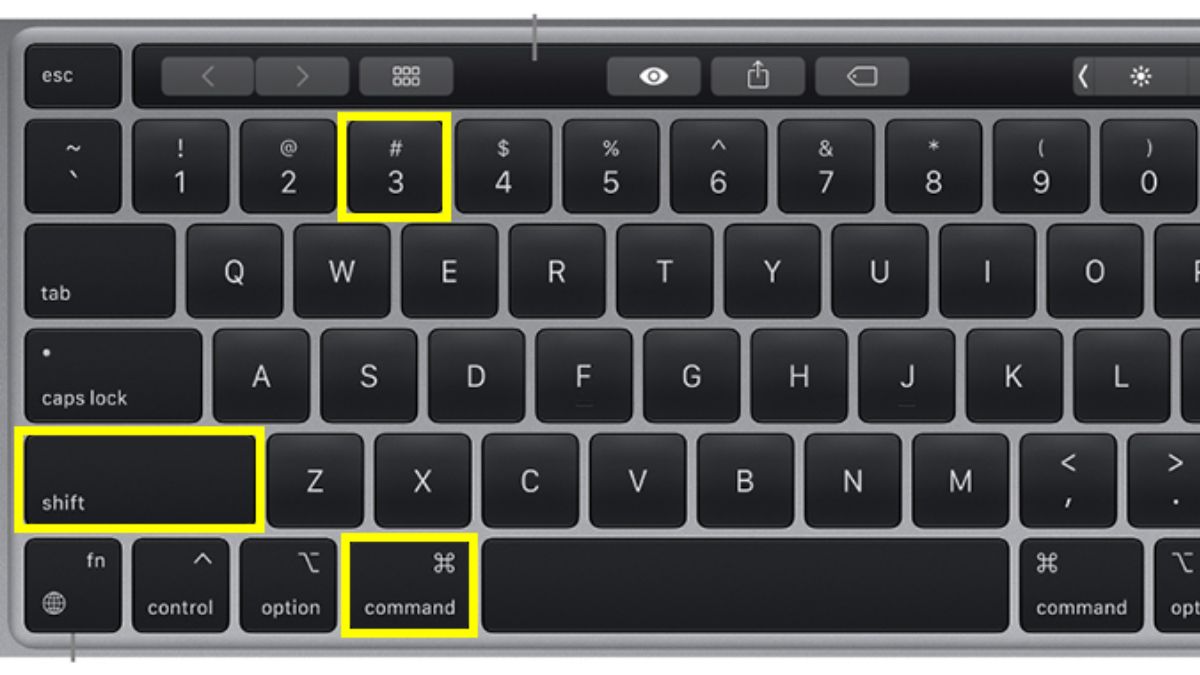
On a Macbook, you use the keyboard shortcut Command + Shift + 3 to capture the entire screen or Command + Shift + 4 to select a specific area (capture a portion of the screen).
 How to take a screenshot on a MacBook using the keyboard shortcut Command + Shift + 3
| Shortcut | Function / Description | Image location / Results | Command (⌘) + Shift + 3 | Capture the entire screen and automatically save the image. | The image is saved by default to the Desktop , with the filename in the format Screenshot [date-time].png. | Command (⌘) + Shift + 4 | Capture a portion of the screen (cursor turns into a plus sign to drag and select an area). | Images are automatically saved to the Desktop ; they can also be temporarily copied to the Clipboard by pressing the button again Control. |
Press Command (⌘) + Shift + 4 , then press Spacebar. | Capture a specific window or menu bar ; the cursor changes to a camera icon. | The image is saved to the Desktop and displays the default shadow (which can be turned off in the options). |
|---|
How to take screenshots on a Windows PC or laptop using built-in software.
In addition to using keyboard shortcuts to take screenshots on Windows computers, you can also refer to the built-in tools below:
Snipping Tool
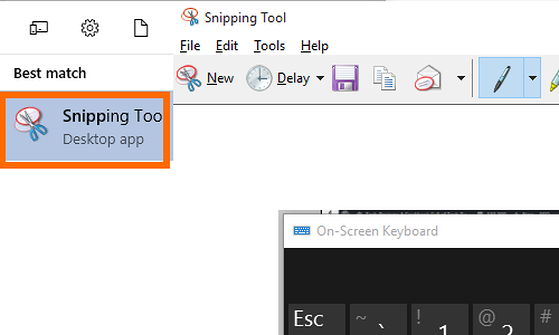
Snipping Tool is a built-in screen capture tool for Windows operating systems, starting from Windows Vista onwards, allowing users to easily capture the entire computer screen or just a specific area.
To open the tool, press the Start key, then All Programs, Windows Accessories, or click Snipping Tool , or type " Snipping Tool" into the search box and press Enter .
Snip & Sketch
Besides the Snipping Tool, you can use another tool available on Windows with similar functionality called Snip & Sketch. However, Snip & Sketch has been merged into the Snipping Tool in Windows 11.
You can quickly access this tool by pressing the Windows + Shift + S key combination . Then, you can select your desired screenshot type, such as capturing a specific area or the entire screen.
Game Bar
Game Bar is a rather unique feature integrated into the Xbox app and only available on Windows 10 and 11. This feature allows users to capture the entire screen, record videos, and then share them on the Xbox system.
To take a screenshot on a desktop PC using Game Bar, follow these steps:
Step 1: Press the Windows + G key combination , then click the Camera icon in the Capture window .
Step 2: To view the screenshots, select Show all captures .
In addition to taking screenshots using Game Bar as instructed above, users can quickly access this feature by using the keyboard shortcut Windows + Alt + Prt Sc (PrtScn) to capture the entire screen.
You can view the captured images by pressing the Windows + G key combination to select "Show all captures".
How to take a screenshot of a long scrolling screen in a browser.
To take a long scrolling screenshot on browsers like Chrome or Edge, you need to use a GoFullPage extension. Here are the detailed steps:
Step 1: Install the GoFullPage extension on your browser.
Step 2: Click on the camera icon at the top of the browser. If you don't see the extension icon, you can click on the jigsaw puzzle icon and select GoFullPage.
Step 3: For quick access, you can click the pin icon next to the extension name so that it always appears on your browser's toolbar.
Step 4: Next, scroll through the page in your browser window so that the extension has access to the entire webpage.
When you click GoFullPage, the tool will scan the entire webpage you have open and display a message saying 'Taking a screenshot'.
Take a screenshot of your computer or laptop screen in the Microsoft Edge browser.
The Microsoft Edge web browser supports the feature of capturing specific areas of a webpage or capturing the entire screen.
Please note that this feature only works for websites opened with Microsoft Edge. Here's how to use it:
Step 1 : Open the Microsoft Edge browser. Click the three-dot icon in the address bar . Web Capture .
Step 2 : Next, select either Capture area or Capture full page .
- With Capture Full Page , you'll be taken to the screenshot editing interface. After customizing, press Save to save it.
- With Capture area , select the area you want to capture. Markup Capture, edit the image, Save .
Several screen capture software programs for Windows and macOS computers.
Another simpler way to take screenshots on your computer is to use software. This method saves you a considerable amount of time and also helps improve your work efficiency. Below are some notable software options for both Windows and MacBook:
Lightshot Screenshot
This is a free screenshot software widely used due to its ease of use and compatibility with both Windows and MacBook operating systems. After installation, you can easily take screenshots by pressing the keyboard shortcut you've configured.
This method of capturing computer screens allows you to edit the captured image instantly with tools such as highlighting, adding text, and saving the image to your computer or sharing it online. A highlight of Lightshot is its ability to search for similar images online, making it easy to find related information.
SnapNDrag
SnapNDrag is a screenshot application specifically for MacBooks, offering many useful features for macOS users. This software allows you to capture the entire screen, a specific area, or just a particular window with just a few clicks. The application supports drag-and-drop functionality to save or share screenshots instantly.
SnapNDrag also allows you to easily organize and manage screenshots, with efficient sorting and search options.
Comparing screenshot methods on Windows laptops.
Essentially, all manufacturers use the same set of Windows keyboard shortcuts. The main difference lies in the location of the PrtSc key and the mode of the Fn (Function) key.
The common keyboard shortcut used on Windows computers is:
- Select a specific area (Most convenient): Windows + Shift + S (Opens Snipping Tool)
- Capture & Save automatically: Windows + PrtSc (Image saved in Pictures > Screenshots).
- Capture the current window: Alt + PrtSc (Save to clipboard).
The differences between models, as mentioned above, lie in the positions of the PrtSc and Fn keys, specifically:
| Characteristic | Dell / HP | Lenovo / Asus / Acer | Key combination | Usually, you need to press Fn + PrtSc (if the PrtSc key is combined with the F10/F11/Insert key). | Usually a PrtScsingle key (or Fn + PrtScon slim Ultrabooks). |
Key location | It is usually located together with the F keys (F10 - F12) or the Insert key. | It's usually located in the upper right corner, next to the Delete key. | Note | If pressing PrtSc doesn't work, try toggling Fn Lock (Fn + Esc) on/off. | Some newer Gaming/AI machines may reposition the keyboard to make room for the Copilot key. |
|---|
How to fix common errors when taking screenshots on a computer.
Taking screenshots on laptops and computers is a familiar operation for many people, but sometimes you encounter puzzling problems. Sometimes you press the capture button repeatedly but no image appears, or the captured image is blurry or black. Below are some common problems and solutions so you no longer have to be frustrated when taking screenshots.
The screenshot was not found even after pressing PrintScreen.
You pressed PrintScreen (PrtScr), but the screenshot doesn't appear? This is a fairly common error, especially for those unfamiliar with this key.
When you press PrintScreen, the image isn't automatically saved as a file; it only resides in the clipboard, waiting to be pasted into an application like Paint, Word, or Photoshop. If you forget this step, you might think the image has disappeared.
Some laptops or keyboards may require pressing Fn + PrintScreen to activate this function. If you want the screenshot saved immediately without manually pasting it, try Windows + PrtScr.
The image will then be automatically saved to the Pictures > Screenshots folder without you needing to do anything further.
Snipping Tool or Snip & Sketch are not working.
You open Snipping Tool but it just freezes and won't let you take a screenshot? Or you try Snip & Sketch, but pressing the capture button doesn't produce any response? This could be due to an operating system error or a software conflict with another application.
The simplest solution is to close and reopen the application. If that doesn't work, you can try the Windows + Shift + S shortcut; this often quickly opens Snip & Sketch's screenshot mode even when the software is malfunctioning.
If the problem persists, check if there are any new Windows updates available. Some older versions of Windows may cause errors when using the screenshot tool.
The screenshot is black or doesn't display the correct content.
You take a screenshot, but instead of seeing the content you want, you only see a black frame? This is a common problem when trying to capture sensitive content, such as banking interfaces, Netflix videos, or some security applications. Some privacy protection software will automatically obscure the content when a screenshot is taken.
If you need to capture content in your browser but the images keep turning black, try Microsoft Edge. This browser has a built-in screenshot tool and usually works better in these situations.
If you're recording video or playing games and screenshots are corrupted, try using software like OBS Studio, or take advantage of Steam's or Xbox Game Bar's built-in screenshot feature. Additionally, some machines with dedicated graphics cards may experience screenshot errors if graphics optimization is enabled. If you encounter this problem, try disabling it in your Windows graphics settings.
The screenshot is blurry or out of focus.
Are you taking screenshots and finding the images blurry and lacking detail? This could be due to your screen resolution or how the image is saved. If your screen has a low resolution, the screenshot won't be as sharp as when taken on a 4K screen. But sometimes, this problem stems from how you save the image.
If you take a screenshot and paste it directly into Word or PowerPoint, the software may automatically reduce the image quality. A helpful tip is to save the image as a PNG file first, then insert it into the document; this will help maintain the best image sharpness.
Additionally, if you're using screen capture software, check if it has an image compression setting. Some software automatically compresses images to save memory, resulting in blurrier images than usual. If capturing screenshots in games, look for a high-resolution screenshot option, as many games default to low-resolution screenshots to conserve resources.
Above are 11 ways to take screenshots on Windows 7, 10, 11, and Macbook computers and laptops. Depending on your purpose and needs, you can use the built-in screenshot keyboard shortcuts on your computer or the tools installed on the Windows operating system. If you find this article helpful, don't forget to share this useful computer tip!
Frequently Asked Questions
Where are computer screenshots saved?
Computer screenshots are typically saved in locations such as the Pictures folder, Clipboard, etc. The save location will depend on the keyboard shortcuts used and your initial settings.
How do I take a screenshot on an Acer laptop?
There are three main ways to take a screenshot on Acer:
- To capture the entire screen and save it automatically: Press Windows + Print Screen (PrtSc). The image will go to Pictures > Screenshots.
- To capture the entire screen, paste it: Press Print Screen (PrtSc). Paste (Ctrl + V) into Paint/Word. to save.
- Capture a region/window: Press Windows + Shift + S. Drag to select the area, or select the window. The image will be saved to the clipboard.