The guide to turning Blogger into WordPress does not worry about losing Google rankings
Blogger is one of the great free tools for bloggers . However, when developing blogs to a more professional level or converting to another purposeful website rather than simply writing and sharing content, then many users will want to switch to WordPress. This is not difficult to understand. Simply because:
- Using Word Press is simple and easy. WordPress was developed for the purpose of serving users who are common users, without much knowledge about website programming. WordPress actions are simple, the intuitive administration interface makes it easy to understand how to manage a WordPress website in a short time.
- There are many plugins supported.
- WordPress supports multiple languages. WordPress source code has many language packs included, including Vietnamese. Although each language or plugin has its own language, you can easily translate yourself with the support software.
- Finally, when you use WordPress, you can not only create a personal blog but also turn your website into many websites for different purposes, such as a sales website.
In the article below, Network Administrator will guide you how to transfer content from Blogger to WordPress without worrying about losing rankings on Google.

Overview of implementation steps:
Here are the steps to transfer content from Blogger to WordPress without worrying about losing rankings on Google:
1. Log in with the WordPress hosting company.
2. Export content on your Blogger by visiting Settings => Other page .
3. Enter content from Blogger to WordPress by visiting Tools => Import page on WordPress window .
4. Set up permalinks on your new WordPress.
5. Set up redirects for Blogger visitors to articles on WordPress.
6. Set navigation for RSS feed .
7. Import your image from Blogger to WordPress's multimedia library.
Step 0: Before starting
Before starting with WordPress, you first need to have good corporate web hosting that knows about good WordPress hosting and its own domain name.
The advice for you is to use Bluehost because they will give you a free domain name and 50% of their hosting plan (especially for WPBeginner users). Bluehost is also a partner and official hosting provider of WordPress.
If you want, you can replace it with Bluehost, or Siteground also provides users similar to WPBeginner users.
After logging into WordPress hosting and setting up your domain name, the next step you need to do is to install WordPress on your hosting account. And once you've installed WordPress, the next step is to 'move' your content from Blogger to WordPress.
Step 1: Get data from Blogger
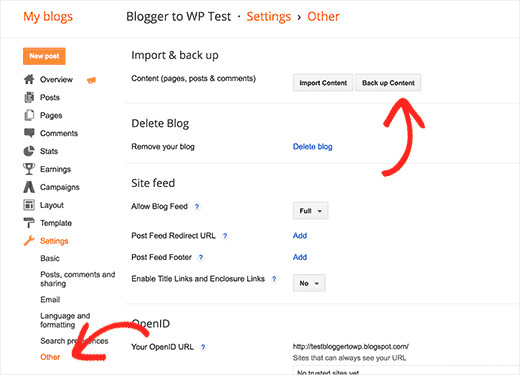
The first step you need to do is get the data from the old blog. To do this, it's easy, just log in to your blogger dashboard, then visit Settings => Other. At the Import & Back up section, click the Back up Content button.
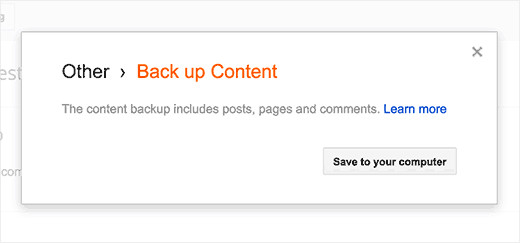
At this time, a popup window appears, where you click the Save to your computer button.
All content, data on your old blog will be downloaded to your computer as an XML file. After the download process is finished, the next step you need to do is download the data to the WordPress site.
Step 2: Download the data to WordPress
To begin the process of downloading data from the Blogger site to WordPress, you need to have an available WordPress page, then visit Tools => Import . On the Import page, click Blogger.
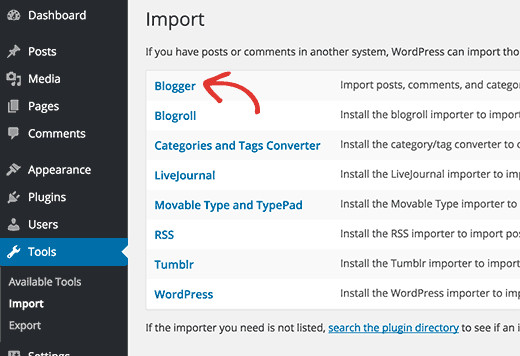
A popup window will appear on the screen asking you to install the plugin to transfer data from Blogger to WordPress. Your task is to click the Install button.
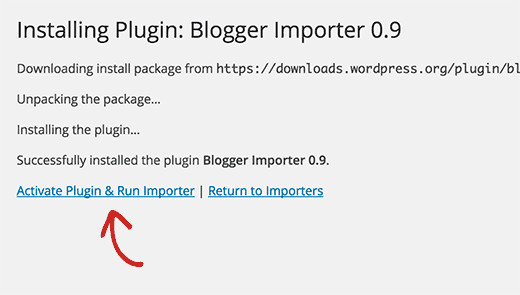
WordPress will download and install the plugin for you. After the download process finishes, find and click the Activate Plugin and Run Importer link to continue.
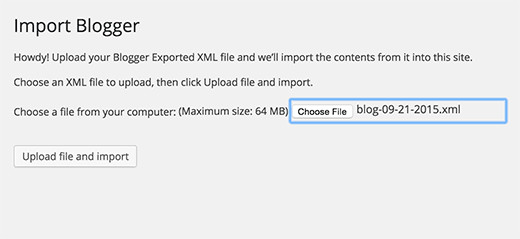
On the Import Blogger window, WordPress will ask you to upload the XML file. The file you downloaded in step 1.
Simply click on the Choose file button and download the XML file you downloaded. Next, click the Upload file and import button to continue.
If you do not select suggested hosts or your site is a large website, you will probably receive an error message stating that your file size is too large.
In this case, you will have to maximize the file upload limit. If your file is small, there won't be any errors.
WordPress will 'import' each of your Blogger posts. When the process is complete, you will be asked to assign the author's name to the entry you entered. You can assign your author's name or create a new author account.
As a result, you successfully imported content from Blogger into WordPress. However, you need to make sure you don't lose any search and traffic rankings from your old blog.
Step 3: Set up Permalinks (static links - links of articles)
Permalinks are a term used for URL structure on individual pages. WordPress integrated features allow you to set SEO friendly URL structure. However, because you enter content from Blogger, your WordPress page URL structure is as close to the Blogger URL structure as possible.
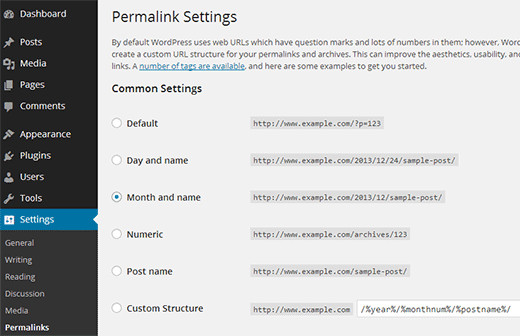
To set up permalinks, go to Settings => permalinks window and select Month and Name as your permalink structure.
Step 4: Set URL redirection
This is the most important step, just for you to keep the traffic, and the user still has access to the page. And this is also a way for Google to know that the new page is an old page, so it will keep the ranking of the new page on the search engine and not drop the ranking.
To successfully migrate Blogger to WordPress, you need to set up redirection on two levels.
First, you will redirect Blogger access to your new WordPress. Next, when a user approaches your WordPress site, you will redirect them to the exact posts they are trying to read.
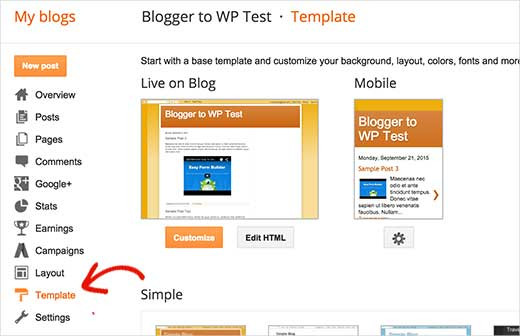
With the first step of setting up redirection on the Blogger page, you must log in to your Blogger account and access the Blog settings => click on Template .
On the Template page, scroll down the page, find and click the Revert to Classic Template link .
After switching to the Classic Template, you will see the "Edit Template HTML" section. Your task is to replace everything in this section with the code below. Make sure you replace replace http://www.example.com with your domain name:
01
02
03 <$ BlogPageTitle $>
04
05
15
16
17
18
19
20
21
22
23
24
25
26
27
28
29
<$ BlogTitle $>
30
thirty first
32
33
<$ BlogItemTitle $>
34 <$ BlogItemBody $>
35
36
37
38
Save the Template again and you have successfully redirected on your Blogger.
However, you must copy and paste the code below into the functions.php WordPress file or on the specific plugin page.
01 function blogger_query_vars_filter ($ vars) {
02 $ vars [] = "blogger";
03 return $ vars;
04}
05
06 add_filter ('query_vars', 'blogger_query_vars_filter');
07
08 function blogger_template_redirect () {
09 global $ wp_query;
$ Blogger = $ wp_query-> query_vars ['blogger'];
11 if (isset ($ blogger)) {
12 wp_redirect (get_wordpress_url ($ blogger), 301);
13 exit;
14}
15}
16
17 add_action ('template_redirect', 'blogger_template_redirect');
18
19 function get_wordpress_url ($ blogger) {
20 if (preg_match ('@ ^ (?: Https?: //)? ([^ /] +) (. *) @I', $ blogger, $ url_parts)) {
21 $ query = new WP_Query (
22 array ("meta_key" => "blogger_permalink", "meta_value" => $ url_parts [2]));
23 if ($ query-> have_posts ()) {
24 $ query-> the_post ();
25 $ url = get_permalink ();
26}
27 wp_reset_postdata ();
28}
29 return $ url? $ url: home_url ();
30}
After you've pasted this code, that's all you need to do to set up the redirect. The above code will create a WordPress 301 redirect - that's what you need to ensure the best SEO.
From now on any visitor's visit on your old Blogger site will be redirected to your new WordPress page.
Step 5: Redirect Feed
The amount of subcriber RSS on the old Blogger site will not be converted. That's why you need to redirect the Blogger feed to the feed of your new WordPress site.
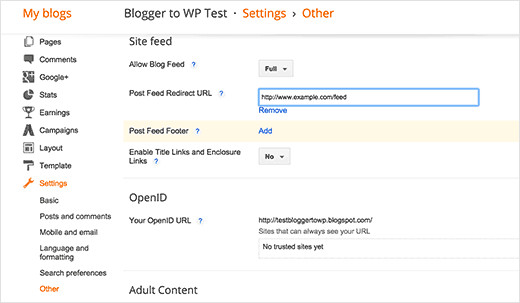
To do this, log in to your Blogger account, then visit Settings => Other under the blog dashboard.
At the Side Feed section, click the Add link next to Post Feed Redirect URL. Here you can enter the feed landlord on your new WordPress page.
Usually it is http://your-awesome-site.com/feed/ (don't forget to replace it with your own domain name).
Step 6: Transfer photos from Blogger to Wordpress photo library
When you transfer data from Blogger to WordPress, WordPress importer will upload images from your Blogger posts into WordPress's multimedia library. However, it may not load some pictures. This does not happen often, but it can also happen.
However, you have nothing to worry about because you can still find and import these images into WordPress. Follow the steps below to import external images and WordPress.
To upload all photos from blogspot to a new host, use the Import External Images plugin.
It will scan all external link images and then switch back to the host.
After installing the plugin, go to Media> Import Images. Then select Import Images Now.
This will import all images from your Blogger into the WordPress Media Library. When the images are in WordPress's multimedia library, you can easily create photo libraries and more.
Refer to some of the following articles:
- Turn off Facebook, take time to visit these 37 Web sites to add new knowledge every day
- How is the Internet and WWW different?
- How to access a website without an Internet connection on an Android device
Good luck!