Table of Contents
This article explores setting up photoshop action batch image processing with straightforward explanations and useful context. It also highlights common questions and important details to consider.
Photoshop is still the leading post-production image processing software with many advanced options, one of which is Photoshop Action, which helps to customize a variety of different images automatically and quickly.
Usually to edit post-production, the photographer tends to conduct "cropping " each photo even though it is just a simple operation such as increasing the contrast, adjusting the color density. With Photoshop Action ( Understand simply that the script handles the default settings), all photos taken at the same condition, the same device can easily be processed with equal customization, saving time.
To create a Photoshop Action, you only need to take steps to set up, adjust photos, color. once. You can then quickly apply to a variety of photos via the hotkey. The steps for setting up an image processing script, increasing the contrast and colors below are done on Adobe Photoshop CS3 or higher.
Step 1: Identify the problem of the image
Open the photo you want to process. Turn on the Histogram option in the Windows menu to track the color graph range of the image. For example, with a low-light, low-light shot below, the Histogram gray chart will display bold on the left and midpoint, while on the right is almost unavailable.

Observe the young photograph with the Histogram band tilted to the center and left
Step 2: Set Action
To create an Action, go to the Windows Menu > Actions And select the Create New Action Icon. In the New Action Window, name and set the Function Key function keyF2 , create a hotkey to activate later. click the Shift Box and then click Record.

First step in setting up a new Photoshop Action
Step 3: Set up the Save Action template
Tonal Tweak Option appears at the bottom of the Actions Panel and the Record Icon will turn red. In the Layers Panel, select Create New Fill or Adjustment Layer And choose Curves . You will see an Action table in the list, located on the right.

Save the Action options that will be set in the next steps
Step 4: Increase contrast
The Curves Command will display the contrast options. Click the Preset Drop-down option to select the medium Contrast contrast level . You can customize the light or dark level for photos here. Refer to the following common parameters: Output Level is 32 and Input is 37, then click OK.
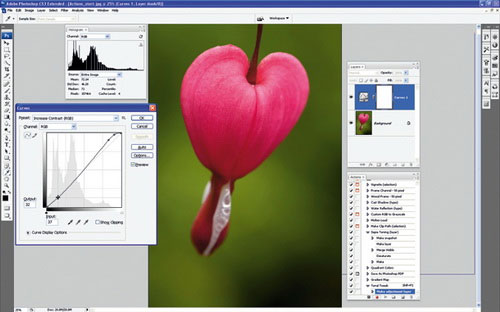
Adjust the contrast level of the image
Step 5: Improve colors
Click the Create New Fill Or Adjustment Layer Icon and then Hue / Saturation Adjustment Layer . To improve the color of the image, you can change the Master Satuaration Parameter To + 12. Click OK And then select the Stop in the Actions Strip. All your adjustments are saved in this action.
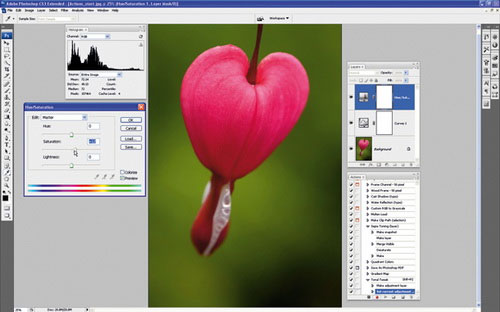
Improve the color quality of images to get a reasonable Model Action
Step 6: Check Photoshop Action
To check the newly created action, press F12 (File> Revert) To switch the image to its original state. Select Action Tonal Tweak In the Actions Strip and press the Play Button . Next, the new option set with the recorded Adjustment Layers Command will immediately change the light and color of the image.

Compare the original image and the edited image with the effect of the Action template
FAQ
What is the main benefit of setting up photoshop action batch image processing?
The main benefit is a clearer understanding of the topic and a practical way to apply the information covered in this guide.
What should I check before using setting up photoshop action batch image processing?
Confirm compatibility, review the required settings, protect important data, and use the latest supported version whenever possible.
What should I do if the result is different?
Repeat the steps carefully, verify permissions and version differences, and consult the product's official support documentation for changes not shown in the article.
Related Articles
 How to Use Photoshop CS5 - Part 17: Batch Image Processing with7 minutes read
 How to Create Actions in Photoshop for Batch Processing Images3 minutes read
 How to Use Photoshop CS5 - Part 25: Remove Automatic Background5 minutes read
 Highlight Image Area with Photoshop Action3 minutes read
 5 Software to Rename Files in Batch13 minutes read
 19 Free Photoshop Action Download Sites8 minutes read
Reader Comments 0
Sign in with email or Google to join the discussion.