Instructions to remove DirectX 11, restore default DirectX
If you are using an older computer, you can refer to the guide to uninstall Directx 11 for a better experience.
Table of Contents
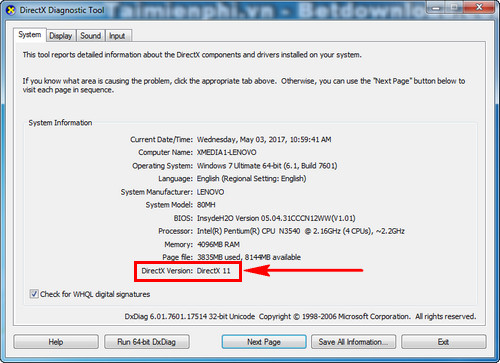
1. Check the DirectX version on your computer.
Press Start or the Windows key on your computer keyboard. Type the command dxdiag in the Run section . Press Enter to open the DirectX Diagnostic Tool window to see the DirectX version you are using.
In the DirectX Version section you will see the DirectX version you are using.
2. Uninstall DirectX 11 on your computer.
Once you have determined that DirectX 11 is installed on your computer. To remove DirectX 11 from your computer, you must follow the instructions below.
Step 1: Press Start or the Windows key on your computer keyboard. Enter the command line regedit.
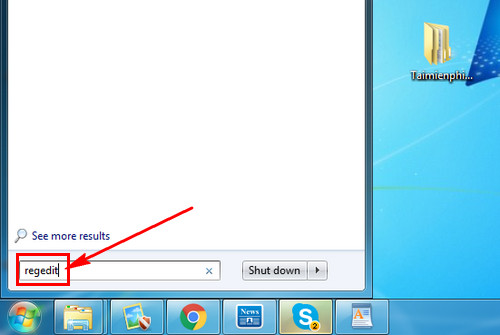
Select Regedit.

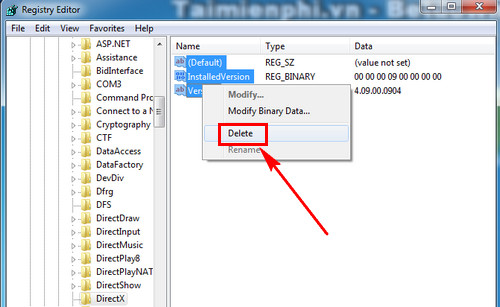
Step 2: On Registry Editor, search for the path
HKEY_LOCAL_MACHINESoftwareMicrosoftDirectX.

Step 3: Pay attention to the information in the right column of DirectX. Highlight and Delete all those files.
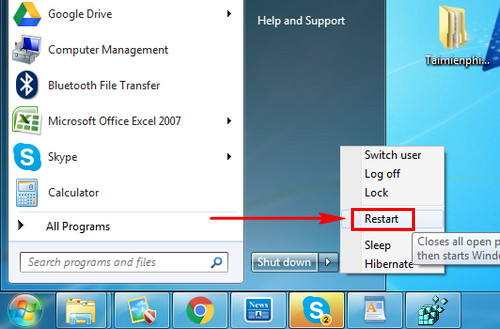
Step 4: That's it, now you just need to Restart your computer to restore the original DirectX version on your computer.
After following the instructions to remove DirectX 11 from Taimienphi, your computer will be restored to default DirectX, you can download the necessary DirectX versions and install normally to play games, install software. However, TipsMake also recommends that you install the latest version of DirectX to increase the performance of your computer. With old versions of DirectX, it will be difficult to download new applications, browsers or games.
But sometimes, the DirectX installation process also has certain errors. So if you encounter an error that DirectX cannot be installed, how should you handle it? This is the problem that many users encounter when installing old versions of DirectX. If you encounter this situation, please refer to the method to fix the error of not being able to install DirectX to fix it. Because DirectX is a very important part of Windows, supporting you in using software. If you encounter an error that DirectX cannot be installed, you should apply the above method to fix it if you do not want to reinstall Windows.
Was this article helpful?
Your feedback helps us improve.
Related Articles
 How to download Direct X and install DirectX on your computer4 minutes read
 DirectX 11 - Download DirectX 11 here2 minutes read
 What is DirectX 12? How important?6 minutes read
 What is Microsoft DirectX?8 minutes read
 How to Uninstall Directx6 minutes read
 Instructions to restore default settings for Firefox3 minutes read
Reader Comments 0
Sign in with email or Google to join the discussion.