Table of Contents
Compatibility note: This tutorial uses Photoshop CS6. The core tools remain familiar in newer releases, although panel locations and some options may differ.
Your original image file is either too large or too small for your desired size. How can you adjust the image size to fit? This article will show you quick and simple steps to resize your image.
Resizing images, also known as changing image dimensions, is a simple operation in Photoshop, but not everyone knows how to do it. If you're new to Photoshop CS6, this is one of the first operations you need to learn.
To resize an image in Photoshop CS6, you need to follow these steps.
Step 1: Open the image file in Photoshop CS6.
The first thing you need to do is open the image you want to resize.
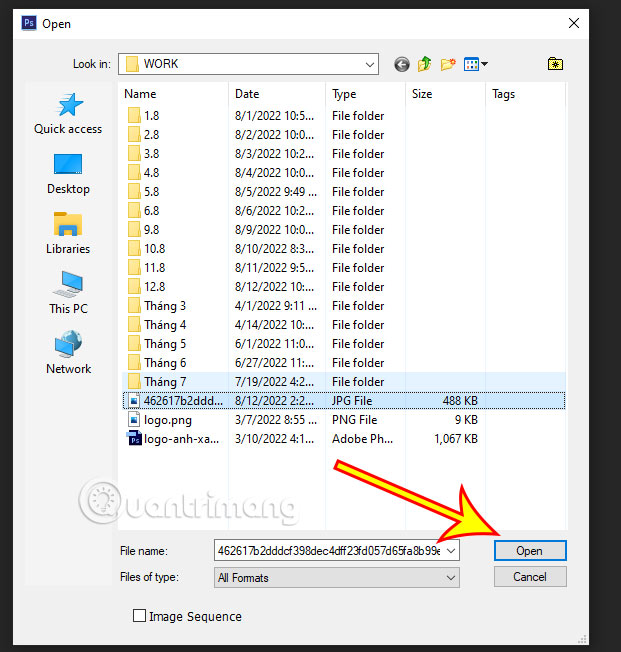
Pay close attention to the image file size. After editing, you can compare the original size with the resized size.
If you don't know how to open image files in Photoshop CS6, you can refer back to the previous article to learn how.
- Instructions on creating, opening, and saving files in Photoshop CS6
In this article, the sample file used by TipsMake.com has a size of 488KB.
Step 2: Apply the Resize tool
To adjust the image size, click on the Image option in the Menu bar and select Image Size.
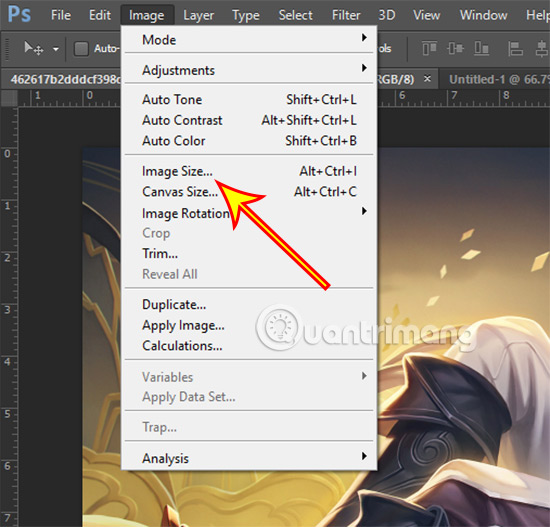
Alternatively, you can also press the keyboard shortcut Ctrl + Alt + I to quickly access this feature.
Photoshop CS6 now has many useful keyboard shortcuts that can assist you during your learning process, which you can refer to.
- Learn about keyboard shortcuts in Photoshop CS6.
Step 3: Proceed to resize the image.
Once the Image Size dialog box appears, simply enter your desired Width and Height to adjust the image size.
Note: Photoshop CS6 will default your image's aspect ratio to match the original image size. Therefore, when you adjust the Width or Height , the other dimension will automatically adjust accordingly.
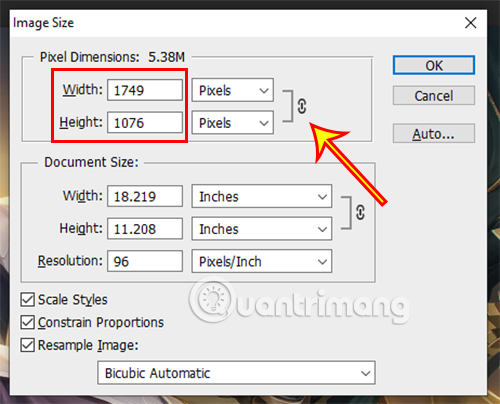
If you want to adjust these two parameters to your liking, click the icon linking them to unlink them. You can also click this icon again if you want to link them back together.
Once you have adjusted the image size to your liking, you need to press OK to complete the resizing process.
Step 4: Export the resized image.
The final thing you need to do is save the edited image for later use.
There are many different ways to save this new image. In this article, TipsMake.com will show you how to use the Ctrl + Alt + S key combination to open the Save As dialog box , then save the image as a JPEG .
In the JPEG dialog box, you can see that the image size has been significantly reduced after resizing (reducing the resolution). Similarly, when you increase the image size, the file size will also increase.
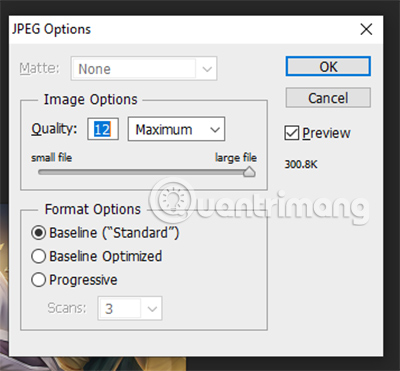
The sample image used by TipsMake.com, after resizing, has been reduced to just 300KB, smaller than the original image.
This tutorial on how to resize images in Photoshop CS6 has now concluded. We believe that with these simple steps, anyone can easily use the resize tool to change the size of images in Photoshop.
Related Articles
 In This Way, Resizing Images in Bulk Will Not Take Much Effort as3 minutes read
 Instructions for Resizing Images in Windows 10 Series5 minutes read
 How to Resize Images Properly in Photoshop9 minutes read
 Ways of Blending 80s Image Colors in Photoshop3 minutes read
 How to Use Photoshop CS5 - Part 16: Delete Any Object from the Image6 minutes read
 5 Easy Ways to Handle Low-Light Photos in Photoshop10 minutes read
Reader Comments 0
Sign in with email or Google to join the discussion.