How to use the Check in feature in the Messages app on iPhone
Check in is a feature introduced by Apple with iOS 17, allowing you to automatically notify friends and family when you have arrived at your destination.
Table of Contents
Check in is a feature Apple introduced with iOS 17 that allows you to automatically notify friends and family when you've arrived at your destination. It's extremely useful when you don't want to constantly share your location or every move but still want to keep someone informed about your safety while traveling.
Even for those simple moments we're all familiar with, like forgetting to let someone know when you're home, the Check In feature is still very useful.
Note : iOS 17 is currently in beta, meaning you can only use the Check In feature right now if you have iOS 17 beta installed on your iPhone.
How to set up the Check in feature on iPhone
Check in is one of many Messages features built into iOS 17. Remember that this feature only works on iMessage and if both users have devices running iOS 17 or later. It also only works with one person at a time. The Check In feature will notify the person you choose when you start traveling and then notify you again when you complete check in or if any problems arise.
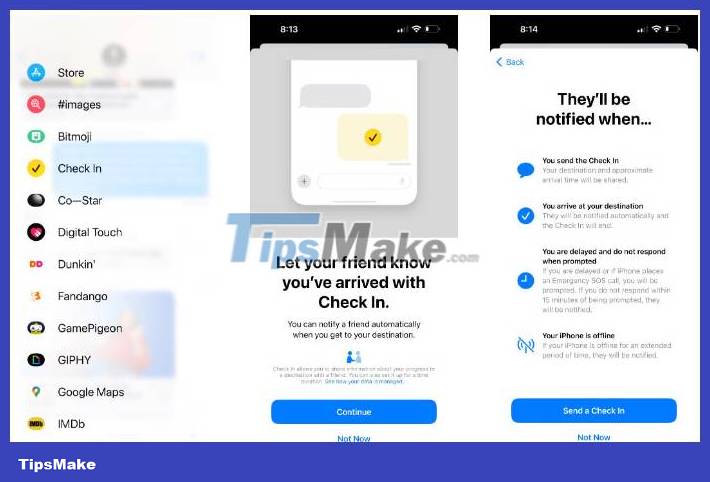
Start by opening a chat with the person you want to check in with. Then tap the plus icon next to the message field, tap More , and find Check In along with your other iMessage apps. Apple will walk you through using this feature if you launch it for the first time.
Check in data sharing: Limited and complete
You have complete control over how much data Apple shares with the recipient of your check-in information if something goes wrong. Apple groups privacy options into two categories: Limited and Full. This is a common activity setting for your contacts, but you can change it at any time in Settings > Messages > Check In Data . It is offered as one of many privacy settings in iOS 17.

With Limited data sharing , your contact will only receive your most recent location, battery percentage, and signal strength. If you have an Apple Watch, this data will also be sent to the watch. However, with Full data sharing , your contact will get everything that's been mentioned, plus your entire route represented on a map, when you last unlocked it. iPhone or remove Apple Watch.
Again, regardless of whether you choose Limited or Full , your check-in contact will only receive this information if you do not respond to your whereabouts notification.
Create your first check-in timer
After starting check in, you can select When I arrive or After a timer for notifications. To check in based on location, select your location by searching for it on the map.
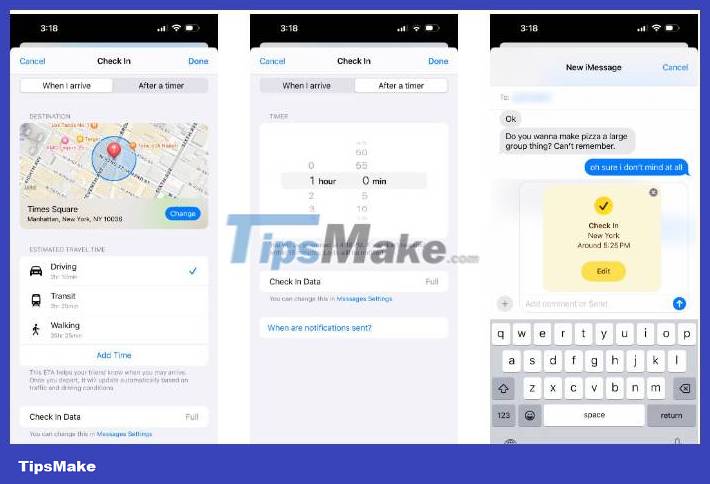
When you select a location, your iPhone displays the ETA (estimated time of arrival) for driving, transit, and walking. Select the travel method you will use and optionally add additional time to the ETA by tapping Add Time - up to an additional hour.
For time-based check-in, you can set the timer from 5 minutes up to 11:55 p.m.
Complete Check in
When setup is complete, tap Done . Then, send check-in information via iMessage to the recipient.
If you're using Location-Based Check In, your recipient will automatically receive a notification when you arrive. For time-based check in, you have 15 minutes to respond to check in after the timer expires.
If you don't respond promptly or stay off track for too long than expected at your chosen location, the person will receive a warning. Before this happens, you will have the opportunity via notification to add some time to your Check In if you experience a delay.
Was this article helpful?
Your feedback helps us improve.
Related Articles
 How to backup and restore messages on iPhone Zalo4 minutes read
 Apple is about to allow the retrieval of messages on iPhone2 minutes read
 How to use the translation feature in Messages on iPhone2 minutes read
 How to send handwritten messages on iPhone - New feature updated on iMessage2 minutes read
 How to turn off sending SMS messages on iPhone2 minutes read
 Instructions on how to recover deleted messages on iPhone3 minutes read
Reader Comments 0
Sign in with email or Google to join the discussion.