Table of Contents
The Crate Delivery challenge in Just Die Already asks you to move three heavy wooden crates into nearby drop-off zones. The crates cannot be carried normally, so use a full-size forklift and approach each location slowly. The smaller forklift is prone to getting stuck and may not lift a crate high enough.
Before moving a crate
- Find a full-size forklift and practice raising, lowering, and tilting the forks.
- Keep the forks low while driving so the crate does not slide off.
- Insert both forks under the center of the crate before lifting.
- Use small steering corrections near bridges, fences, and drop-off bins.
- If the forklift flips or falls into water, restarting the attempt is often faster than trying to recover it.
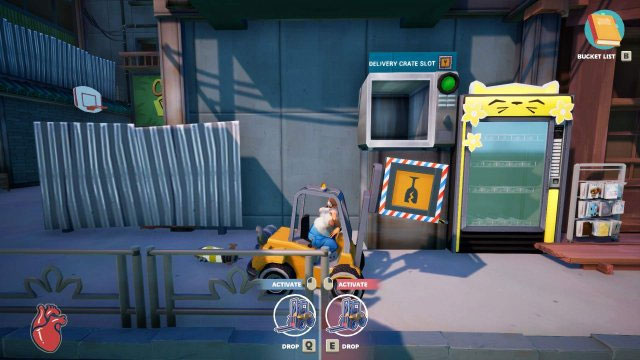
Crate 1: City center basketball court
The easiest delivery is near the basketball hoops and the tram route in the city center. Bring the full-size forklift to the crate, slide the forks underneath, and lift only enough to clear the ground.
- Line up squarely with the crate instead of approaching at an angle.
- Wait for the tram to pass before crossing or blocking its route.
- Drive toward the marked delivery area at low speed.
- Center the crate over the drop-off zone, lower it, and reverse straight out.
If the tram is approaching, move the forklift clear and let it pass. A collision can knock the crate loose or overturn the vehicle.
Crate 2: Docks
The dock delivery is the most awkward because the forklift must cross a narrow bridge and nearby NPCs can interfere with the vehicle. Take the bridge straight on, avoid sharp corrections, and keep the crate as low as possible.
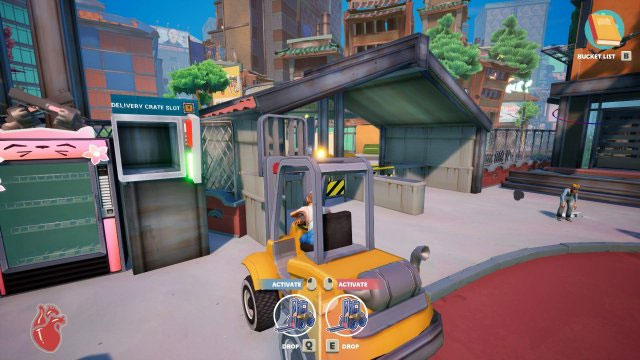
- Align the forklift with the bridge before accelerating onto it.
- Cross slowly; turning while a wheel is near the edge can send the forklift into the water.
- At the destination, stop and realign before trying to place the crate in the bin.
- Lower the crate gradually and back away without turning until the forks are clear.
Two NPCs near the drop-off can push or move the forklift. Removing them temporarily may not help because they can respawn. If you have the balloon gun, sending them away from the work area can create enough time to finish the delivery. Otherwise, wait for a clear opening and make short, controlled movements.
Crate 3: Track-and-field loop
The final crate is at the loop track. Reaching the inside with a forklift is the difficult part; once the vehicle is there, the delivery itself is relatively straightforward.
- Watch the road traffic and wait for a gap before moving the forklift.
- Use the ramp on the left side to cross the barrier into the track area.
- Approach the crate with the forklift straight and the forks lowered.
- Carry it to the nearby drop-off point and lower it into position.
Do not race an approaching car. A hit can separate the crate from the forks and force you to reposition both the vehicle and the load.
Forklift controls and positioning tips
The game's physics are intentionally unpredictable, but careful positioning reduces failed attempts:
- The forks miss the crate: back up, lower them completely, and approach from the flat side.
- The crate slides forward: reduce speed and tilt the forks back slightly if the controls allow it.
- The crate will not clear the bin: use the full-size forklift and lift only after you are close to the drop-off.
- The vehicle becomes wedged: reverse in a straight line before steering. Rapid turning usually makes the problem worse.
- The crate falls upside down: use the forks to nudge and roll it into a position that can be lifted again.
Recommended completion order
Start with the basketball-court crate to learn the forklift handling in an open area. Complete the track crate next, then attempt the docks after you are comfortable balancing a load and crossing narrow routes. The game does not require a graceful delivery—only getting each crate into its marked zone.
Related Articles
 The Design of Beautiful Wooden Stairs, Modern2 minutes read
 The Beautiful Wooden Doors2 minutes read
 Things You Should Never Use to Clean Wooden Floors6 minutes read
 Beautiful Wooden Living Room Partitions Help the House More2 minutes read
 Fujitsu Introduced a Wooden Laptop Case3 minutes read
 10+ Samples of Beautiful and Simple Living Room Furniture3 minutes read
Reader Comments 0
Sign in with email or Google to join the discussion.