How to remove password protection from PDF in Ubuntu
Portable Document Format (PDF) is one of the most frequently used file formats today. Today's article will discuss some ways to achieve this.
Create an unsecured PDF file from the command line
This method requires the command line utilities pdftops and ps2pdf to be installed on the Linux system. If you are running Ubuntu, these utilities are already available, otherwise you can install them by running the following command:
sudo apt-get install xpdf-utils contextOnce all the requirements are ready, first execute the pdftops command (syntax below) to convert the password-protected PDF file to a postscript (.ps) file:
pdftops -upw [password] [complete-path-to-pdf-file] [complete-path-to-ps-file]In the command sample shown above, the -upw option is used to specify the user password for the PDF file. Replace [password], [complete-path-to-pdf-file] and [complete-path-to-ps-file] with the actual password used to open the .pdf file, the path of the pdf file and the location to save the .ps file. In this case, these two files are: '~/Downloads/PDF/secured.pdf' and '~/Downloads/PDF/unsecured.ps' respectively.
When running this command, the postscript file (.ps) will be created at the location specified in the command.

The next step is to convert this postscript file into a .pdf file, which can be easily done using the ps2pdf command. This is the command used in the example case:
ps2pdf ~/Downloads/PDF/unsecured.ps ~/Downloads/PDF/unsecured.pdfand it creates 'unsecured.pdf' in the same folder.

Now, when you open this newly created PDF file, it will not ask for a password.
Create insecure PDF files with Document Viewer
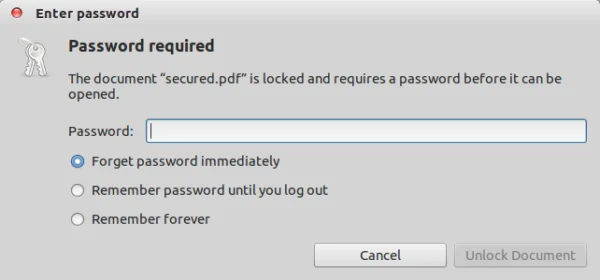
This method focuses on achieving the same using Document Viewer, the default PDF viewer in Ubuntu. First, open the password-protected PDF file in Document Viewer by entering the password:

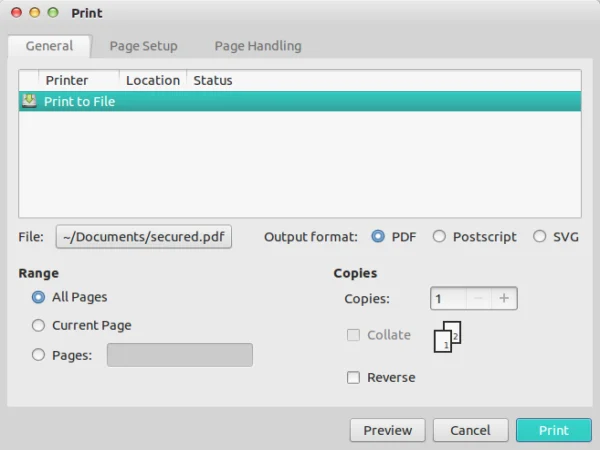
Once the file is open, go to File -> Print and make sure the 'Print to File' option in the 'General' tab is selected.

Then, make sure that the file option contains the output PDF name and location of your choice - this information can be changed by clicking the button where the information is displayed. The example changed the output file name from 'secured.pdf' to 'no-password.pdf'.

Now, simply click on the 'Print' button and the unsecured PDF file will be saved at the location specified in the File option, in this case '~/Documents'.
Try opening a new file now and it will not ask you to enter any password.
Of course, these are not the only two ways to create an unsecured .pdf file from a password-protected file, but the methods discussed in this article will give you an idea of how to achieve the same thing. yourself using the command line as well as the GUI.
Have you ever tried any of these (or any other) methods to create an unsecured .pdf file? How was your experience? Share your thoughts in the comments section below!
You should read it
- What's new in Ubuntu 18.04 LTS just released?
- How to prolong the life of Ubuntu 18.04 installation with Ubuntu Pro
- What is the difference between Ubuntu Desktop and Ubuntu Server?
- Ubuntu 21.04 users need to update the system ASAP
- 5 things to do after upgrading to Ubuntu 22.04 LTS
- 5 Reasons Ubuntu Cinnamon Is Better Than Other Ubuntu Versions
 Why should you consider deleting your Temu account?
 7 Android features that help reduce travel anxiety
 Cheap smartphones can have serious privacy problems
 The original Snapdragon X Elite benchmark couldn't even beat the Apple M3, let alone the M4!
 How to log in to SSH server with GPG key
 List of Samsung Galaxy devices that will not be updated to One UI 7 (Android 15)