How to Fix 'Error 0x00000709: Operation Could Not Be Completed' on Windows
It's frustrating when something as simple as setting up your default printer in Windows results in an error. Luckily, resolving the "Operation could not be completed (error 0x00000709)" error isn't too difficult. Here's what you can do to resolve the error and get back to printing.
1. Check for interference from other printers
If multiple printers are connected, Windows may sometimes display an "Operation could not be completed" error when trying to change the default printer. To avoid any interference, disconnect all other printers except the one you want to set as default. Then you won't encounter any errors.
2. Run the printer troubleshooter
Running the built-in Windows printer troubleshooter is an effective way to fix all kinds of printer-related errors, including this one. This tool will scan your system for all common problems and attempt to fix issues that may be causing the "Operation could not be completed" error.
To run the printer troubleshooter, follow the steps below:
- Right-click the Start button and select Settings .
- Select the System tab from the left sidebar.
- In the right pane, click Troubleshoot .
- Click Other troubleshooters .
- Locate Printer troubleshooter and click the Run button next to it.

Wait for the troubleshooter to run and then try changing the default printer again.
3. Change printer options
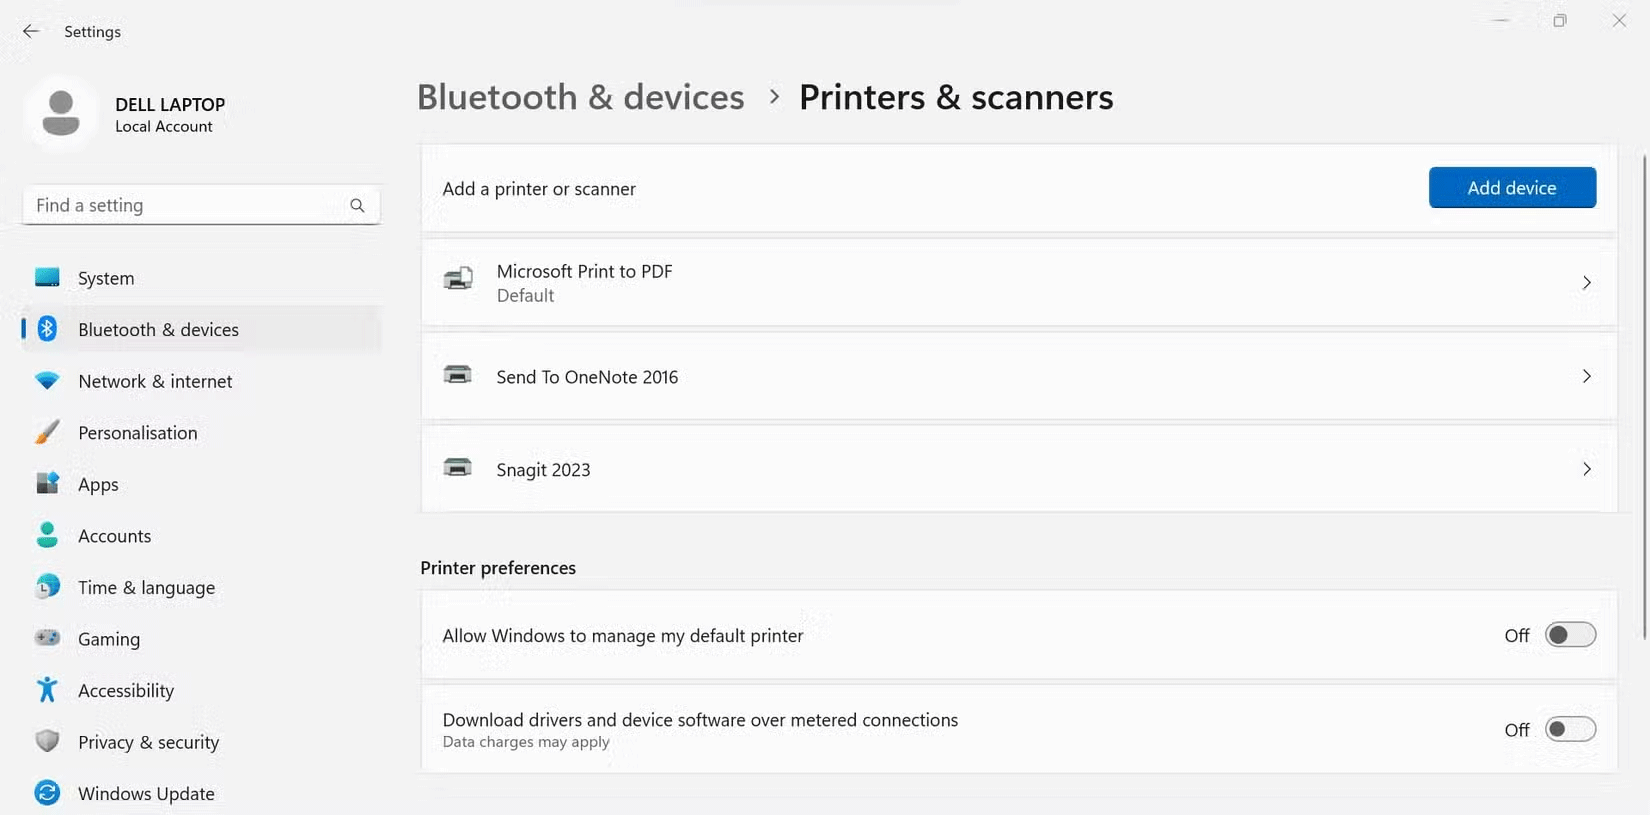
By default, Windows manages your default printer for you. While this feature is useful, especially if you frequently connect to different printers, it can sometimes cause problems. Therefore, it is best to turn this feature off.
To prevent Windows from managing the default printer, follow these steps:
- Press Win + I to .
- Select the Bluetooth & devices tab from the left sidebar.
- In the right pane, click Printers & scanners .
- In the Printer preferences section , turn off the switch next to Allow Windows to manage my default printer .

4. Rename the printer in Registry Editor
Error message 0x00000709 recommends that you name your printer correctly. In this next step, you will change the name manually in Registry Editor.
Warning : Although the tweak below is known to fix the problem, you need to be careful and follow the steps correctly. Making incorrect changes to registry files can cause serious problems.
Before proceeding, make sure you create a backup of the relevant registry files. Once done, follow these steps:
- Press Win + S to open the search menu.
- Type Registry Editor in the search box and click Run as administrator .
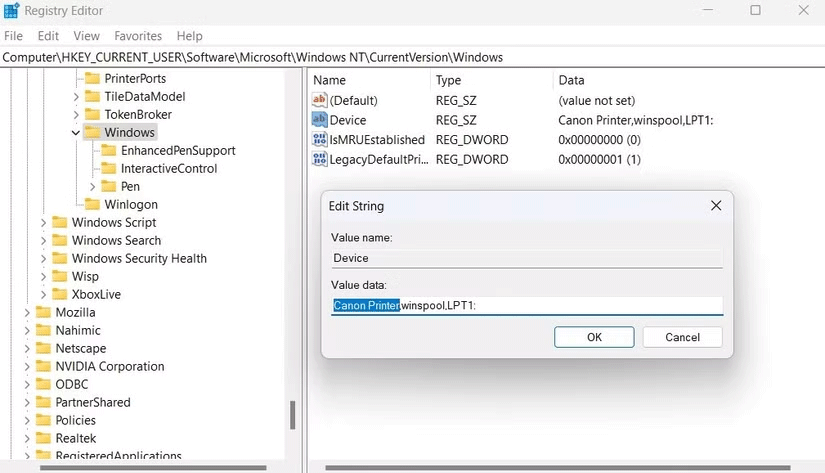
- In the Registry Editor address bar, paste the following path and press Enter to quickly navigate to the Windows key:
ComputerHKEY_CURRENT_USERSoftwareMicrosoftWindows NTCurrentVersionWindows- Double-click the Device item in the right pane to edit.
- In the Value data field , replace the first entry with your printer name.
- Click OK to save changes.

Make sure you restart your computer after completing the steps above. If renaming the registry key doesn't make a difference, apply the remaining fixes.
5. Change RPC connection settings
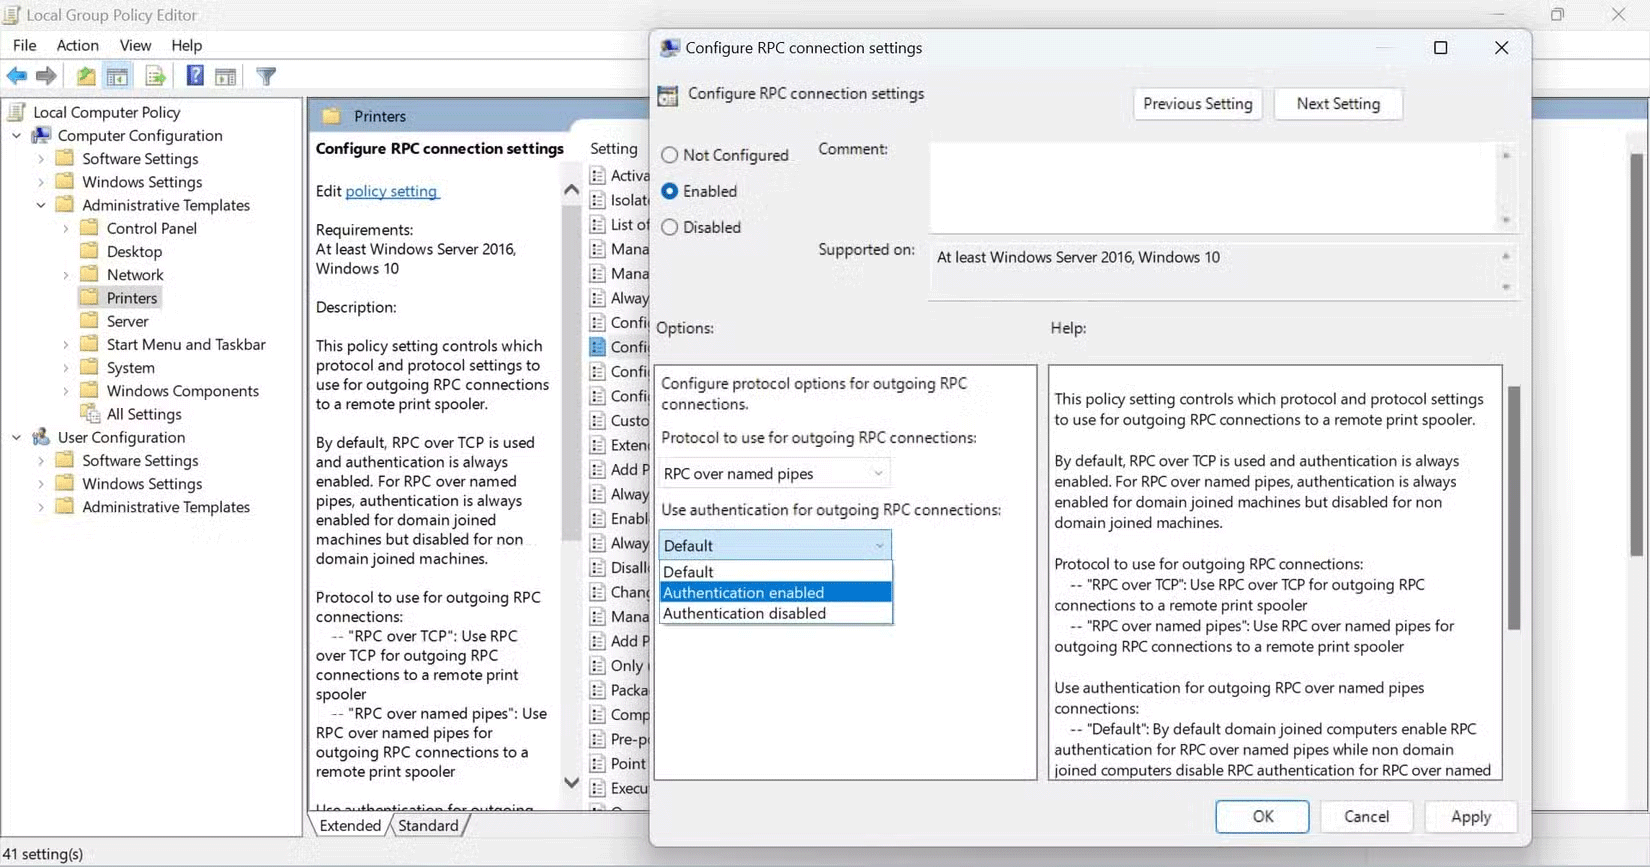
After you have changed the printer name, make sure that the printer is connected to the network. If the printer is connected but you are still getting the error, try modifying the RPC (Remote Procedure Call) connection settings in the Group Policy Editor. This policy manages the protocol settings for RPC connections to the remote print spooler.
Note : The local Group Policy Editor is only available on Windows Professional, Education, and Enterprise editions. If you're using the Home edition, this fix won't apply to you.
To enable and change policy settings, follow these steps:
- Open the search menu, type Edit group policy and select the first result that appears.
- Use the left pane to navigate to Computer Configuration > Administrative Templates > Printers .
- Double-click the Configure RPC connection settings policy on the right.
- Click the Enabled option to enable the policy.
- Click the Protocol to use for outgoing RPC connections drop-down menu and select RPC over named pipes .
- Click Apply > OK .

Restart your computer for the changes to take effect. If the error persists even after doing this, repeat the steps above and select RPC over TCP from the Protocol to use for outgoing RPC connections drop-down menu . If that doesn't work either, you can enable or disable authentication from the Use authentication for outgoing RPC connections drop-down menu - try switching this option to whatever isn't selected.

6. Uninstall the problematic update
Are you getting error 0x00000709 right after installing a Windows update? If so, the update might be causing the problem. In this case, uninstalling the problematic update should resolve the error and restore normalcy.
There are a few ways to uninstall a Windows update, but the easiest is through the Settings app. Here's how to do it:
- Press Win + I to open the Settings app.
- In the left sidebar, click Windows Update .
- In the right pane, click Update history .
- Under Related settings , click Uninstall updates .
- Find the most recent update by checking the installation date.
- Click the Uninstall option next to the update name and follow the on-screen prompts to complete the process.

After removing the update, you should be able to change the default printer without any problems.
Not being able to set a default printer is really annoying. However, unless there is a problem with the printer, one of the steps listed above can help resolve the "Operation could not be completed (error 0x00000709)" error on Windows and get you printing right away.