How to distort a photo in Photoshop
Using Wrap an item and Puppet Wrap in Photoshop you can freely edit, distort photos ... to post Facebook or give a joke to someone. Below are instructions on how to proceed.
Table of Contents
If you are intending to tease someone by editing, distort their face on the image. Or if you are trying to distort someone's or your photo to post Facebook, Twitter, etc., you don't know how to do it. The following article Admin network will guide you on how to distort extremely simple images in Photoshop.
1. Wrap an item
The Warp command allows you to drag and adjust points to change the shape of photos, shapes or paths . You can also use Shape in Wrap Style in the options on the toolbar to distort an image.
To select the points you want to distort, just select View> Extras to hide or show the wrap mesh and adjust the points.
Use Wrap
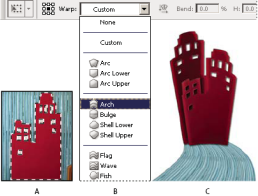
A. Choose the shape you want to use to distort.
B. Then select the Wrap option on the pop-up window on the options toolbar.
C. Results
Step 1 :
Choose the image you want to distort
Step 2 :
Do one of the steps below:
- Select Edit => Transform => Wrap
- If you choose another command or use the Free Transform command, click on the Switch Between Free Transform And Warp Modes on the optional toolbar.
Step 3:
Do one of the following:
- To distort an image using a specific shape, on the pop-up Wrap window located in the custom toolbar, click on the Style you want.

- To change the shapes, drag the control points, the segments on Bounding Box or the grid or an area in the grid. When adjusting a curve, use the control pointer (Control Handles). Or the same as you adjust the curve in Vector graphics .

To undo the adjustment process, select Edit> Undo .
- To change the orientation of the styles to distort the image you selected from the Warp menu, click on Change The Warp Orientation on the toolbar .
- To change the reference points, click on a square on the reference point on the option toolbar.
- To adjust the width, curvature, distortion . of the image, enter the Bend values (curvature setting), X (set the horizontal distortion) , and Y (vertical distortion setting) into Text box in the toolbar option.
Note : If you select None or Custom on the pop-up Warp Style window, you cannot enter those values.
Step 4 :
Do one of the following:
Press Enter (on Windows) or Return (on Mac OS ), or click Commit in the options bar.
To cancel the change, press Esc or click Cancel in the options toolbar.
See also: How to use Photoshop CS5 - Part 5: Photo editing
Note:
When you warp, distort a Bitmap image , after each editing, changing the image will be less sharp. Therefore, you should not execute each statement one by one.
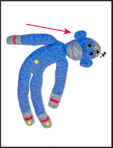
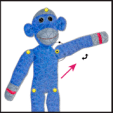
2. Puppet Warp
The Puppet Warp allows you to distort a certain part of a specific image, but other parts of the image remain intact.
Step 1:
In the Layer Panel , select the Layer or Mask you want to convert.
Step 2:
Select Edit> Puppet Warp.
Step 3:
On the optional toolbar, adjust the following grid settings:
Mode : Determines the general elasticity of the mesh.
Density : Determines the distance between grid points. Many points increase accuracy but require more processing time. Less points are the opposite.
Expansion: Expand or shrink the outer edge of the mesh.
Show Mesh: Uncheck the Show only adjustment pins section (show only adjustable pins).
To temporarily hide the adjustment foot, press the H key .
Step 4:
In the image window, click to add the pin to the area you want to modify and the areas you want to keep.
Step 5:
To reposition or remove a Pin, do one of the following:
- Pull Pin at grid position.
- To show the grid area you overlapped with, click Pin Depth on the options toolbar.
- To remove the selected Pin, press Delete . To remove the other Pin, place the cursor directly on these Pin, press Alt (for Windows) or Option (for Mac OS) ; When the scissors icon appears, click on it.
- Click Remove All Pins on the option toolbar.
To select multiple Batteries, click Shift or select Select All on Context Menu .
Step 6:
If you want to rotate a pin grid, select that pin grid. Then do one of the following:
- To rotate a fixed grid, press the Alt (for Windows) or Option (for Mac OS) keys, and position the cursor nearby, but not more than the battery. When a circle appears, drag the outer part to rotate the grid.
- The rotation level appears on the options bar ( Options bar) .
- To rotate the grid automatically using Mode option , on Rotate Menu in the options bar, select Auto.
When your edit is complete, press Enter or Return.
Press Alt (Windows) or Option (Mac OS) to rotate the grid around the selected Pin.
Good luck!
Was this article helpful?
Your feedback helps us improve.
Related Articles
 Instructions for using Photoshop CS5 to edit photos in full set4 minutes read
 How to use Photoshop CS5 - Part 9: Delete complex backgrounds in Photoshop5 minutes read
 How to use Photoshop CS5 - Part 5: Photo editing7 minutes read
 Advantages of using Photoshop in ChatGPT for photo editing.6 minutes read
 Tutorial for creating 3D photo effects in Photoshop (Part 1)5 minutes read
 How to erase text on photos using Photoshop simply4 minutes read
Reader Comments 0
Sign in with email or Google to join the discussion.