Table of Contents
This guide explains how to bring Icon to the Desktop in Win 10, with clear steps, practical tips, and important checks before you begin.
Method 1 : Very simple, you just need to open the Start menu to find the application that needs to bring the icon to the screen, hold the mouse button on the icon of the application and drag and drop to the Desktop is done.
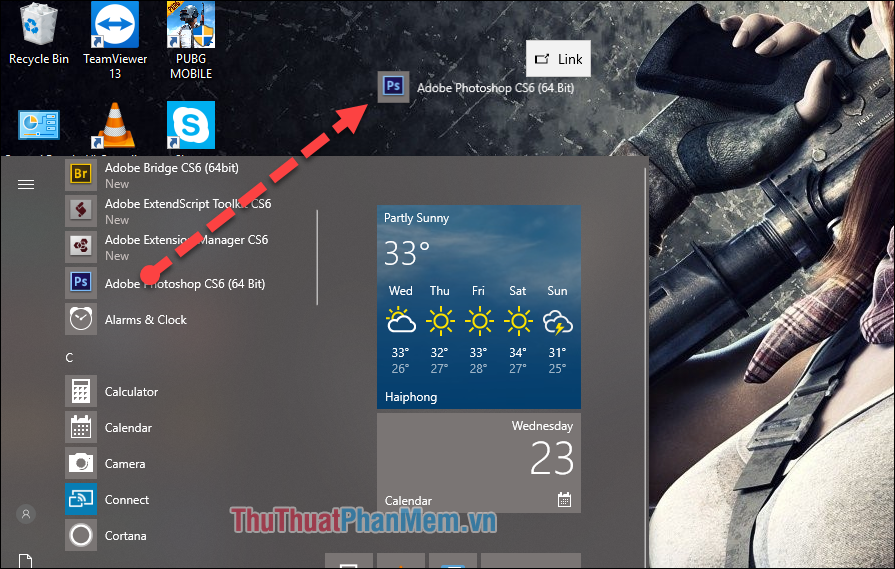
Method 2: In case the application you want to bring the icon to the desktop is not in the start menu or cannot be dragged and dropped by the mouse, how do we do it?
Step 1 : Open the search feature, then enter the application name, when the desired application results, right-click and select Open file location.

Step 2 : You will be taken to the directory of that software, then right-click on the application's icon and select Send to -> Desktop (create shortcut)

Thus the icon has been launched on the Desktop:

Above are the 2 easiest ways to help you put the icons of applications on the Desktop, hope you will find the article useful. Good luck!
FAQ
What should I know about Bring Icon to the Desktop in Win 10?
Focus on the key features, requirements, limitations, and practical use cases explained in this guide.
How do I get the best results with Bring Icon to the Desktop in Win 10?
Follow the recommended steps, use current software or information, confirm compatibility, and review settings before major changes.
Are there any risks or limitations?
Potential limitations depend on compatibility, data quality, cost, privacy, support, and how the product or method is used.
Related Articles
 How to Bring This PC (Computer), Network, Control Panel Icon to the Desktop2 minutes read
 Shrink Icon Size: How to Resize Desktop Icon on Windows?6 minutes read
 Click: How to Change or Create Desktop Icons for Windows11 minutes read
 Icon on the Desktop: How to Add a Desktop Icon?3 minutes read
 How to Arrange the Icon Icon on the Desktop3 minutes read
 How to Bring the Calendar and Clock to the Windows 10 Desktop Screen3 minutes read
Reader Comments 0
Sign in with email or Google to join the discussion.