How to backup files on Linux to Google Drive
Google Drive is a great vehicle for people who need to store online copies of files. Linux users can take advantage of Google Drive's free 15GB plan to back up essential configuration files. Plus, you can back up large amounts of data, including media files, if you have a working Google Workspace (formerly G-Suite) plan.
This guide will show how you can automatically back up files in Linux to Google Drive using the open source google-drive-ocamlfuse and CRON package.
What is Google-drive-ocamlfuse?
Google-drive-ocamlfuse is a FUSE file system that allows users to mount their Google Drive storage on their local machine. It is written in OCaml and is freely available via GitHub. Some of the key features of google-drive-ocamlfuse include full read / write access, support for multiple accounts, Unix permissions, and Team Drive support.
How to use google-drive-ocamlfuse for automatic backups
The first step is to mount the remote Google Drive to the local file system. This is where google-drive-ocamlfuse comes into play. You can then use an automatic scheduler to periodically move files to drive. To keep things simple, use the Linux CRON utility to handle the scheduling process. (You can also use Zeit to schedule cron jobs).
Install and configure google-drive-ocamlfuse
First, you need to install google-drive-ocamlfuse on your Linux machine. Fortunately, this is very simple. Activate Terminal and enter the following command at the prompt.
sudo add-apt-repository ppa:alessandro-strada/ppaIt will add the required package to the package manager's repository list. You can go ahead and install the package using the following commands.
# Debian / Ubuntu
sudo apt update && sudo apt install google-drive-ocamlfuse# Fedora
sudo dnf copr enable sergiomb/google-drive-ocamlfuse sudo dnf install google-drive-ocamlfuse# Arch
yay -S google-drive-ocamlfuseWait until the installation is finished. When it's done, you'll need to configure it for mount purposes. The first step for this is to create a mount point for Google Drive in the local file system. You can do this by entering the command below into Terminal.
mkdir -p ~/mount/google-driveNext, mount the drive memory with the following command:
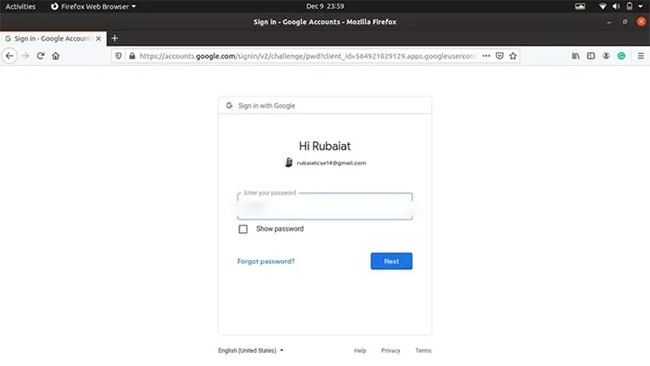
google-drive-ocamlfuse ~/mount/google-drivegoogle-drive-ocamlfuse will open the default browser and redirect to the account verification page for Google Drive. Select the account you want to mount locally.

Enter the password for the selected account to authenticate.

Next, Google will ask for permission to access google-drive-ocamlfuse. Click on 'Allow' and go to the next page.
You will be asked to allow access to your user account again.
After you give permission, it will redirect you to the google-drive-ocamlfuse website. Congratulations, you've successfully mounted your Google Drive account to the local file system.

Now is a good time to verify if mount for Google Drive is going well or not. If this stage fails, you cannot use it to back up files to Google Drive. Use the command below to verify this.
ls -l ~/mount/google-drive/The output will display a list of files and folders in Google Drive storage. If everything goes as expected, you can proceed with configuring the backup scheduler.
Backup files to Google Drive using CRON
Backing up understands simply the operation of copying. Since Google Drive is already mounted, you can copy the file to it as part of the local filesystem. You can verify this by running the following command:
touch test-file cp test-file ~/mount/google-drive/The command will copy the test file to memory. Use the ls command to verify if it has been successfully copied to Google Drive.
ls ~/mount/google-drive/Now that everything is ready, let's configure cron to automate the backup process. If you haven't already, cron is a scheduler that allows users to run certain commands periodically. You can specify which commands to run and when to run them using crontab.
The article is using the following crontab to copy the '/ tmp' directory content to Google Drive at 00:00 everyday.
0 0 * * * cp /tmp/ ~/mount/google-drive/If you want to back up your files once a week, use the following crontab section.
0 0 * * 0 cp /tmp/ ~/mount/google-drive/The command will copy the contents of '/ tmp' into memory at 00:00 every Sunday. Replace '/ tmp' with the directory containing your personal files. However, there is one final step. None of the above crontab entries will automatically mount Google Drive.
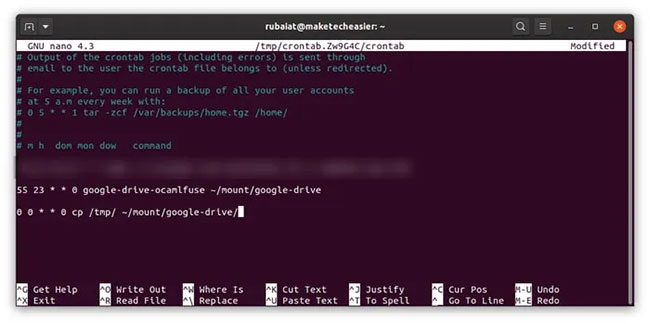
A quick solution for this is to mount the memory with another crontab entry, then track it with that item for backup.
55 23 * * 0 google-drive-ocamlfuse ~/mount/google-drive 0 0 * * 0 cp /tmp/ ~/mount/google-drive/As you can see, the example will mount the drive 5 minutes early. It gives cron enough time to make sure that the backup is not missed due to the initialization problem. Use the command below to edit the crontab and add the above lines.

You should read it
- ★ Download files and websites directly from Google Drive in Chrome browser
- ★ How to upload files to Google Drive, upload files to Google Drive
- ★ Don't miss these 9 useful Google Drive tricks!
- ★ From December 20, 2021, Google Drive will automatically block or delete files 18+
- ★ How to fix the error can't download files from Google Drive on Windows