Table of Contents
An AI lip-sync tool can animate a still portrait so its mouth and facial movements follow a supplied voice or song. The basic workflow is straightforward: upload a suitable image, add clean audio, select a supported model, generate the clip, and review the result for visual errors.
The button names, model list, duration limits, and credit cost shown in this guide reflect the pictured interface and may change. Check the service's current controls and terms before uploading media.
Use only images and audio that you own or have permission to use. Obtain consent before animating a real person, do not use the result to impersonate someone, and label synthetic media when viewers could reasonably mistake it for an authentic recording.
Step 1: open the Talking Photo mode
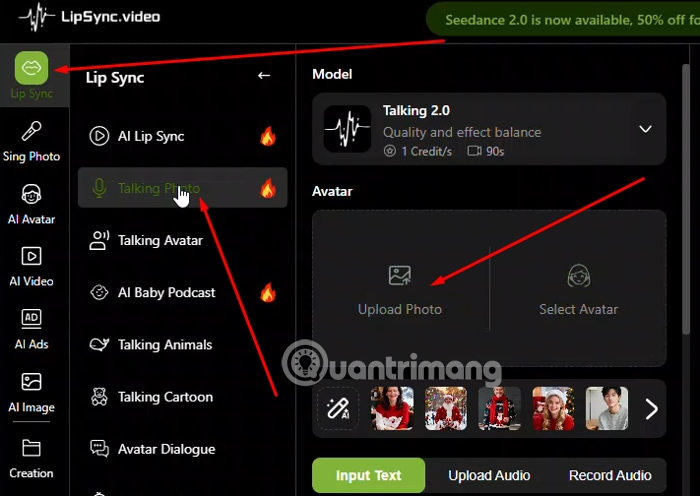
Open the lip-sync service and select Lip Sync, then choose Talking Photo or the closest equivalent. This mode is intended to animate one visible face from a still image.
Step 2: upload a suitable portrait
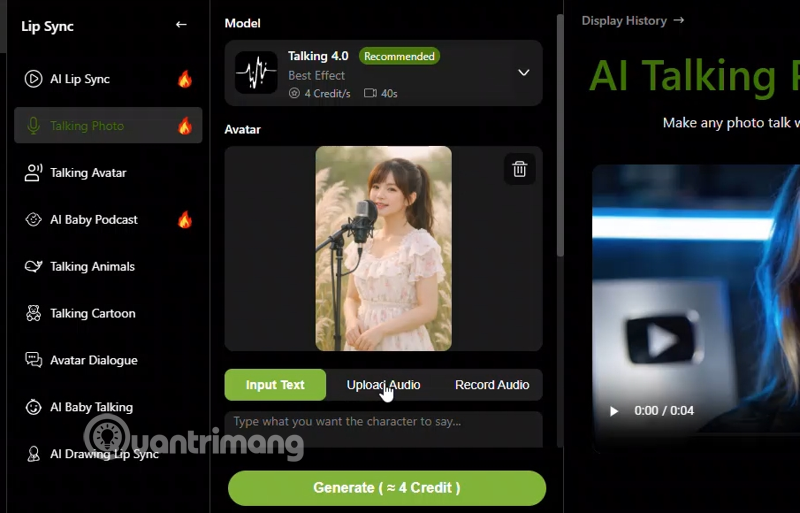
Select Upload Photo and choose a clear image in which the face and mouth are unobstructed. A vertical image can be convenient for Shorts, Reels, or TikTok, but use the aspect ratio required by your intended platform rather than stretching the source.
For a cleaner result:
- Use an image with adequate resolution and even lighting.
- Prefer a front-facing or modest three-quarter view.
- Avoid hair, hands, props, or heavy shadows covering the lips.
- Leave enough space around the head for the intended crop.
- Start with one prominent face; crowded images can confuse face selection.
Step 3: choose a model or quality preset
The example interface offers several Talking model versions. Newer or higher-quality modes may produce better motion but can take longer or use more credits. The labels are not a guarantee that one model is best for every face or audio track.
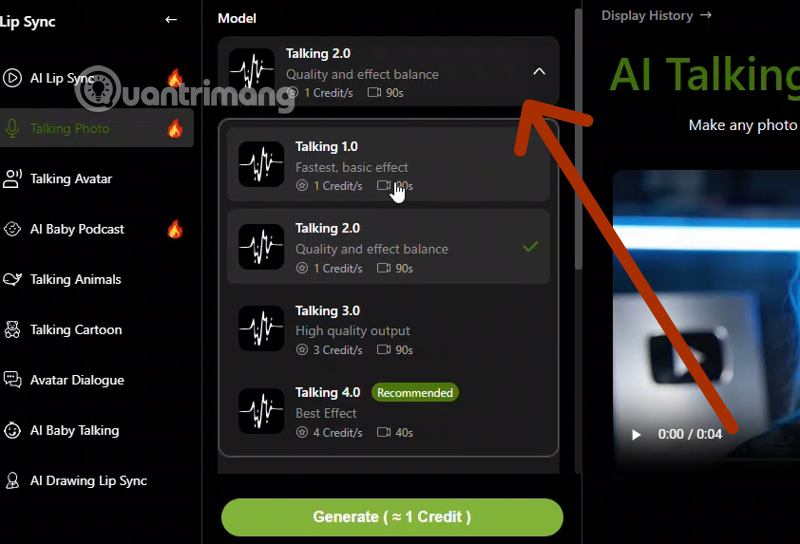
Begin with the service's recommended balanced option. If the mouth shape, head motion, or identity changes too much, compare a short sample using another available model before spending credits on a longer clip.
Step 4: upload the audio
Choose Upload Audio and add a supported audio file. The pictured tool accepts a short clip; the current duration and file-format limits should be visible in the upload panel.
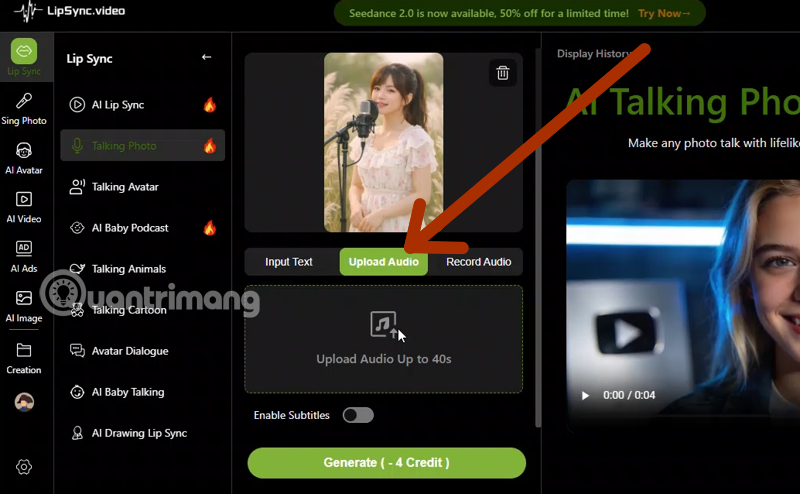
A clean vocal track usually gives the model a clearer timing signal. Reduce background noise, avoid overlapping speakers, and trim long silence at the beginning or end. Music with loud instruments over the voice may produce less stable synchronization than an isolated or clearly mixed vocal.
Do not upload copyrighted music merely because a tool accepts the file. You still need the appropriate rights for the intended use and distribution.
Step 5: generate and review the video
Confirm the selected image, audio, model, crop, and displayed credit cost, then choose Generate. Processing time varies with the selected mode, clip length, service load, and account.
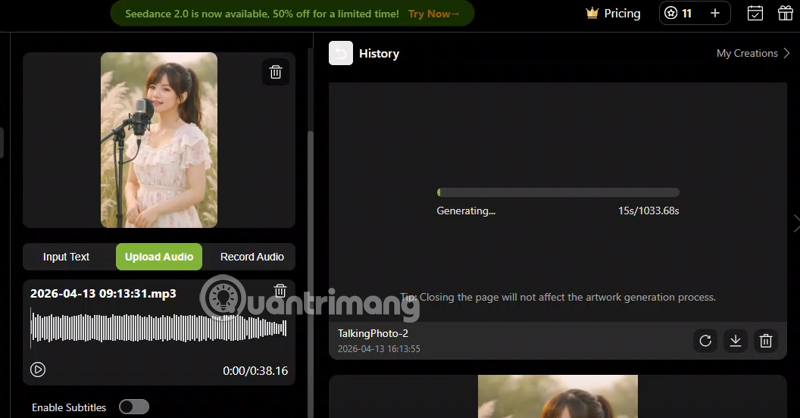
Watch the complete preview before downloading. Check the mouth at consonants and pauses, the outline of the lips and teeth, head boundaries, eye movement, and whether the face changes identity. Also confirm that the audio remains synchronized after exporting.
How to make the result look more natural
Match the image to the performance
A neutral, well-lit portrait is easier to animate than an extreme facial expression. If the audio is energetic, a source image with an appropriate pose may still feel more convincing than a technically accurate animation from a mismatched expression.
Prepare the audio first
Use a quiet recording, consistent volume, and clear speech or singing. Edit out mistakes and unwanted silence before generation. Re-generating the same flawed audio is unlikely to solve timing problems created by noise or overlapping voices.
Test a short segment
Generate several seconds that include both speech and a pause. A short test reveals whether the face, model, and audio work together without using the resources required for the full clip.
Use light post-production
Trim the beginning and end, normalize audio if necessary, and add accurate captions in a video editor. Do not hide severe face distortion with aggressive sharpening or filters; regenerate from a better source instead.
Avoid excessive re-generation
Decide what counts as acceptable before producing many variations. Compare synchronization, identity consistency, artifacts, and total cost rather than choosing solely by novelty.
Common problems and fixes
| Problem | What to try |
|---|---|
| Mouth movement is late or early | Trim leading silence and use a cleaner single-speaker track |
| Lips or teeth look distorted | Use a sharper, more frontal portrait and compare another model |
| Face changes during the clip | Reduce extreme motion, shorten the clip, or use a simpler background |
| Portrait is cropped badly | Prepare the source at the target aspect ratio with space around the head |
| Upload fails | Check the current file type, size, duration, and account limits |
| Audio sounds worse after export | Compare the preview and download, then use the original audio in post-production if permitted |
Privacy and responsible publishing
- Review how the service stores uploaded faces, audio, and generated files.
- Do not upload children's images, client material, or confidential media without appropriate permission and safeguards.
- Avoid political, financial, romantic, or other impersonation that could deceive or harm someone.
- Keep records of the source media and permissions for commercial work.
- Add a clear disclosure when the synthetic nature of the performance is not obvious.
AI lip-sync tools are useful for permitted character animation, prototypes, education, and creative experiments. A strong result depends on careful source preparation and review—not just choosing the highest-numbered model.
Related Articles
 Guide to Lip Sync with Muvik6 minutes read
 How to Use Musical. Ly - Extreme Lip Sync Application8 minutes read
 How to Create Lip-syncing Animal Videos on CapCut3 minutes read
 Overview of Creating Professional Videos with AI10 minutes read
 Top 5 Lip Sync Apps on the Best Phone8 minutes read
 How to Create AI Timelapse Videos9 minutes read
Reader Comments 0
Sign in with email or Google to join the discussion.